RO CSVI
CSVI Field Mapper
| RO CSVI
The CSVI Field Mapper helps you to map your fields against CSVI fields. One of the most daunting tasks you have to deal with when setting up a new import is to match your own fields with the CSVI fields. To give you a hand, the CSVI Field Mapper has been created.
What is the Field Mapper?
CSVI Field Mapper is a tool to help you create your template with the correct CSVI fields.
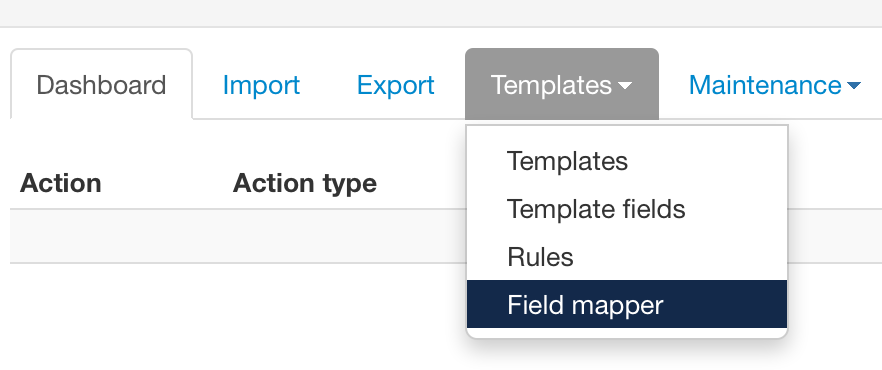
Finding the field Field Mapper
The field mapper is located under Templates.
How does the Field Mapper work?
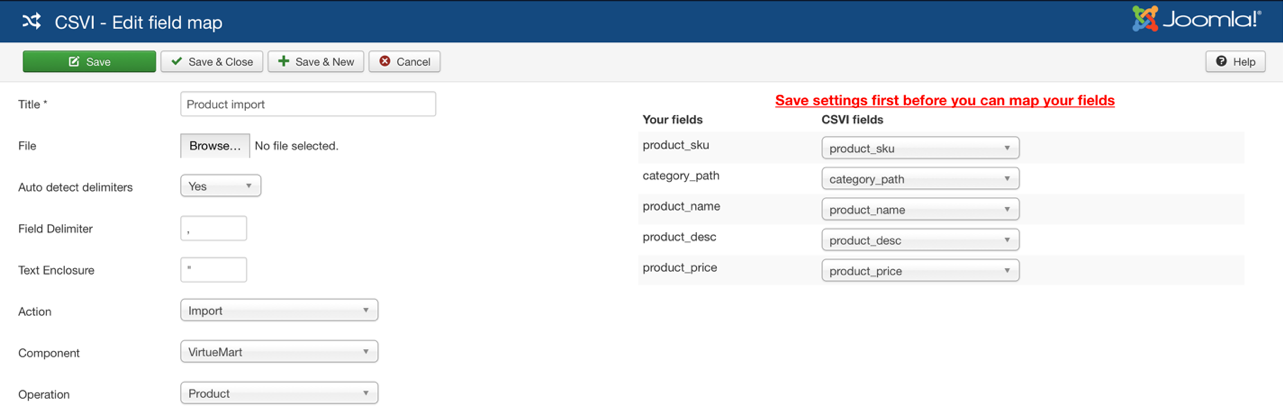
In short, you upload a small sample of the actual file you want to import and CSVI will read the column headers from this file. CSVI will then present these column headers in a table with a dropdown beside it where you can choose the CSVI field you want to link it to. Once you are done, it can look like this:
When you are done with the mapping of the fields, you can create a template of this by clicking on the Create Template link.

Creating a field map
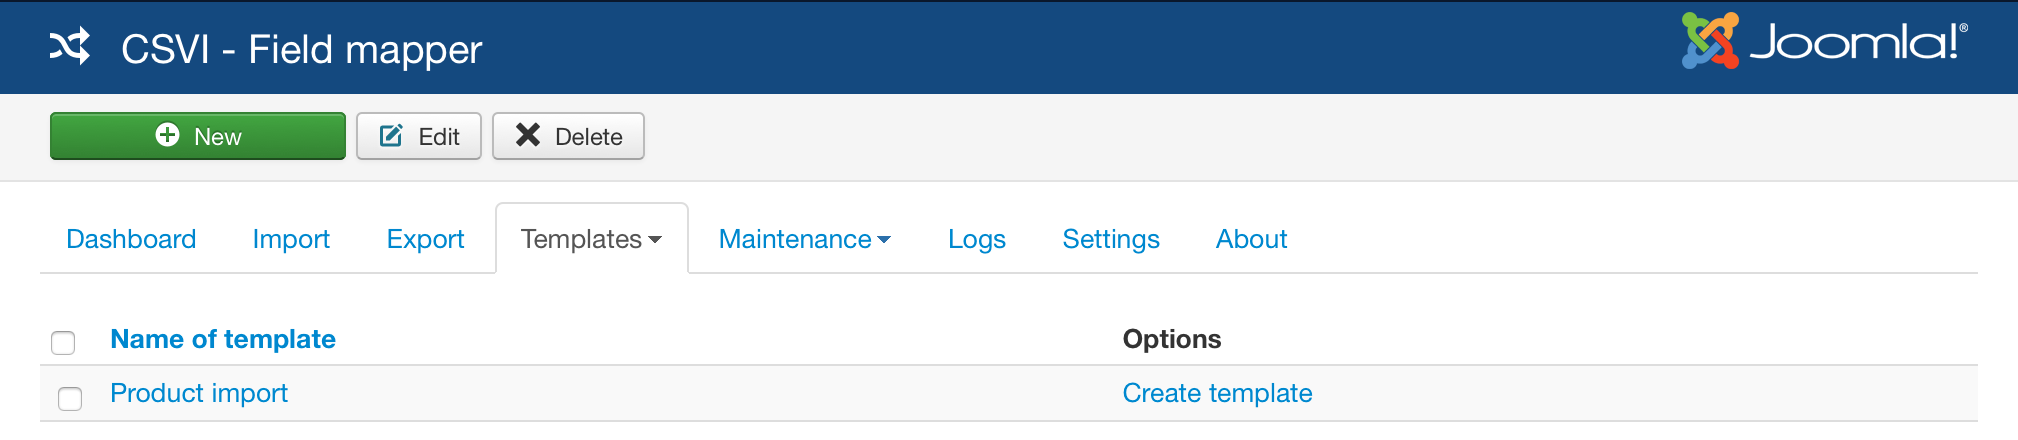
To create a field map we start by going to Components -> CSVI Pro -> Templates -> Field mapper and you get the field mapper list:
Now click on the New button to create a new field map and you get the new screen:
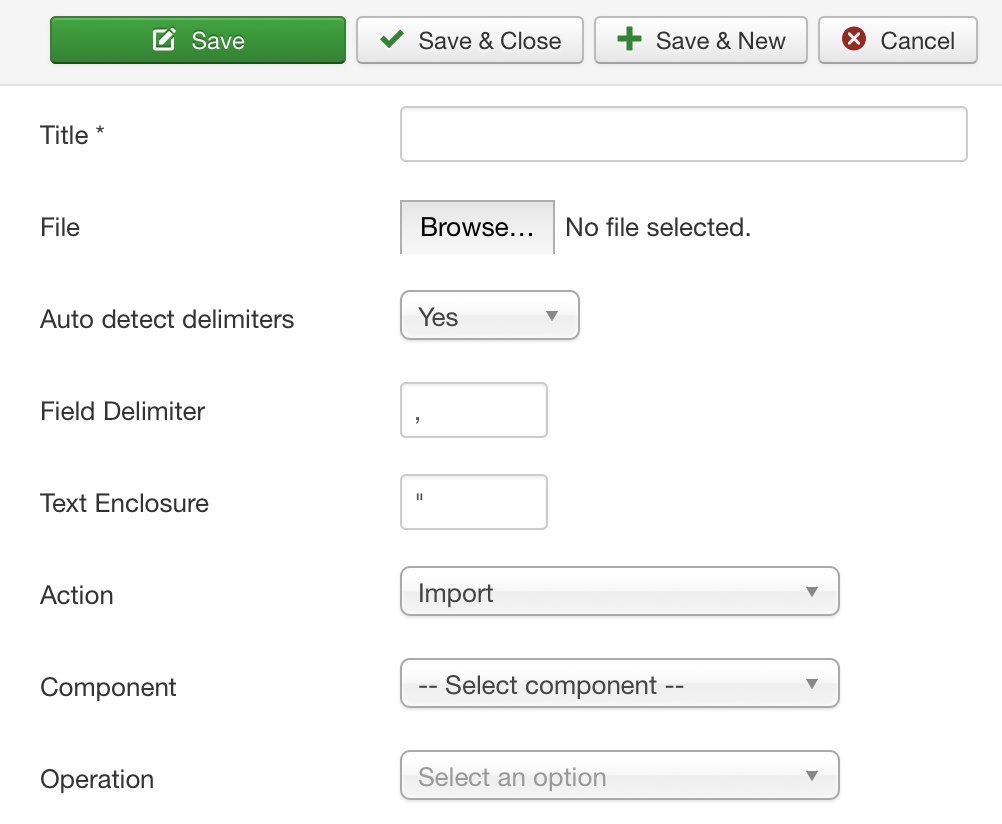
Now the form needs to be filled out:
Name
Give your field map a name
File
Select the file on your computer that you want to map. Take these points into consideration:
- The first line of the field must contain the field names
- The file cannot have Mac line-endings
- Don't upload your full file if it is a large file. We are only using the first line of the file.
Autodetect delimiters
CSVI will try to detect the delimiters used in your CSV file. In case this doesn't work correctly, you can set this to No and specify your own delimiters.
Field delimiter
The field delimiter is the character that separates the fields in your CSV file.
Text enclosure
The text enclosure is the character that surrounds each field.
Action
Select whether you want to do an import or export.
Component
Select for which component you want to do the import/export.
Operation
Select what kind of operation you want to perform.
After these fields are filled out, click on Save. This will create the field map and process your file.
Mapping the fields
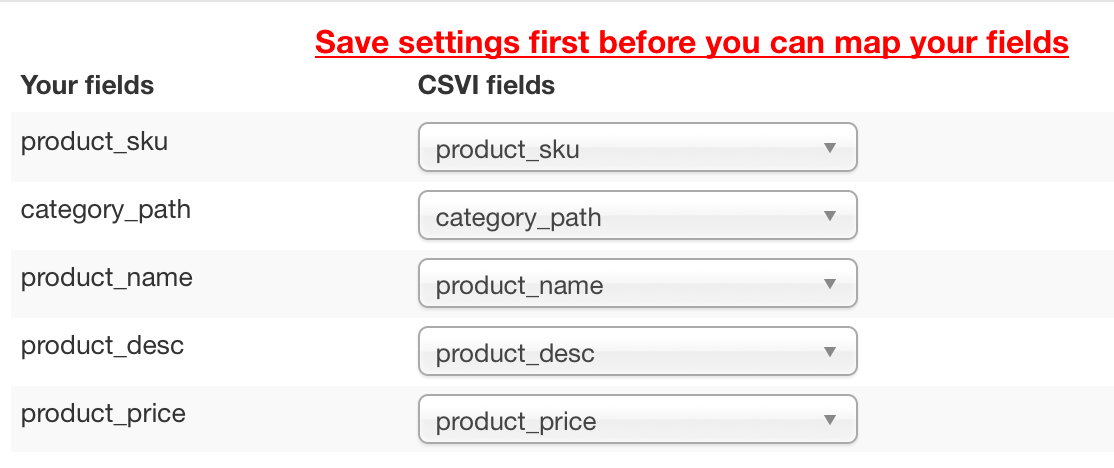
After the field map has been saved you can see a table like the screenshot. On the left you see the field names from your file and on the right the available field names of CSVI. CSVI does not match the fields automatically, you will have to choose which fields it belongs to. In the screenshot you can see that the field sku has been linked to the product_sku field, the field picture has been linked to file_url and so on.
Do the same for your fields and click on Save & Close, this brings you back to the field map list.
Create a template
With your field map ready, you can now create a template by clicking on the Create template link in the Template column.
This will create a new template based on your field map settings that you can then use for import.
Final steps
- Go to Templates -> Templates
- Click on the name of the template to edit the template
- On the File tab set the option Use file for configuration to No
- Save the template
You can now use this template for an import.
How to load a patch file?
| RO CSVI
To load a patch file take the following steps:
- Go to Components -> RO CSVI -> Maintenance
- Select RO CSVI
- Select Load patch file, you now see this screen:
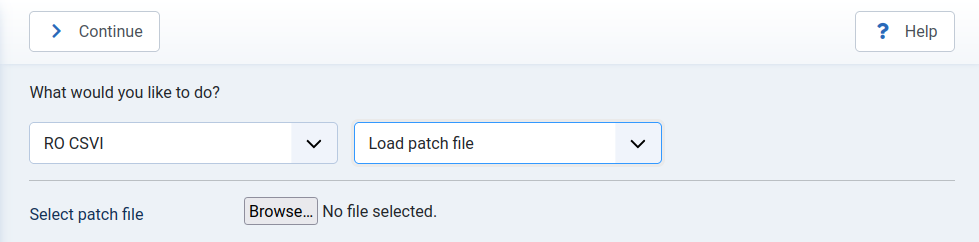
- Click on Browse and select the patch file provided to you by the forum
- Click on Continue
- Your patch file has now been loaded
Missing fields in RO CSVI
| RO CSVI
Every import and export in RO CSVI works based on fields associated to a specific import or export. The fields tell RO CSVI what kind of information is being processed.
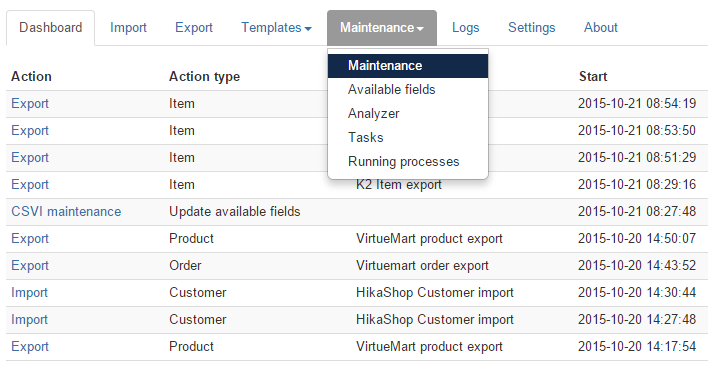
An overview of the fields can be found by going to Maintenance -> Available Fields. It can happen that fields are missing, the list will needs to be updated. There are 2 reasons why fields can go missing:
- The list of available fields is not up-to-date
- The list of tasks is not up-to-date
The tasks and available fields are closely related because each task contains a list of available fields. All tasks together make up the full list of available fields.
In case RO CSVI supports any custom fields created by the extension you use, it is necessary to update the available fields in CSVI as well after the custom fields have been created. Otherwise RO CSVI doesn't know about the custom fields and thus they can't be used.
Updating the tasks
To update the tasks, follow these steps:
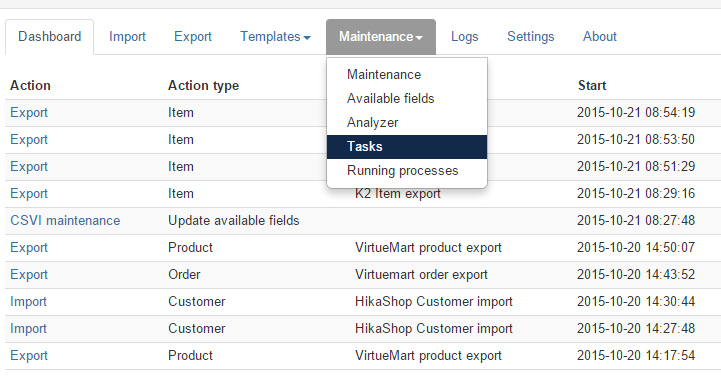
- Go to Maintenance -> Tasks in the menu
- Click on Reset to reset the tasks. You do not need to select any tasks. The reset will reset all tasks found in the system.
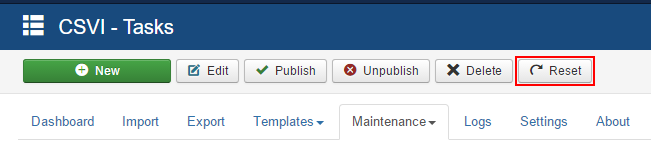
- The system will ask you if you are sure, confirm by clicking the Reset button.
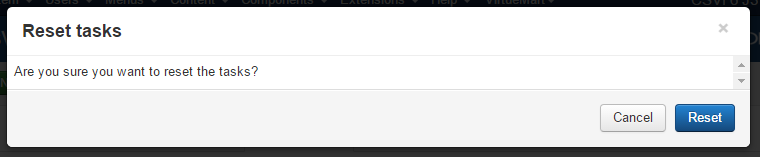
- The tasks are now reset.
Updating the available fields
To update the available fields, follow these steps:
- Go to Maintenance -> Available fields in the menu
- Click on Update to start the update of the available fields
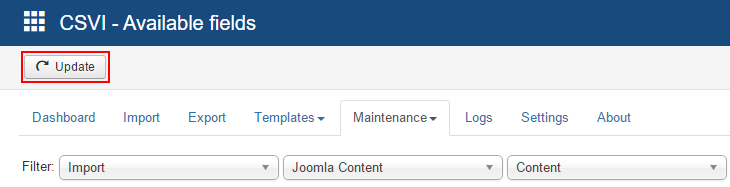
- RO CSVI will start to update the available fields
Conclusion
After the tasks and available fields have been updated they can be used for import and export.
Backup/Restore Templates
| RO CSVI
Backup and Restore templates
Requirements
- CSVI 6.0+
- Joomla 2.5+
- PHP 5.2+
Backup Templates
CSVI provides an option of backing up your templates and restore them whenever needed. It can be done from maintainence tab, select the templates needs to be backedup and the folder path where file has to be stored, click on continue on top corner.
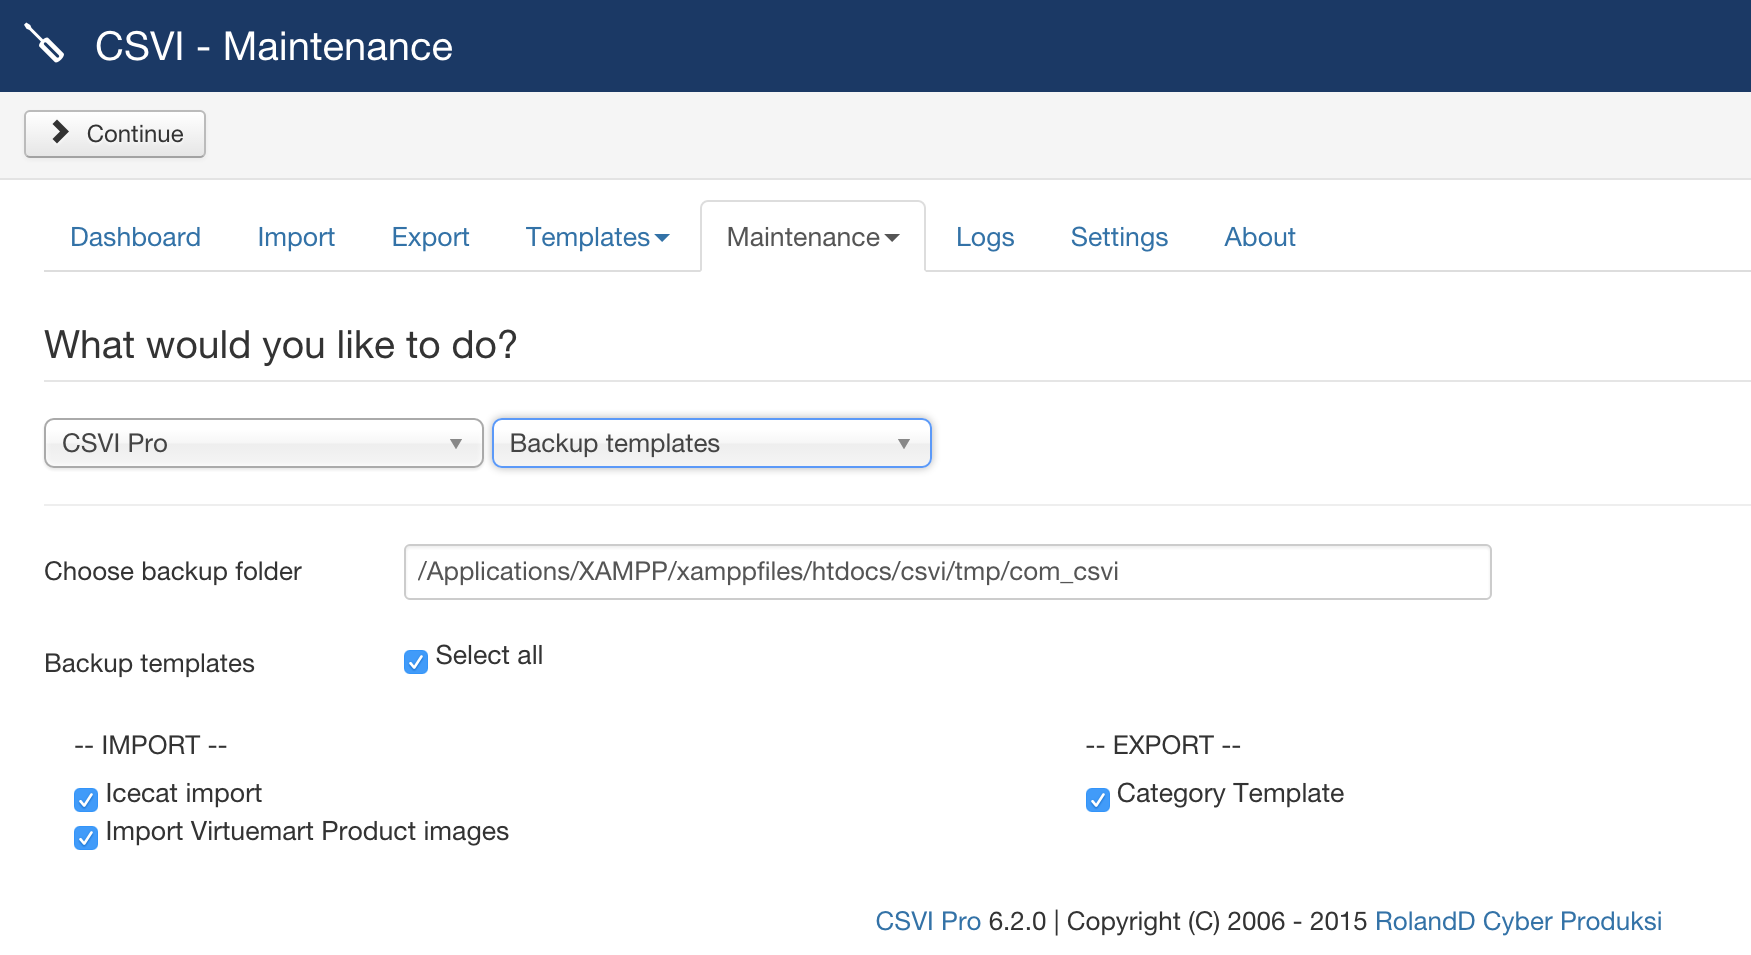
Once the Process is completed, CSVI would notify the message with the number of templates and the log information. The path and the name of the backup file name is also displayed with the message.
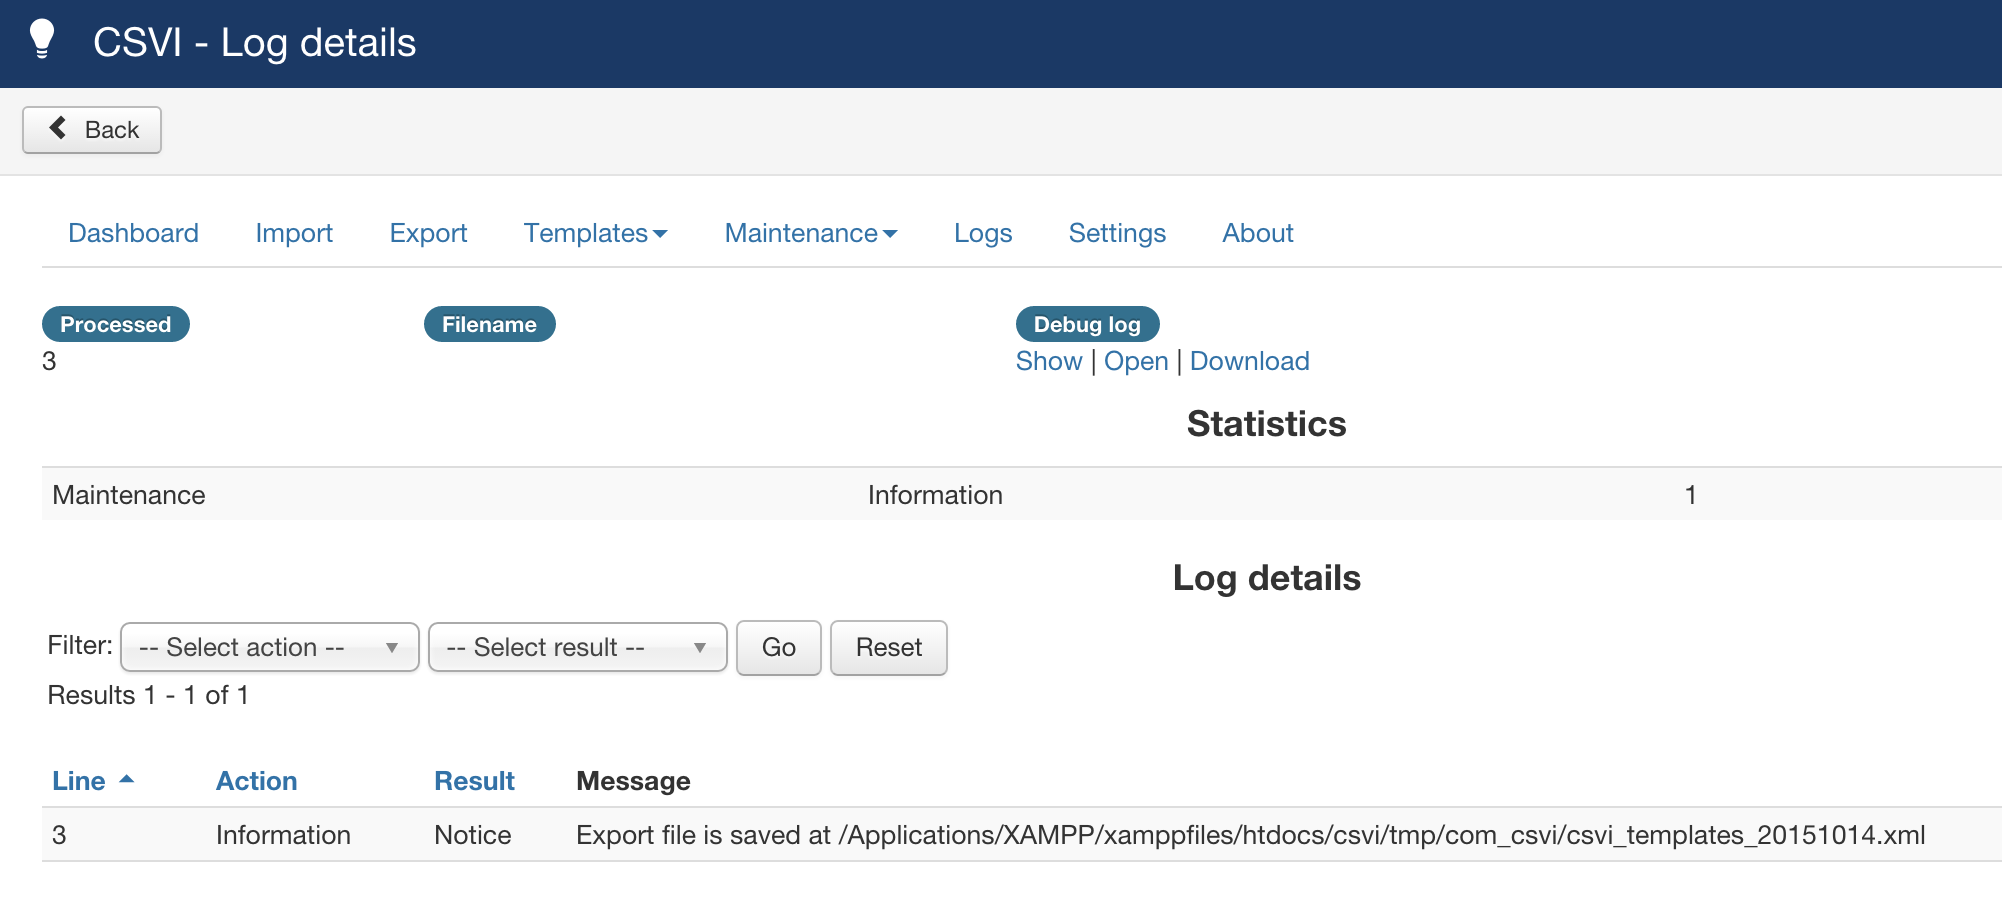
An example of backup file can be seen clicking here
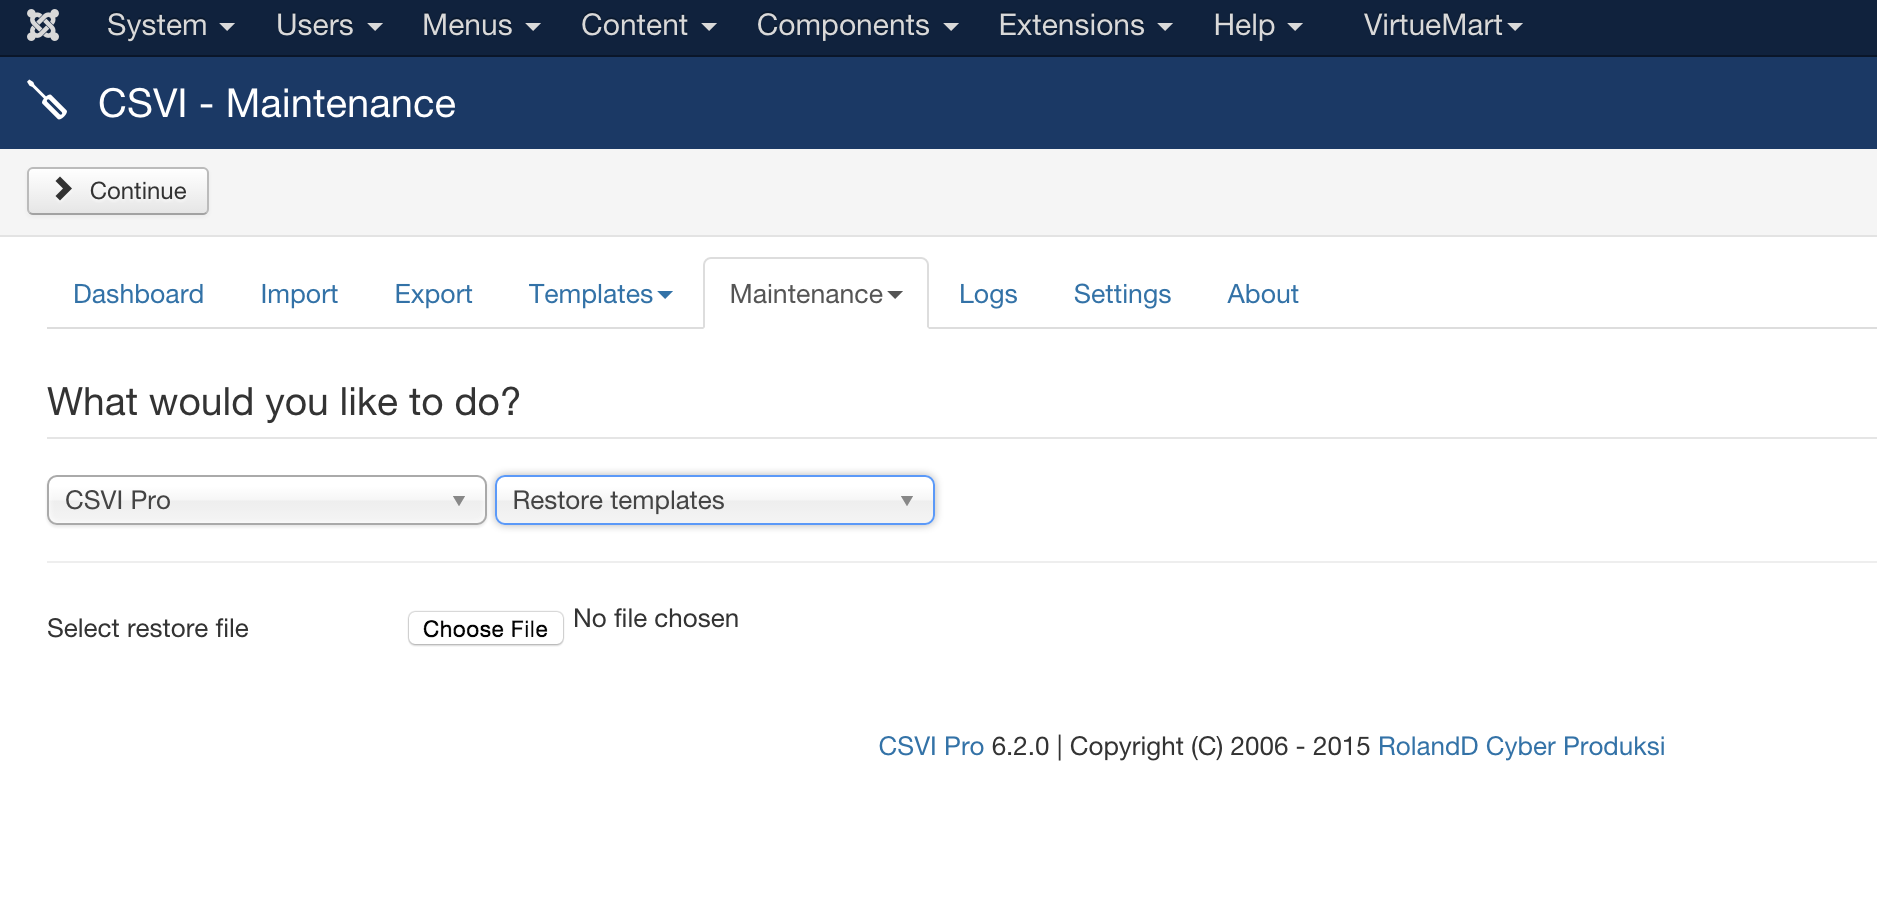
Restore Templates
CSVI provides an option of restoring the templates using the file created on backup process. This helps in saving the time of creating templates again when needed. This can be accomplished using maintainence tab. Choose the XML file generated in backup process and click on continue on top corner
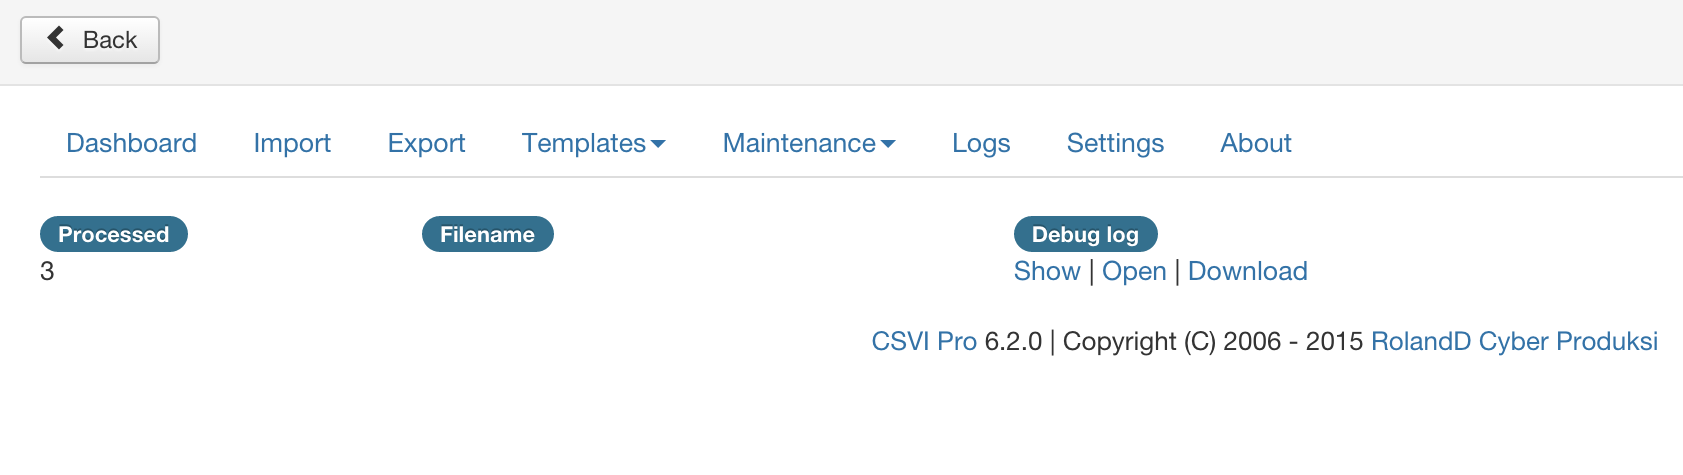
Once the process is complete, CSVI would notify the number of templates restored.
Manage timeouts
| RO CSVI
When doing any kind of import, it is not uncommon to run into timeout problems. There are several reasons for this:
- The import file is too big for your server settings
- Retrieving external images takes too much time
- Incorrect template settings
Why does the server have limits?
The server has limits to prevent you from overloading and possibly bring down the server. This is usual on shared hostings because the hosting provider doesn't want you to trouble your neighbours, same as you don't want your neighbour to bring down the server. If you have a VPS you have more freedom to do what you like as you have more resources available. On a dedicated server you can do as you please as you are the only one on the server, bringing it down will only affect you.
How do I change the server limits?
You can't is the short answer. Hosting providers have these limits in place to make sure the server does not get overloaded on shared hosting accounts. If you have a VPS or dedicated server, you can probably increase the server limits to whatever you have available on your server. Contact your hosting provider on how to do this for your server.
How to change the CSVI import limits?
The import limits used by CSVI can be changed in the template after clicking on the Advanced button. This will show the Limit tab and it's options.
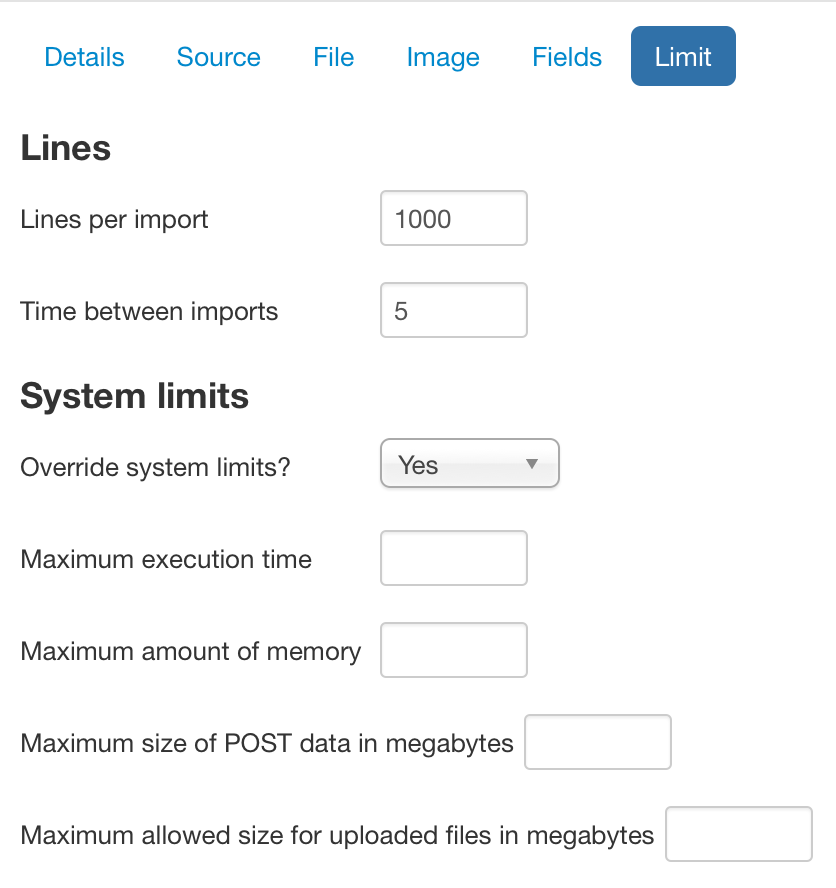
By setting the Override system limits to Yes, these settings are activated. On import CSVI will set these settings but this is no guarantee that they will be used. The server can and usually is setup to ignore these settings, on a dedicated server this usually can be used. The advice is not to use these settings unless you are sure they can be used on your server.
The Limit tab contains 2 settings:
- Lines per import
- Time between imports
No need to change this one
The Lines per import is the one we are going to change, as it determines how many lines CSVI should read before restarting. How many lines this needs to be depends on your server. A rule of thumb is that an import run cannot last longer than 30 seconds, so you need to find out how many lines you can process within 30 seconds. A value of 0 means, read the whole file, never restart. Any other value will be the number of lines CSVI processes before restarting.
An example, your file has 5000 lines to import but the import stops at 543 lines because that is what the server can handle in 30 seconds. We set the Lines per import to 400 and save the settings. What happens now is that CSVI process the first 400 lines, waits 5 seconds and restarts. After the restart it reads the next 400 lines, waits 5 seconds and restarts again. This process continues until CSVI has read all 5000 lines and then finalizes the import.
If you find out that with Lines per import set to 400 it still times out, lower the number to 300 and try again. This is always a trial and error process since it all depends on your server.
Large files, what do I need?
You need patience, large files take time to import.
What is the perfect setting for my large file?
There is no answer to this, since it is your file, you will have to test the settings for your file on your server.