RO CSVI
Uninstall RO CSVI
| RO CSVI
When you uninstall RO CSVI via the Extension Manager only the files are removed but the database tables remain. The reason behind this is, if you want to update RO CSVI that you don't lose all your settings.
There may be circumstances where you need to delete the database tables as well. In that case there are 2 ways to do this:
- Manually remove all the tables in your database that start with csvi_
- Use the built-in option in RO CSVI to remove the tables.
Uninstall RO CSVI tables using Maintenance
The built-in option to remove the RO CSVI tables can be found in the Maintenance area.
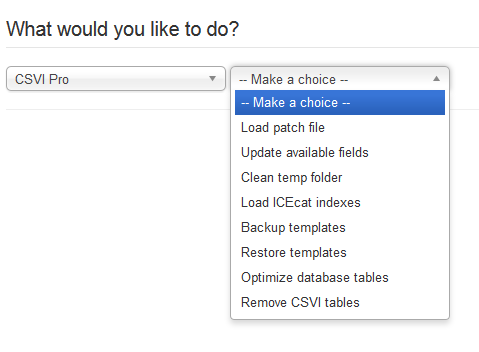
- Go to Components -> RO CSVI
- Click on Maintenance
- In the first dropdown select RO CSVI
- In the second dropdown choose Remove CSVI tables
- Click on Continue
- All CSVI tables will now be removed and RO CSVI can be uninstalled via the Extension Manager
After RO CSVI has been uninstalled via the Extension Manager you will have a clean system and ready to install a fresh installation of RO CSVI.
Once the uninstallation is complete you can do an extra check to make sure the following folders are all removed:
- administrator/components/com_csvi
- components/com_csvi
- api/components/com_csvi
- plugins/csviaddon
- plugins/csviext
- plugins/csvirules
Writing a rule plugin
| RO CSVI
Rule plugins are a powerful new tool in CSV Improved because it allows us with surgical precision to tailor the import and export process. Out of the box CSV Improved comes with 4 such plugins:
- Combine
This adds the option to combine fields - Copy
This adds the option to copy the content of one field to other fields - Margin
This adds the option to recalculate prices - Replace
This adds the option to replace values in a field
These four plugins are useful but not always what you are looking for as you may need something specific. That is why CSV Improved can be extended by writing your own plugins.
Structure of a rule plugin
A CSVI rule plugin is actually a regular Joomla plugin of the type csvirules. A plugin consists of these files:
- foo.php
- form_foo.xml
- foo.xml
The main file
The main file is foo.php, this file contains all the code that does all the work. This is a class that is created like this:
class PlgCsvirulesFoo extends RantaiPluginDispatcher
A rule plugin must always extend the RantaiPluginDispatcher as this dispatcher calls the plugin.
The class contains several mandatory functions and variables:
-
private $id = 'csvifoo';
-
public function getName() {} -
public function getSingleName($plugin) {} -
public function getForm($plugin, $options=array()) {} -
public function runRule($plugin, $settings, $field, CsviHelperFields $fields) {}
$id
This is the unique ID of your rule.
getName()
The getName() function provides CSVI with the name and ID of your rule, this is shown in the dropdown of available rules when creating a new template field.
getSingleName()
The getSingleName() function provides CSVI with only the name of your rule. This is used for display purposes.
getForm()
The getForm() function provides CSVI with a form the user can fill in if your rule requires certain settings. For example a field that allows the user to set which fields should be affected, or a field with values that needs to be matched. It can be almost anything. This function relies on the existence of the form_foo.xml file.
runRule()
The runRule() function does the actual work, this is where the magic happens. In this function you put all the logic of your rule and update the fields with their new values.
The form file
The form file is form_foo.php. This file is optional and only needed if you want to get input from the user. The fields used are standard JForm fields so you can use any field available in Joomla. The structure of the file looks like this:
<?xml version="1.0" encoding="utf-8"?>
<form>
 <fields name="pluginform">
 <fieldset name="foo">
 <field name="source"
 type="textarea"
 rows="5"
 required="true"
 class="input-xxlarge"
 filter="raw" />
 </fieldset>
 </fields>
</form>
The only requirement is that the fieldset name matches the name of your rule, in this case foo.
Running your code
The runRule() function is the heart of your rule, without it, nothing is going to happen. Here are some pointers to help you understand what is going on in runRule(). The function takes 4 arguments:
- $plugin
- $settings
- $field
- $fields
$plugin
This is the ID of the plugin being called. So you need to check if it is your name being called, if not, do not run your code.
$settings
This is an object with data saved by the user from the form provided by your rule.
$field
The current field being processed.
$fields
An instance of CsviHelperFields. This is the class to use to manipulate the fields because it contains all the fields.
There are 2 ways in which you can modify a field that is being imported:
- $fields->updateField()
This function is the same for both import and export - $fields->set()
This function takes different arguments depending on whether it is an import or export. The updateField() is the preferred method of modifying a field.
Identifying a field
Fields are always identified by the value in the xml_node variable. This variable contains the unique identifier for that field. One word of caution, when dealing with XML files that have duplicate nodes, this field may contain a value that is the same for multiple fields.
Installation XML
To be able to install a plugin in Joomla, an XML file is required. This is a regular Joomla XML file, just make sure the group is set to csvirules as shown here:
<extension version="3.3" type="plugin" group="csvirules" method="upgrade">
Language files
In case you want to make your rule plugin multi-lingual you can include language files as per the Joomla standard.
Examples
If you want to check out some examples, have a look at the rule plugins that come with CSV Improved, they contain all kinds of ways of handling the fields.
Source tab option to Load from textfield
| RO CSVI
This option is to paste the import content into a textarea field and import the content from the textarea. The content can be either CSV or XML.

The field to enter the import content is seen after selecting the import template and before the preview page.

Not Acceptable error
| RO CSVI
Requirements;
CSVI Pro 5.8+
The following error can be seen on some restrictive servers:
"Not Acceptable
An appropriate representation of the requested resource /administrator/index.php could not be found on this server.
Additionally, a 404 Not Found error was encountered while trying to use an ErrorDocument to handle the request."
Fixing the problem
- Login
- You may see an empty screen, click the logout button. This is to reset your session.
- Login again
- Go to Components -> CSVI Pro -> Settings
- Set to the option Use cookies to No
- Save the settings
- You should be able to use CSVI now
Setting up a front-end export template
| RO CSVI
A front-end template allows you to run an export from the menu or via a link.
Export via a menu item
To make a template show up in your menu, you can create a regular menu item and users can use this link to execute a template. First you will need to create an export template in CSVI, otherwise the menu won't know there is a template. How to create a template is explained in the Create a template tutorial.
The template settings need to look like this to be able to use it for a menu item:
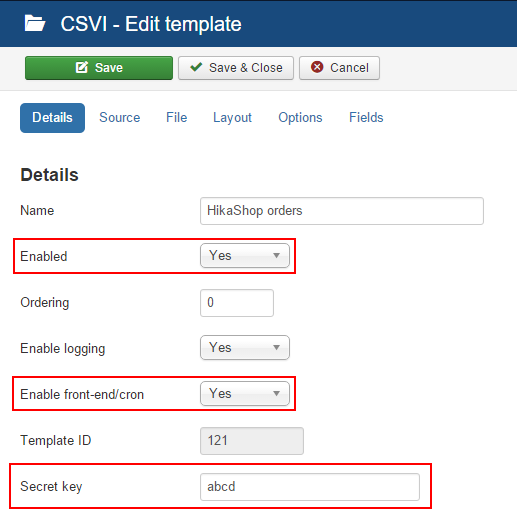
These conditions apply to use a template for front-end export:
- The template must be enabled
- Enable front-end/cron must be enabled
- A secret key must be set
- Go to Menus -> Manage
- Click on New to create a new menu item
- Enter a Menu Title
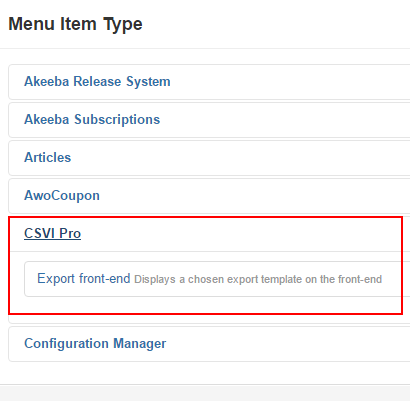
- Select the Menu Item Type Export front-end by clicking on the Select button
- Select the template you want to use for the menu item
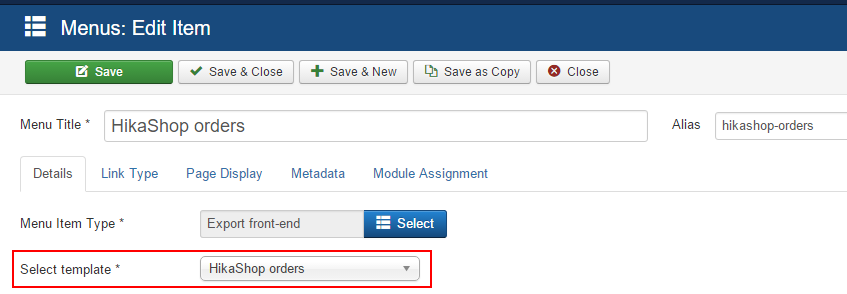
- Enter the secret key. This is required to prevent templates to be executed without authorization.
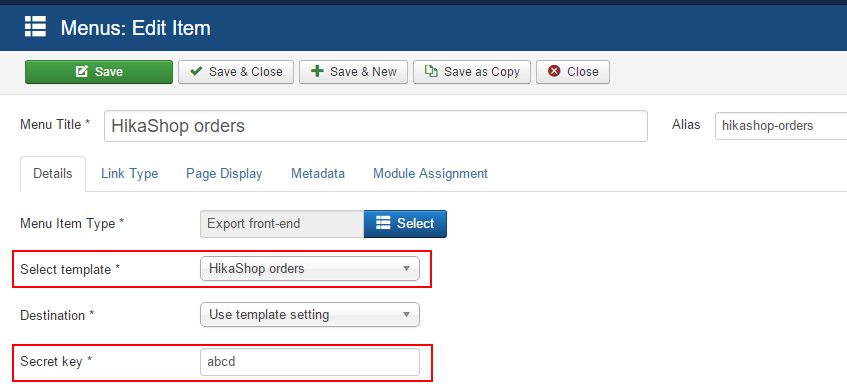
- Set any other settings you would like to apply, for example a specific usergroup that is only allowed to use the menu item. When all done, the settings will look like this:
- Save the menu item
The menu item will now show up on the front-end if the user has the correct permissions.
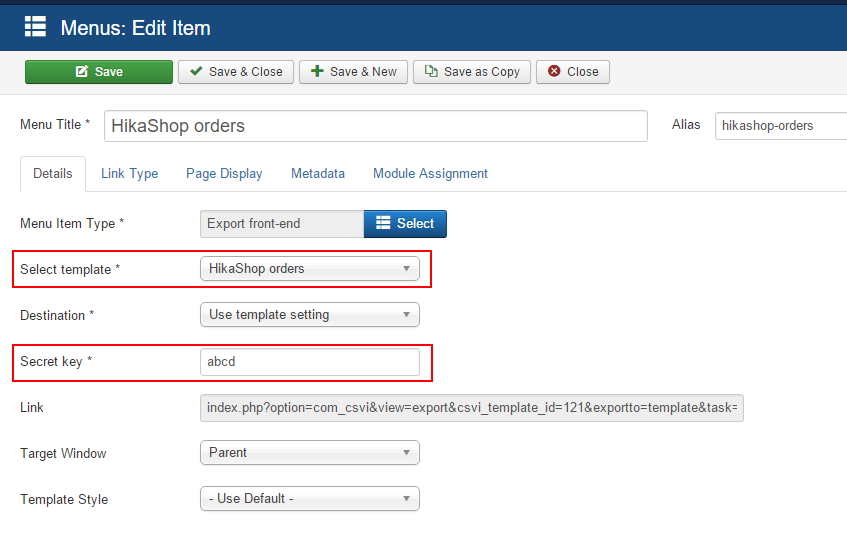
Export via a link
It is also possible to run an export via a link, this way the export doesn't have to be visible in the menu. The link can actually be seen in the menu item above as this will be the same link.
The link looks like this:
http://www.example.com/index.php?option=com_csvi&view=export&csvi_template_id=121&exportto=template&task=export&tmpl=component&key=abcd
The link has 3 important parts:
- csvi_template_id
This is the ID of the template you want to use. This number can be found when you edit the template - exportto
This sets the location where the exported file should be sent to. By default this is template, meaning the settings in the template will be used. Other options are:- tofront
Show the export result in the browser - todownload
Download the export file
- tofront
- key
This needs to be the same as the secret key set in the template
Styling the output
In case you have chosen to export the type HTML on the Options page, CSV Improved will render an HTML table. This table has no styling at all, however you can add your own CSS file and style the page as you wish.
Create a CSS file called exporttable.css and place it in the folder media/com_csvi/css and this file will be loaded when the table is rendered.
Override template settings
It is possible to override options you have in your template to make the export more flexible. Each option must begin with form_ and then followed by the name of the option. For example to set a specific order number in the HikaShop export, the URL will look like this:
http://www.example.com/index.php?option=com_csvi&view=export&csvi_template_id=121&exportto=template&task=export&tmpl=component&key=abcd&form_orderlist=15
This will export only order ID 15.