RO CSVI
Open a CSV file with Excel
| RO CSVI
Opening a CSV file with Excel correctly is somewhat of a hassle, here is a step by step instruction on how to do it correctly.
1. Open a new workbook
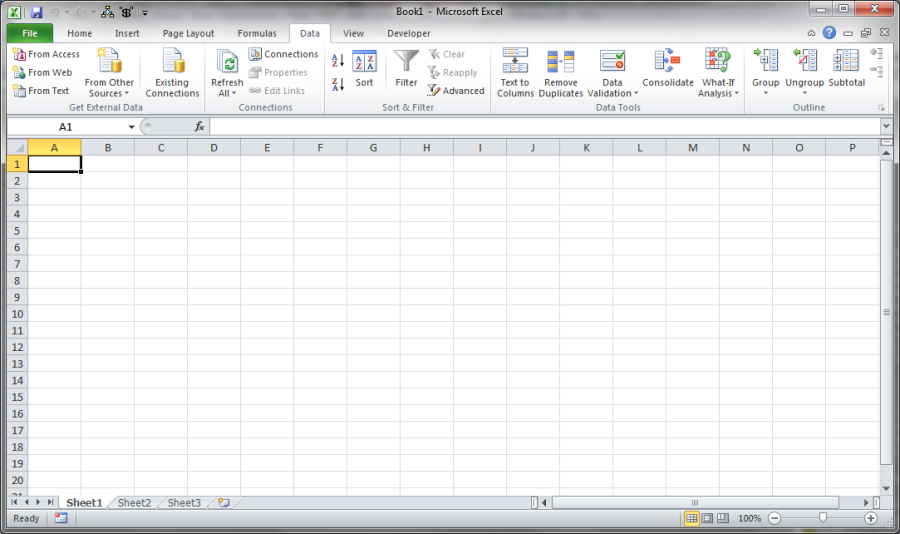
2. Choose From Text
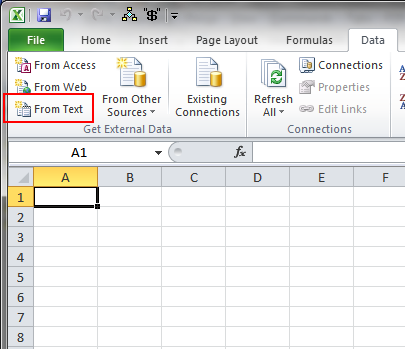
3. Select the file to open and click Import
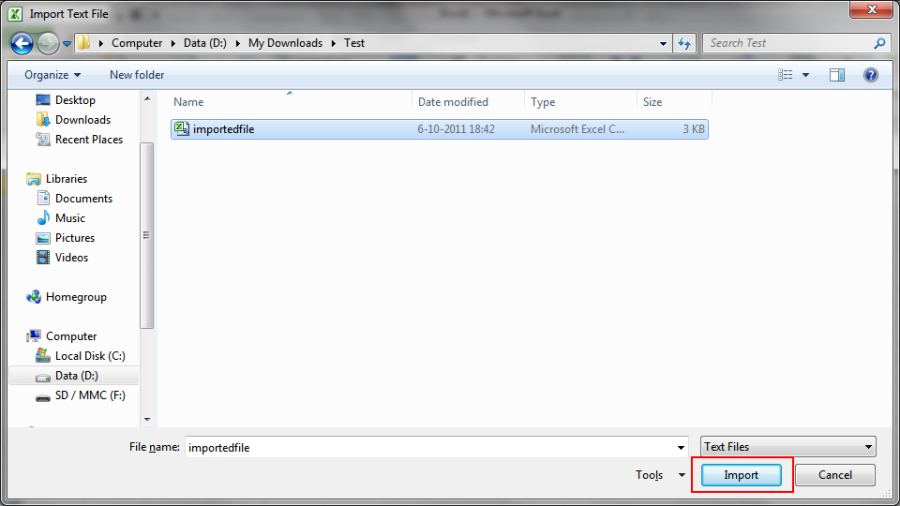
4. Start the Text Import Wizard and make sure the settings are the same as the screenshot and click Next
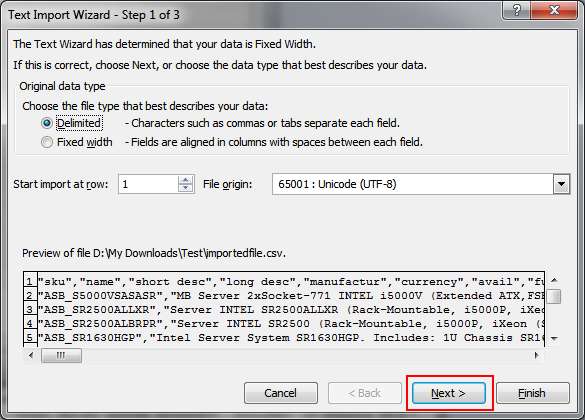
5. Set the delimiters to match the ones in your file and click Next
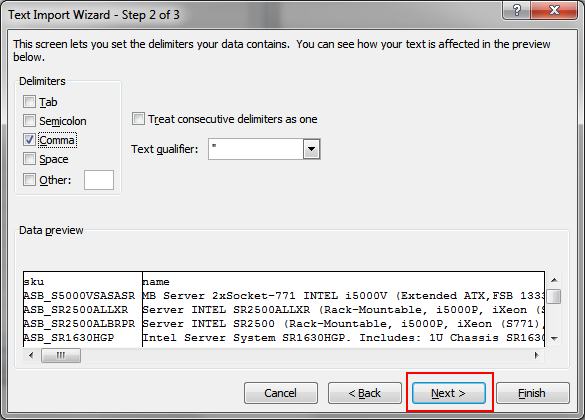
6. Check if your columns are OK and click Finish.
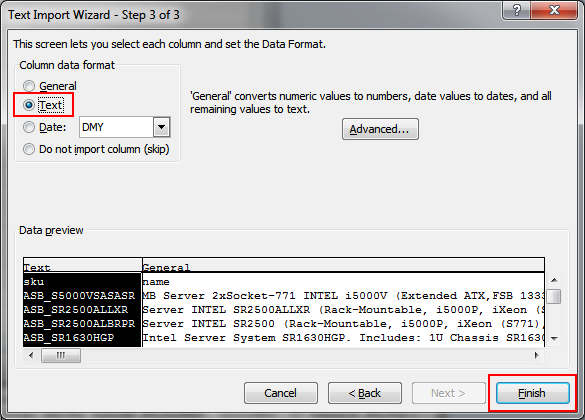
For columns not showing up correctly, set the column data format to Text. This is useful for SKUs that start with 0, this way the preceding 0 is not lost.
7. Click OK to insert the file into the workbook.
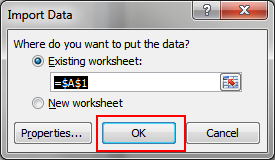
8. Now you are done and you can update your data.
Source tab option to Load from URL
| RO CSVI
Option to load the import file from a link. Include the link in Load from URL field.

Test URL button can be used to check if the given link is valid or not. If a link is not valid, a message shows as

If a link is valid, a message is shown as

Process XML files
| RO CSVI
Basic XML
CSVI has the option to import and export products in the XML format. The XML format by itself is an open standard, this means it has no fixed structure. The structure is defined by the program itself and is called an XML schema. For CSVI the structure looks like this:
<?xml version="1.0" encoding="UTF-8"?>
<channel>
<item>
</item>
</channel>
Every XML file needs to start with the line:
<?xml version="1.0" encoding="UTF-8"?>
This line tells the program it is an XML file and data is encoded in UTF-8.
The second line starts the group of data and looks like:
<channel>
Each set of data is contained in a node called “item”. The node starts like:
<item>
Now the data to import follows. Inside the node we use tags to identify the type of data that is being imported or exported. A tag is exactly the same as a column in a spreadsheet. A single tag looks for example like:
<product_sku>LAP01</product_sku>
- The opening tag is
<product_sku>
- The data is CSVI101
- The closing tag is
</product_sku>
It is important that each tag is closed otherwise the XML file is invalid.
After all the data is added to the node, the node also needs to be closed. Closing the node is done like this:
<item>
Either a new node can be opened now for the next set of data or the XML file can be closed. To close the XML file, first the channel needs to be closed by adding this line:
</channel>
The file is now complete and ready to be saved and processed.
An example XML file can look like this:
<channel>
    <item>
        <product_sku>LAP01</product_sku>
        <product_name><![CDATA[Laptop Type 01]]></product_name>
        <category_path>Computers/Laptops</category_path>
    </item>
</channel>
This is a basic setup of an XML file. This example also shows the usage of the CDATA tag. This is a special tag and is used to tell the system that any data inside the CDATA tag is not to be read as XML data but as plain data. This is for example necessary when the data contains a special character like the ampersand (&). For full details, have a look at the Wikipedia XML page. On export, CSVI already adds the CDATA tag automatically to fields considered to usually have special characters. CSVI offers several XML export formats to serve for different shopping sites. These sites are:
- Beslist.nl
- Google Merchant
Each of these sites have their own XML schema and it is advised to read on how to use this. An example of this is the Google Base example template.
Advanced XML
CSVI can now import complex XML structures. To be able to import complex XML structures, you need to tell CSVI how your structure looks like. The structure is set in the XML Record Nodes field. This field must contain the blueprint of your XML structure.
Simple structure
The CSVI XML format uses a simple structure that looks like this:
<channel>
    <item>
        <product_sku></product_sku>
        <product_name></product_name>
    </item>
</channel>
Every record is enclosed between the <item></item> tags. The XML Node field can then be filled like:
- <item></item>
- <item/> (self-closing)
Complex Structure
An XML file can also contain a complex structure like this:
<product>
    <id>A2045</id>
    <name>Great Product</name>
    <description_it>My great product</description_it>
    <price>10.52</price>
    <weight unit="kg">
        <unit>kg</unit>
    </weight>
    <images>
        <image1>myimage.jpg</image1>
    </images>
</product>
Every record is here enclosed between the <product></product> tags however the tagnames do not have a name according to the fields in the Available fields list. Further the image is contained in a subnode called <images>.
The field <weight unit="kg"> indicates there is a subnode called unit that is being matched to a fieldname called kg. Now the fieldname kg does not exist but it is called product_weight_uom. This we will need to adjust for the blueprint.
To make CSVI understand this format it is necessary to tell CSVI how to read the XML file. A blueprint of the above example will look like this:
<product>
    <id>product_sku</id>
    <name>product_name</name>
    <description_it>product_desc</description_it>
    <price>product_price</price>
    <weight unit="product_weight_uom"></weight>
    <images>
        <image1>product_full_image</image1>
    </images>
</product>
The field to use must be placed between the node names for example <id>product_sku</id> will tell CSVI that the ID field is the product_sku field.
Special tags
Note: CSVI Pro 4.4 required
As of CSVI Pro 4.4, you can now also import XML structures with duplicate nodes by using special tags. These tags are:
- csvi="combine"
- csvi="add"
When using these special tags, you cannot use the template fields to match the structure of the XML file. However it is possible to add extra fields to the template and enable the option Add extra fields. These fields will be added to the end of each item. Give these fields a default value and they will be imported also. This can be used to publish your products immediately for example.
We will use this example node:
<product>
    <id>R254617</id>
    <name>Printer</name>
    <features>
    <feature>Multi-color - Yes</feature>
    <feature>Condition - Refurbished</feature>
    <feature>Speed - 5ppm</feature>
    </features>
    <images>
    <image id='1'>
    <url><![CDATA[http://www.example.com/image1.jpg]]></url>
    <primary>1</primary>
    </image>
    <image id='2'>
    <url><![CDATA[http://www.example.com/image2.jpg]]></url>
    <primary>0</primary>
    </image>
    </images>
</product>
Combine
The combine option is used to combine duplicate nodes into 1 field. Look at the example node, this printer has 3 features. The next printer in the import file might have 5 features. Since these features are variable, it is not possible to match them with different fields in CSVI. The combine option will make it possible to match them with 1 field, for example the product description. By setting the combine tag on the feature node, CSVI will merge all fields that match the <features><feature> path.
Add
The add option is used to import duplicate nodes into different fields. Look at the example node, this printer has 2 images. The add option will make it possible to match them with a field of your choice. By setting the add tag on the image node, CSVI will match all next nodes to the given fieldname. All fields that match the <images><image> path will be handled by the add option.
The blueprint for this XML node will look like this:
<product>
    <id>product_sku</id>
    <name>product_name</name>
    <features><feature csvi="combine">product_desc<feature></features>
    <images>
    <image id='skip'>
    <url csvi="add">file_url</url>
    <primary>skip</primary>
    </image>
    <image id='skip'>
    <url>file_url_thumb</url>
    <primary>skip</primary>
    </image>
    </images>
</product>
Custom XML
The custom XML export gives you the flexibility of exporting any kind of XML layout.
Setting Up The XML Layout
The XML layout has 3 parts that needs to be set up. The parts are:
- Header
- Body
- Footer
Header
The header contains the start of the XML file. Example:
<?xml version="1.0" encoding="UTF-8"?>
<channel>
Body
The body contains a single node that will be duplicated for every export item. A node is build up from several sections:
- Opening tag
The opening tag starts the node, for example: <product> - Fields
The fields specify what information is going to be exported, for example:<id>[product_sku]</id>A field is constructed of 3 different parts:
<name>[product_name]</name>
<description_it>[product_desc]</description_it>
<price>[product_price]</price>
<weight unit="[product_weight_uom]">[product_weight]</weight>
<images>
<image1>[picture_url]</image1>
</images>- Start tag
<id> - Field to be exported. The field that is going to be exported must always be enclosed in square brackets.
[product_sku] - Closing tag
<id>
- Start tag
- Closing Tag
The closing tag closes the node, for example: </product>
Each field that is going to be exported needs to be added to the list of fields to be exported on the Export tab. Example:
<product>
<id>[product_sku]</id>
<name>[product_name]</name>
<description_it>[product_desc]</description_it>
<price>[product_price]</price>
<weight unit="[product_weight_uom]">[product_weight]</weight>
<images>
    <image1>[picture_url]</image1>
</images>
</product>
Footer
The footer closes the XML file. Example:
</channel>
Output File
The above example will generate the following output file:
<channel>
    <product>
        <id>P01</id>
        <name><![CDATA[Chain Saw]]></name>
        <description_it><![CDATA[
<ul>
<li>Tool-free tensioner for easy, convenient chain adjustment </li>
<li>3-Way Auto Stop; stops chain a fraction of a second </li>
<li>Automatic chain oiler regulates oil for proper chain lubrication </li>
<li>Small radius guide bar reduces kick-back </li>
</ul>
<p><br /> <strong>Specifications</strong><br /> 12.5 AMPS   <br /> 16" Bar Length   <br /> 3.5 HP   <br /> 8.05 LBS. Weight</p>
]]></description_it>
        <price>2,99</price>
        <weight unit="pounds">10.0000</weight>
        <images>
            <image1>http://www.example.com/components/com_virtuemart/shop_image/product/c3a5bf074da14f30c849d13a2dd87d2c.jpg</image1>
        </images>
    </product>
</channel>
Source tab option to Load from server
| RO CSVI
Set the absolute path of import file to load directly from server. The path will be set under Load from server field. Test Path button is used to check if the path is valid or not. This option is very useful when running the import as cron so RO CSVI can load the file automatically for cron import.

If the path is not a valid path, a message is shown as

If the path is a valid path, a message is shown as

How to enable updates in RO CSVI?
| RO CSVI
Updating CSVI is easy using Joomla installer.
Getting the Download ID
The first thing to get is the download ID. You can get the Download ID by following these steps:
- Log in to the website https://rolandd.com
- After you have logged in, click the My Subscriptions link
- You will then find the Download ID for each subscription
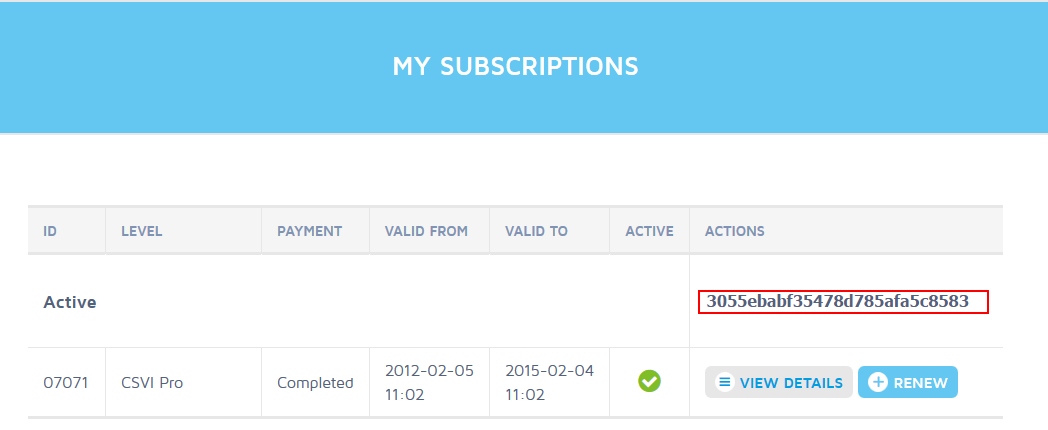
Setting up the Download ID
With the Download ID, go to your website and follow these steps:
- Go to Components -> and click on RO CSVI
- You are now on the dashboard
- Click on the Options icon in the toolbar
- You can fill in the Download ID
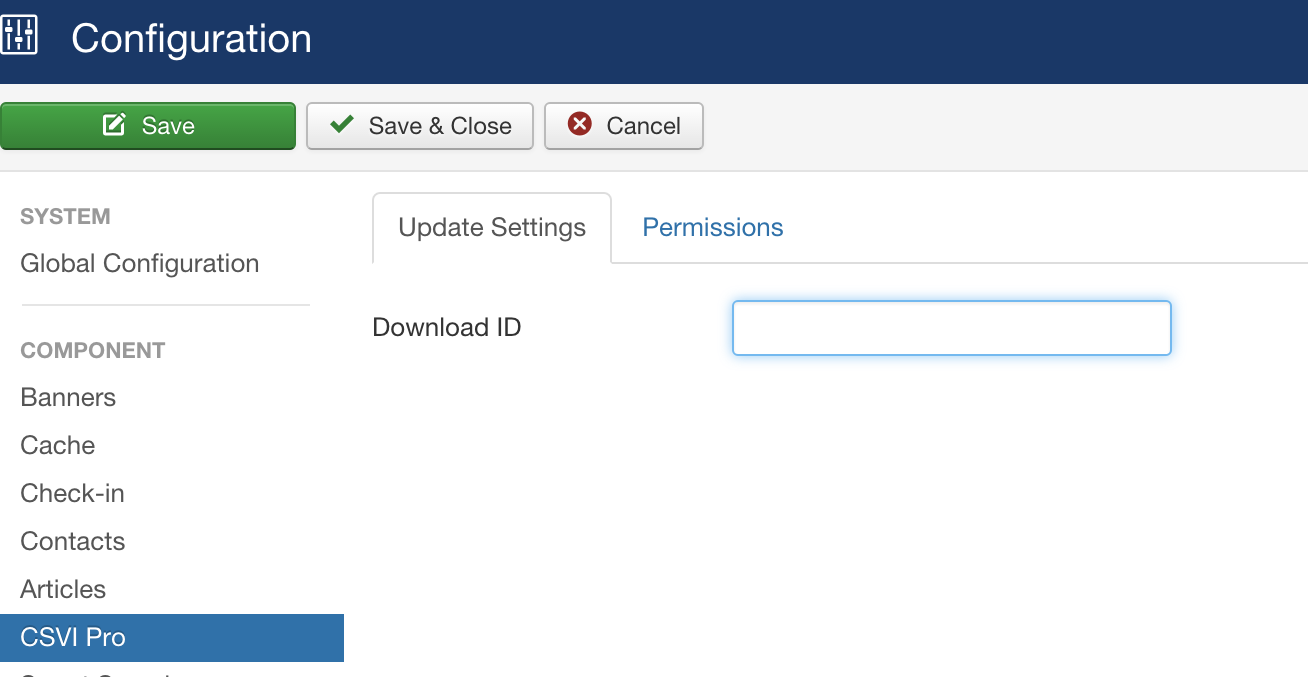
- Click on Save & Close
- The Download ID is now set
Updating CSVI
You can now update CSVI using the Joomla updater. Go to Joomla Extensions Menu >> Manage. Click on update on the left sidebar. New versions of RO CSVI will be listed here if available.
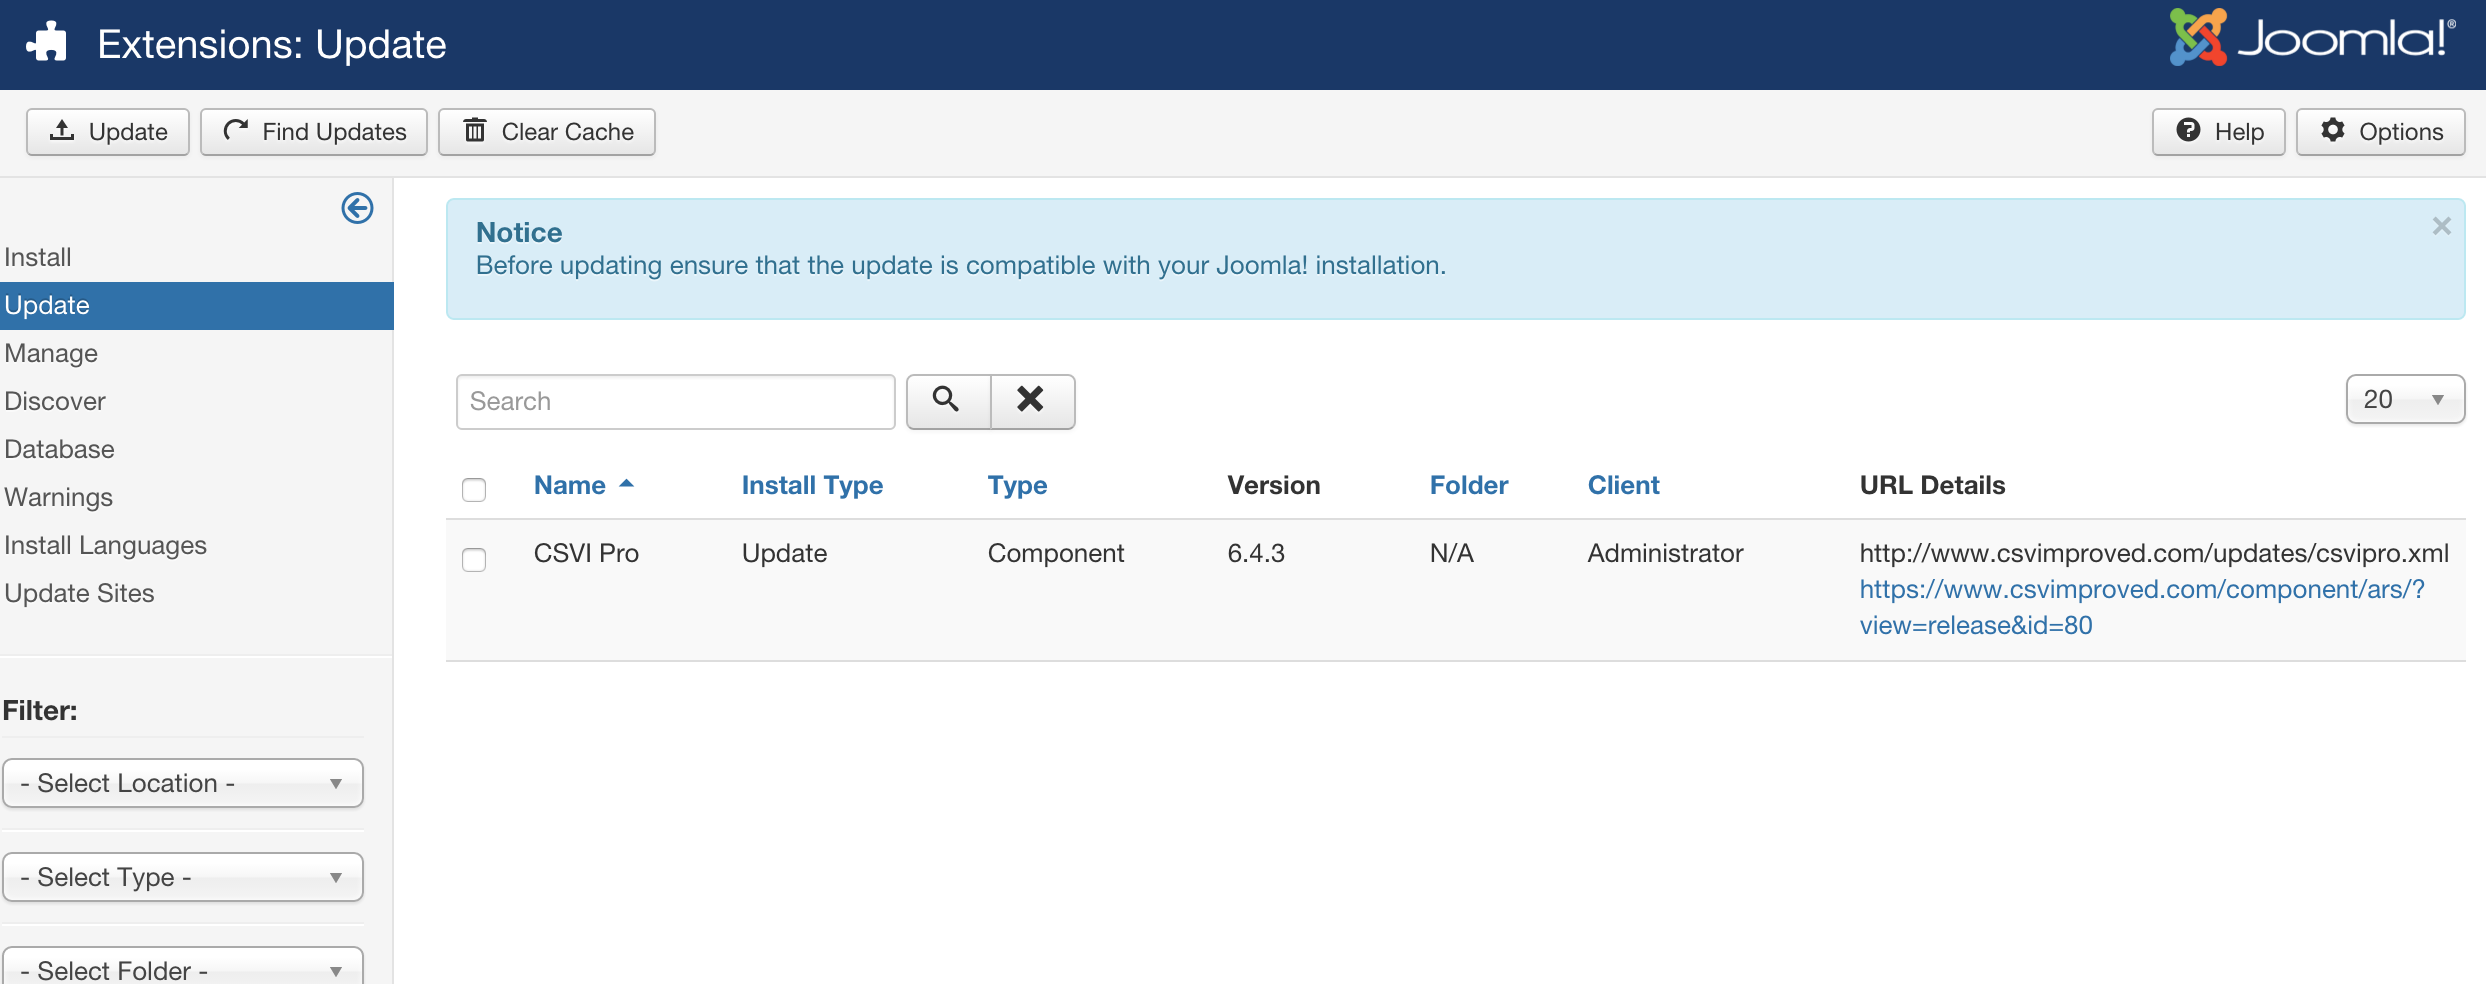
Select the RO CSVI extension from the list and click on update button on top left corner.

If needed, click on the Find update Button to get the latest information.
After the update has finished you can return to RO CSVI.