VirtueMart
VirtueMart Order Items import
A template can be created by following these steps:
- Go to Components -> RO CSVI -> Templates
- Click New
- Give the template a name, say for example VirtueMart Order items import
- Set Action to Import
- Set Component to VirtueMart
- Set Operation to Order item
- Click Next: Select Source
- Source is set default to Load from your computer. No need for change.
- Click Next: Select options
- The default values are OK, change if needed.
- Click Next: Select fields
- Nothing needed here as we set to Use column headers as configuration in step 10.
- Click Next: Finalize
- All done here
- Click Close to return to the list of templates or Edit if you want to fine-tune the template further.
Adding the template fields
Template fields can be added by following these steps:
- Go to Components -> RO CSVI -> Templates
- Click on Template fields
- In the Search Tools select your template
- Click on New to add a single field or click on Quick Add to add multiple fields.
Quick Add
The Quick Add Option allows you to quickly add multiple fields to a template. It is not possible to set any settings per field here but that can be done after the fields have been added to the template.
Run the import
The import can be run by following these steps:
- Go to Components -> RO CSVI -> Import
- Select the template created earlier with name VirtueMart order item import
- Click Select file
- Select the file to import
- Click Preview
- You now see a preview of the file as to how RO CSVI sees the file
- Click Start import
- The import is run
- The Log details page will be shown with information regarding the import if the Enable logging is enabled in the template
Video showing the process
"product_sku";"virtuemart_order_id";"order_status_name";"product_quantity";"product_item_price";"product_final_price"
"H01";"9";"Refunded";"10";"9,50";"85"Auto delete of discontinued products
Auto-delete products using CSVI
Most of the times to remove products manually from shop which are no more in use is a tedious work. With CSVI and with the steps explained below, removing products which are not needed any more is going to be easy.
- First unpublish all products in your database.
To do this you can export only product_sku field from VirtueMart product export template. Save the exported file. Here is an example product export template Example_product_export_template.xml. - Next create a VirtueMart product import template, add published and product_sku field to your template fields.
Set published field default value to 0 in template fields. Import the file you downloded from export template. Now all products are set to unpublished. Here is an example product import template for unpublishing all products Example_product_import_template.xml - Create an import file with products you need keep in your shop.
This import file can just have product_sku field, no more fields are actually required as CSVI updates product only with product_sku field. You can even use the same file saved in previous step from export process, remove the product skus not needed and keep the product skus you need in shop. - Unpublish all products
Create an import template and in template settings on Options tab set option "Unpublish before import" to Yes. CSVI will make all products to unpublished status before starting the import process with this option. Example import template Example_product_import_template_unpublish_before_import.xml - Run the import of published products
Do the import with file having the product skus you need in the shop along with published field set to value Y. CSVI will automatically publish the products which are in the import file. - Export unpublished products
Now do the export of the products which are in unpublished status. In the exported file add another field product_delete with value Y. Example export template is here Example_product_export_for_unpublished_products.xml - Delete exported unpublished products
Import this file back again, all the products in the import file will be deleted. This way you are removing all the products which are no longer needed in the shop.
Setting up as cron job
The above process can also be set as a cron job so the unpublished products are deleted automatically. This setup needs two cron job routines.
Step 1:
- Create a product export template with action as export, component as VirtueMart and operation as Product.
- In the template settings, on source tab, set the destination as Save on server.
- On file tab, give a name to the file to be exported, say for example unpublished.csv.
- On the same file tab, set Field delimiter to ; (semi-colon) and Text enclosure to " (double quotes).
- On the same file tab set Export state to Unpublished.
- Add product_sku and product_delete as template fields for the template. In default value for product_delete field set it as Y.
- Save the template.
Step 2:
- Create a new VirtueMart product import template.
- On Source tab, set source as Load from server, in the load from server path fill the location same as set in Export template in Step 1.
- Save the template
Step 3:
- Set up a cron job to run the export template created on Step 1.
- Set up cron job to run the import created on Step 2. Make sure that this cron job runs after the cron job created for Step 1.
Now your products with unpublished are removed automatically. The article explains the process in VirtueMart but the same can be followed for HikaShop by using corresponding fields in HikaShop.
VirtueMart Media Items import
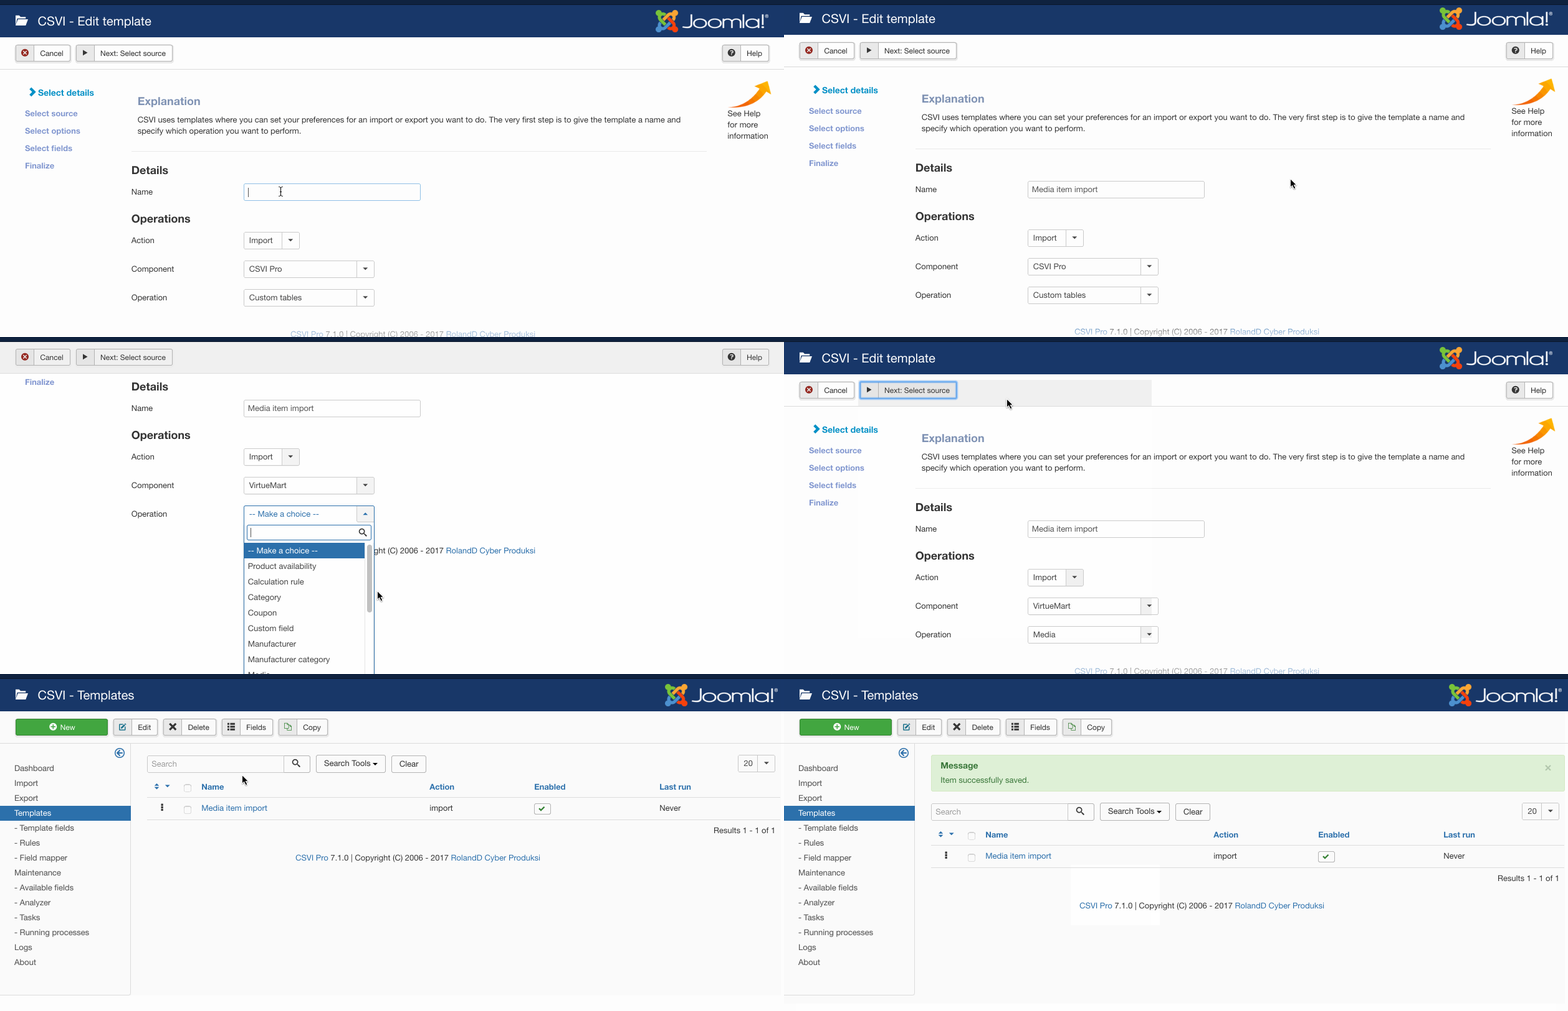
A template can be created by following these steps:
- Go to Components -> CSVI Pro -> Templates
- Click New
- Give the template a name, say for example VirtueMart Media import
- Set Action to Import
- Set Component to VirtueMart
- Set Operation to Media
- Click Next: Select Source
- Source is set default to Load from your computer. No need for change.
- Click Next: Select options
- The default values are OK, change if needed.
- Click Next: Select fields
- Nothing needed here as we set to Use column headers as configuration in step 10.
- Click Next: Finalize
- All done here
- Click Close to return to the list of templates or Edit if you want to fine-tune the template further.

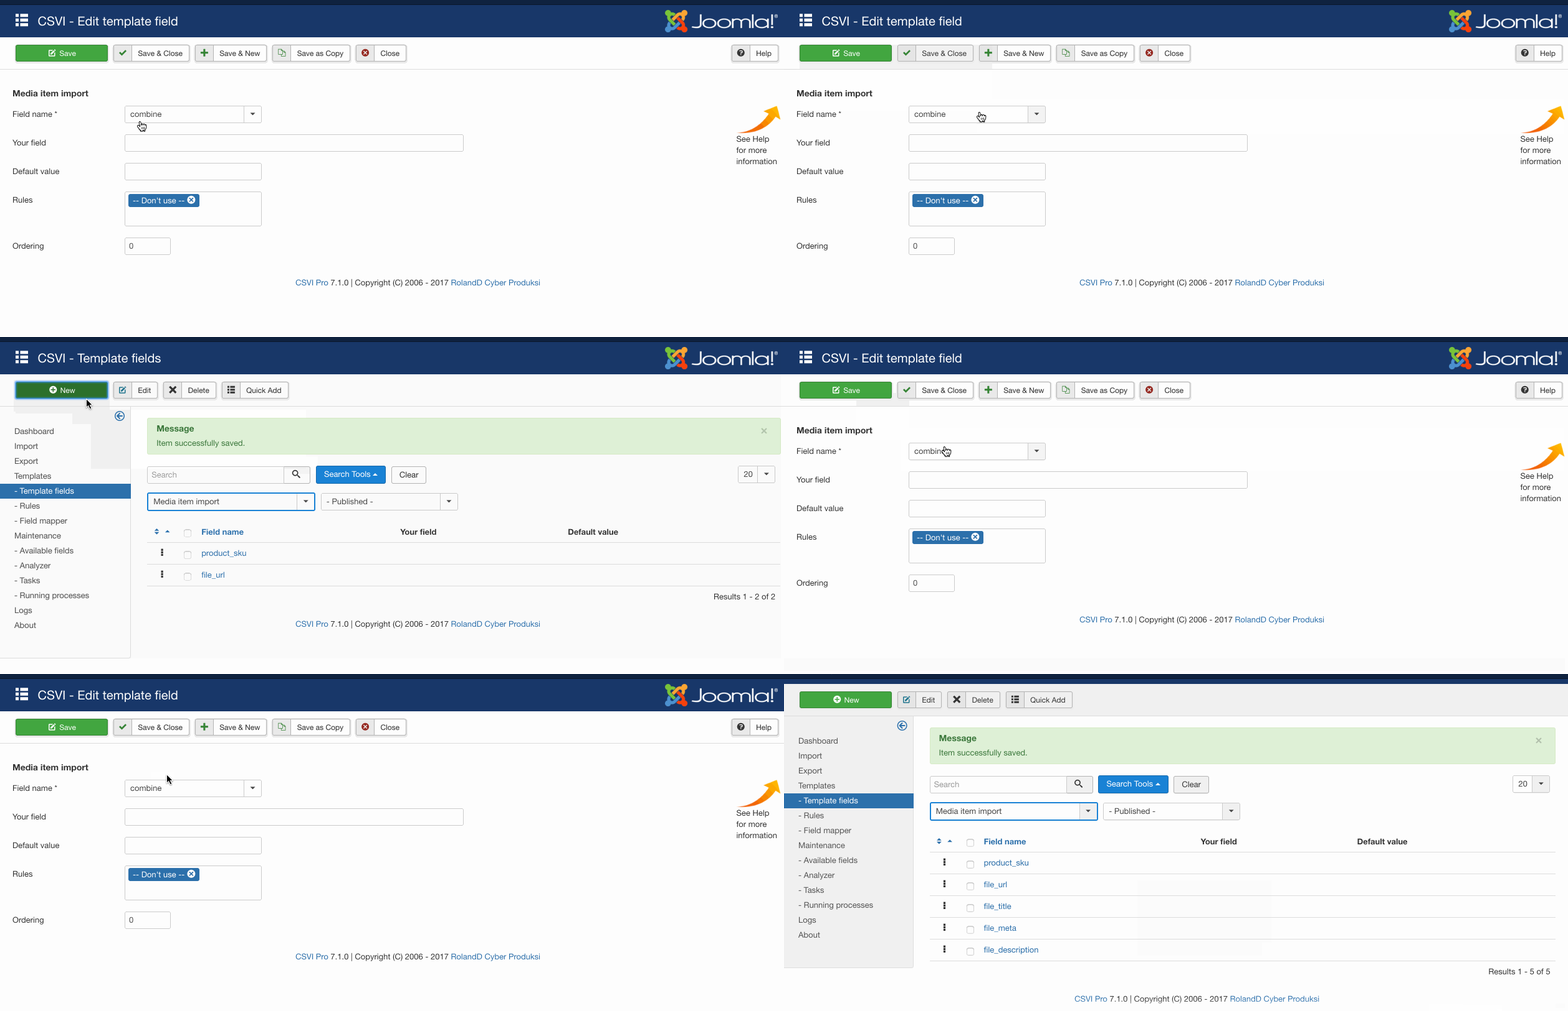
- Go to Components -> CSVI Pro -> Templates
- Click on Template fields
- In the Search Tools select your template
- Click on New to add a single field or click on Quick Add to add multiple fields.
Quick Add
The Quick Add Option allows you to quickly add multiple fields to a template. It is not possible to set any settings per field here but that can be done after the fields have been added to the template.

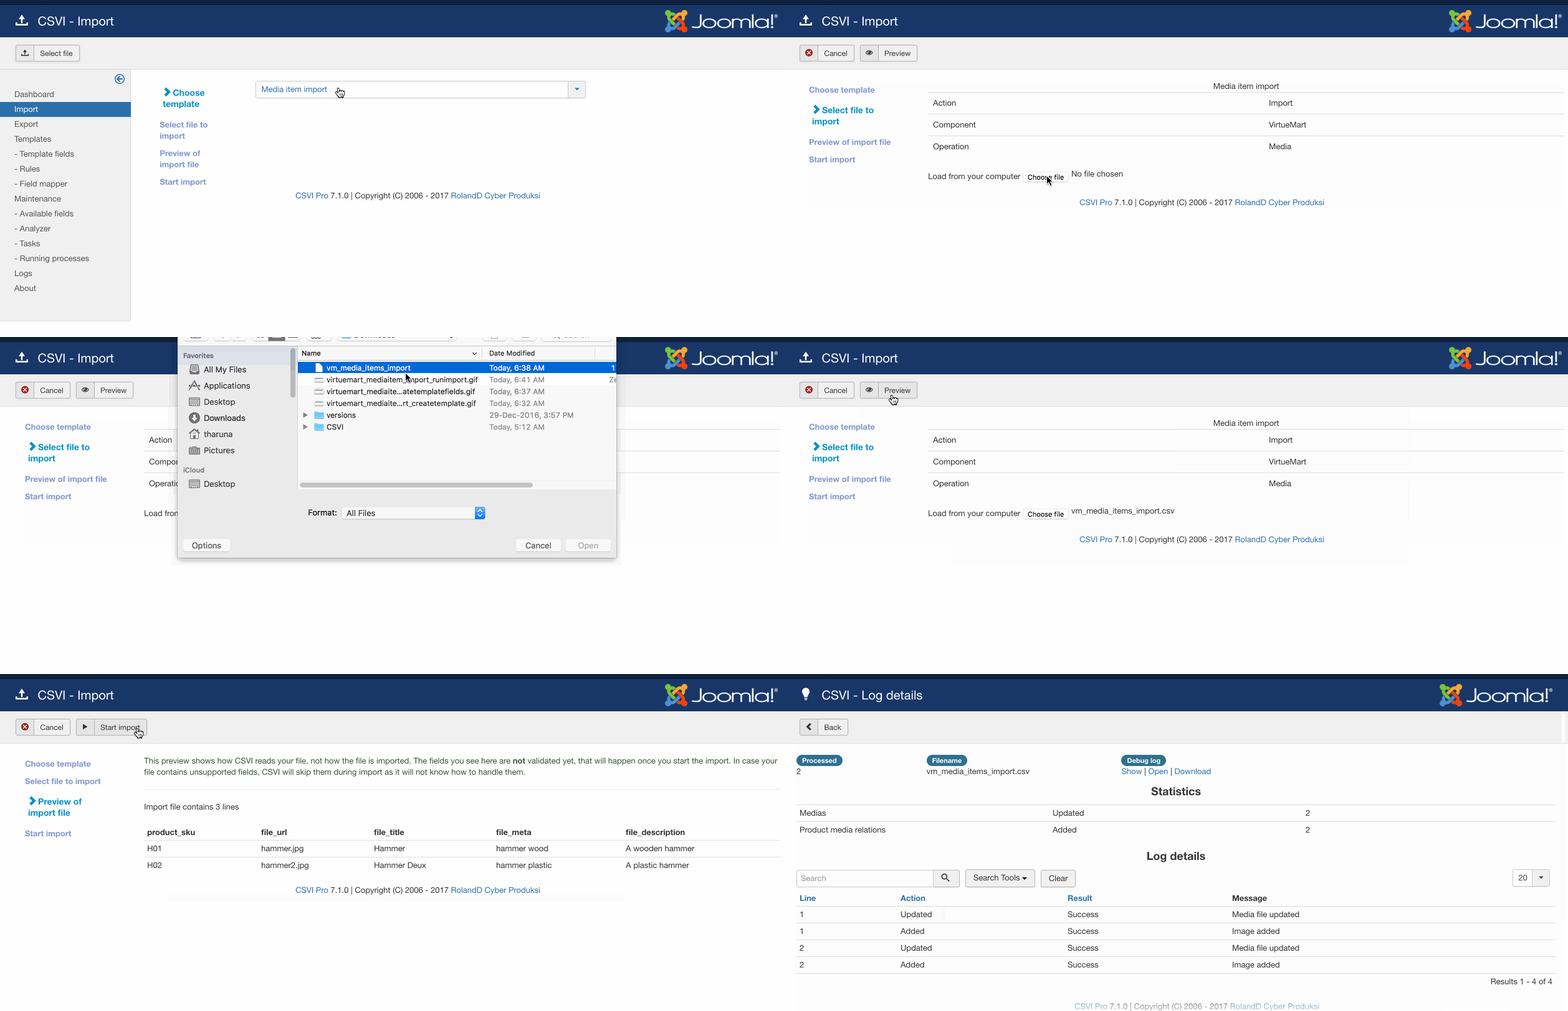
- Go to Components -> CSVI Pro -> Import
- Select the template created earlier with name VirtueMart media import
- Click Select file
- Select the file to import
- Click Preview
- You now see a preview of the file as to how CSVI sees the file
- Click Start import
- The import is run
- The Log details page will be shown with information regarding the import if the Enable logging is enabled in the template

"product_sku";"file_url";"file_title";"file_meta";"file_description"
"H01";"hammer.jpg";"Hammer";"hammer wood";"A wooden hammer"
"H02";"hammer2.jpg";"Hammer Deux";"hammer plastic";"A plastic hammer"
Multiple images
"product_sku";"file_url";"file_title";"file_meta";"file_description"
"H01";"hammer1.jpg";"Hammer left";"hammer wood";"A wooden hammer from the left"
"H01";"hammer2.jpg";"Hammer right";"hammer wood";"A wooden hammer from the right"
"H01";"hammer3.jpg";"Hammer top";"hammer wood";"A wooden hammer from the top"
Product documents
"product_sku";"file_url";"file_title";"file_description"
"H01";"hammer1.pdf";"Hammer document";"A technical description of the wooden hammer"
Delete media
"file_url";"media_delete"
"images/stories/virtuemart/product/hammer1.jpg";"Y"
Can I use picture_url for import?
No you cannot. This field in only meant to export a fully qualified URL to your image.
To import images you need to use the following fields:
- VirtueMart 1
product_image
product_thumb_image - VirtueMart 2
file_url
file_url_thumb
VirtueMart Manufacturer Categories import
A template can be created by following these steps:
- Go to Components -> RO CSVI -> Templates
- Click New
- Give the template a name, say for example VirtueMart Manufacturer category import
- Set Action to Import
- Set Component to VirtueMart
- Set Operation to Manufacturer Category
- Click Next: Select Source
- Source is set default to Load from your computer. No need for change.
- Click Next: Select options
- The default values are OK, change if needed.
- Click Next: Select fields
- Nothing needed here as we set to Use column headers as configuration in step 10.
- Click Next: Finalize
- All done here
- Click Close to return to the list of templates or Edit if you want to fine-tune the template further.
Adding the template fields
Template fields can be added by following these steps:
- Go to Components -> RO CSVI -> Templates
- Click on Template fields
- In the Search Tools select your template
- Click on New to add a single field or click on Quick Add to add multiple fields.
Quick Add
The Quick Add Option allows you to quickly add multiple fields to a template. It is not possible to set any settings per field here but that can be done after the fields have been added to the template.
Run the import
The import can be run by following these steps:
- Go to Components -> RO CSVI -> Import
- Select the template created earlier with name VirtueMart manufacturer categories import
- Click Select file
- Select the file to import
- Click Preview
- You now see a preview of the file as to how RO CSVI sees the file
- Click Start import
- The import is run
- The Log details page will be shown with information regarding the import if the Enable logging is enabled in the template
Video showing the process
Creating manufacturer category
"mf_name";"mf_email";"published"
"Manufacturer 1";"This email address is being protected from spambots. You need JavaScript enabled to view it.";"Y"
"Manufacturer 2";"This email address is being protected from spambots. You need JavaScript enabled to view it.";"Y"