VirtueMart
Why are my products not showing up?
There are several reasons why products are not showing up after an import. Here is a list of possible causes:
- No slug set
When a product has no slug, VirtueMart will show a Product not found message - Not published
On import, you need to set the published field to Y or 1. Not including this field leaves the product unpublished even if VirtueMart shows it as published - No matching shopper group
Products can be linked to a specific shopper group, if there is no shopper group match, VirtueMart will not show the product - Incorrect language
After you have imported products and go to VirtueMart to check and see if they are there you might find that no products show up. The reason for this is that VirtueMart uses a different language than what you imported them in. For example, your site has 2 languages, English and Dutch where English is your site default language.
(Extensions -> Language manager)
After you import your first products in the Dutch language, VirtueMart won't show them because it is looking for English products. To see the list of Dutch products you need to go to Extensions -> Language manager and set your Site language to Dutch as default. Now go back to VirtueMart and your products will show up.
Products and shopper groups
Requirements
CSVI Pro 5.8+
CSVI Free 4.5.2+
VirtueMart 2.0.16+
VirtueMart can show products to specific shopper groups, to import this relation the field shopper_group_name needs to be used. Multiple shopper groups can be used also by separating them with a pipe symbol.
Sample CSV
This sample CSV assigns product G01 to the shopper group Gold Level
"product_sku";"shopper_group_name"
"G01";"Gold Level"
This sample CSV assigns product G01 to the shopper group Gold Level and -default-
"product_sku";"shopper_group_name"
"G01";"Gold Level|-default-"
VirtueMart Orders import in RO CSVI
A template can be created by following these steps:
- Go to Components -> RO CSVI -> Templates
- Click New
- Give the template a name, say for example VirtueMart Order import
- Set Action to Import
- Set Component to VirtueMart
- Set Operation to Order
- Click Next: Select Source
- Source is set default to Load from your computer. No need for change.
- Click Next: Select options
- The default values are OK, change if needed.
- Click Next: Select fields
- Nothing needed here as we set to Use column headers as configuration in step 10.
- Click Next: Finalize
- All done here
- Click Close to return to the list of templates or Edit if you want to fine-tune the template further.
Adding the template fields
Template fields can be added by following these steps:
- Go to Components -> RO CSVI -> Templates
- Click on Template fields
- In the Search Tools select your template
- Click on New to add a single field or click on Quick Add to add multiple fields.
Quick Add
The Quick Add Option allows you to quickly add multiple fields to a template. It is not possible to set any settings per field here but that can be done after the fields have been added to the template.
Run the import
The import can be run by following these steps:
- Go to Components -> RO CSVI -> Import
- Select the template created earlier with name VirtueMart Order import
- Click Select file
- Select the file to import
- Click Preview
- You now see a preview of the file as to how RO CSVI sees the file
- Click Start import
- The import is run
- The Log details page will be shown with information regarding the import if the Enable logging is enabled in the template
Video showing the process
Creating an order
"order_number";"email";"user_currency";"payment_element";"order_total";"order_subtotal";"order_tax";"order_status_name"
"bfba03";"This email address is being protected from spambots. You need JavaScript enabled to view it.";"EUR";"standard";"10,50";"9,50";"1";"COM_VIRTUEMART_ORDER_STATUS_CANCELLED"
Creating an order keeping the order ID
"virtuemart_order_id";"email";"user_currency";"payment_element";"order_total";"order_subtotal";"order_tax";"order_status_name"
"260";"This email address is being protected from spambots. You need JavaScript enabled to view it.";"EUR";"standard";"10,50";"9,50";"1";"COM_VIRTUEMART_ORDER_STATUS_CANCELLED"
It is also possible to use the virtuemart_order_id instead of order_number but in the order import template the option "Keep Order ID" must be set to Yes.
Product Meta Information
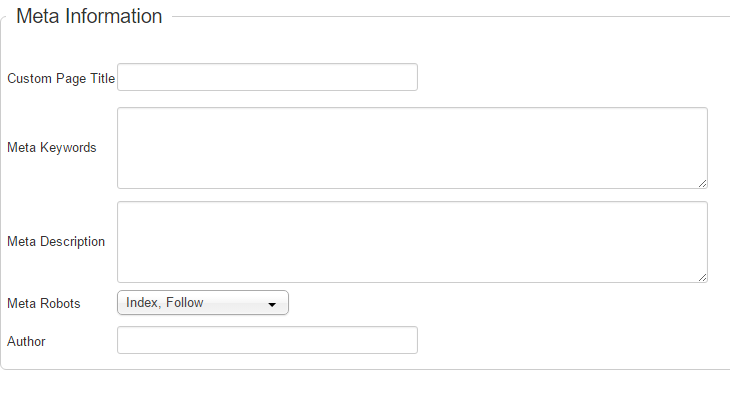
| VirtueMart | CSVI Import | CSVI Export |
|---|---|---|
| Custom Page Title | customtitle | customtitle |
| Product Meta Description | metadesc | metadesc |
| Product Meta Key | metakey | metakey |
| Product Meta Robot | metarobot | metarobot |
| Author | metaauthor | metaauthor |
Export shipping prices with Google Merchant export
Shipping prices
The shipping prices let you set shipping prices per product based on the product price.
Requirements
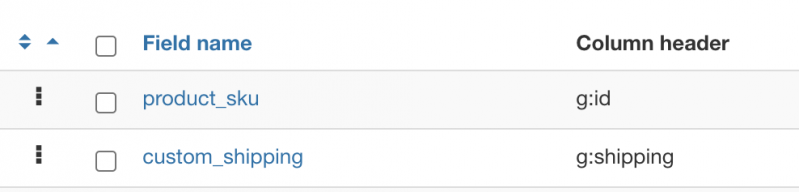
The shipping field on the list of export fields must be the custom_shipping field. RO CSVI uses VirtueMart core vmpsplugin to calculate this field.
Output
custom_shipping field is available in Google Merchant export.
Set the custom_shipping field as one of the export field in Google merchant export.
In Google Merchant export this field gets three values on export, title of the shipment, price and country code. Sample of XML output would
<g:shipping>
<g:country>IN</g:country>
<g:service>Self Pickup</g:service>
<g:price>78.00</g:price>
</g:shipping>
If there is no matching shipment, this node will not available in export XML.