VirtueMart
Stockable variants import
Required fields
Stockable Custom Fields plugin by Break Design and the RO CSVI - VirtueMart - Breakdesigns extension by RO CSVI (available from the Extension Downloads)
Background information
The ability to import stockable variants make it easier than using the interface in VirtueMart
Creating the custom field
Before you can start to import your stockable variants, you first need to create a custom field needed for import. As per the example below we are going to import two custom fields Size and Color. So lets start adding these custom fields from VirtuMart custom fields page.
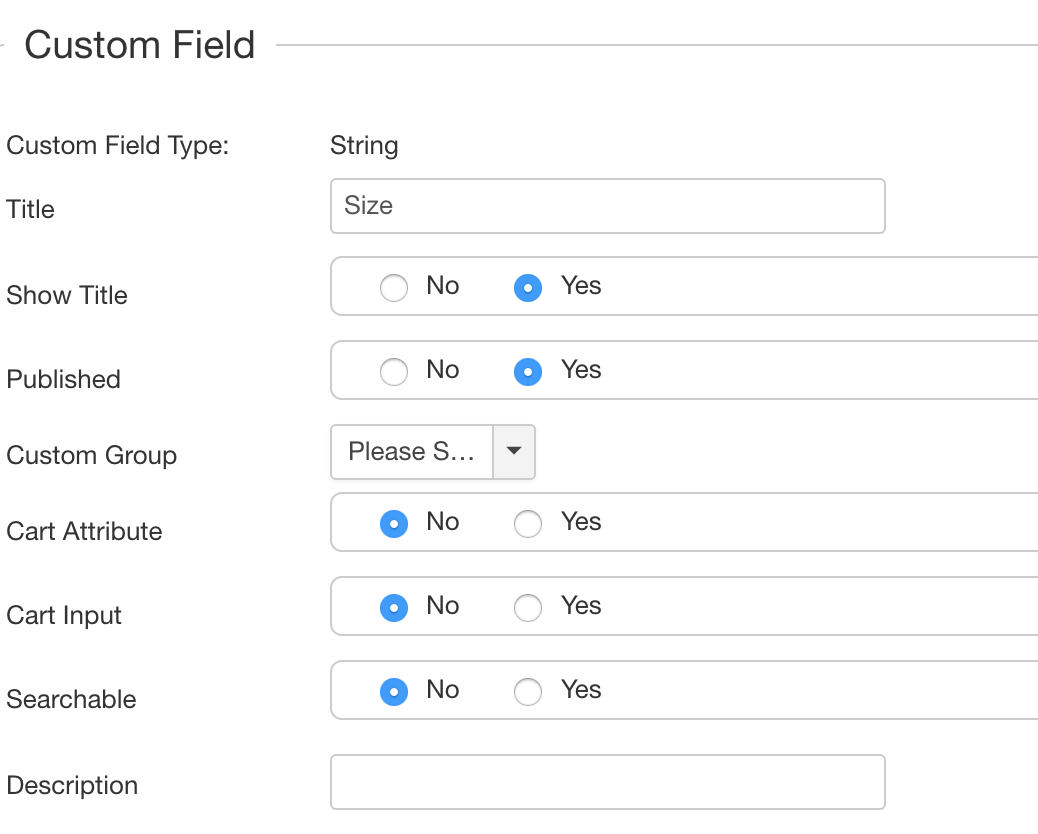
Add Size custom field by following the below steps
- Click on Custom Fields in the left menu in the Products section in VirtueMart
- Click on New
- Fill in the following fields:
- Custom Field Type: String
- Title: Size
- Published: Yes
- Layout position: Don't change
- Admin Only: No
- Is a list?: No
- You Hidden: No
- Click on Save & Close
- The Size custom field has now been created
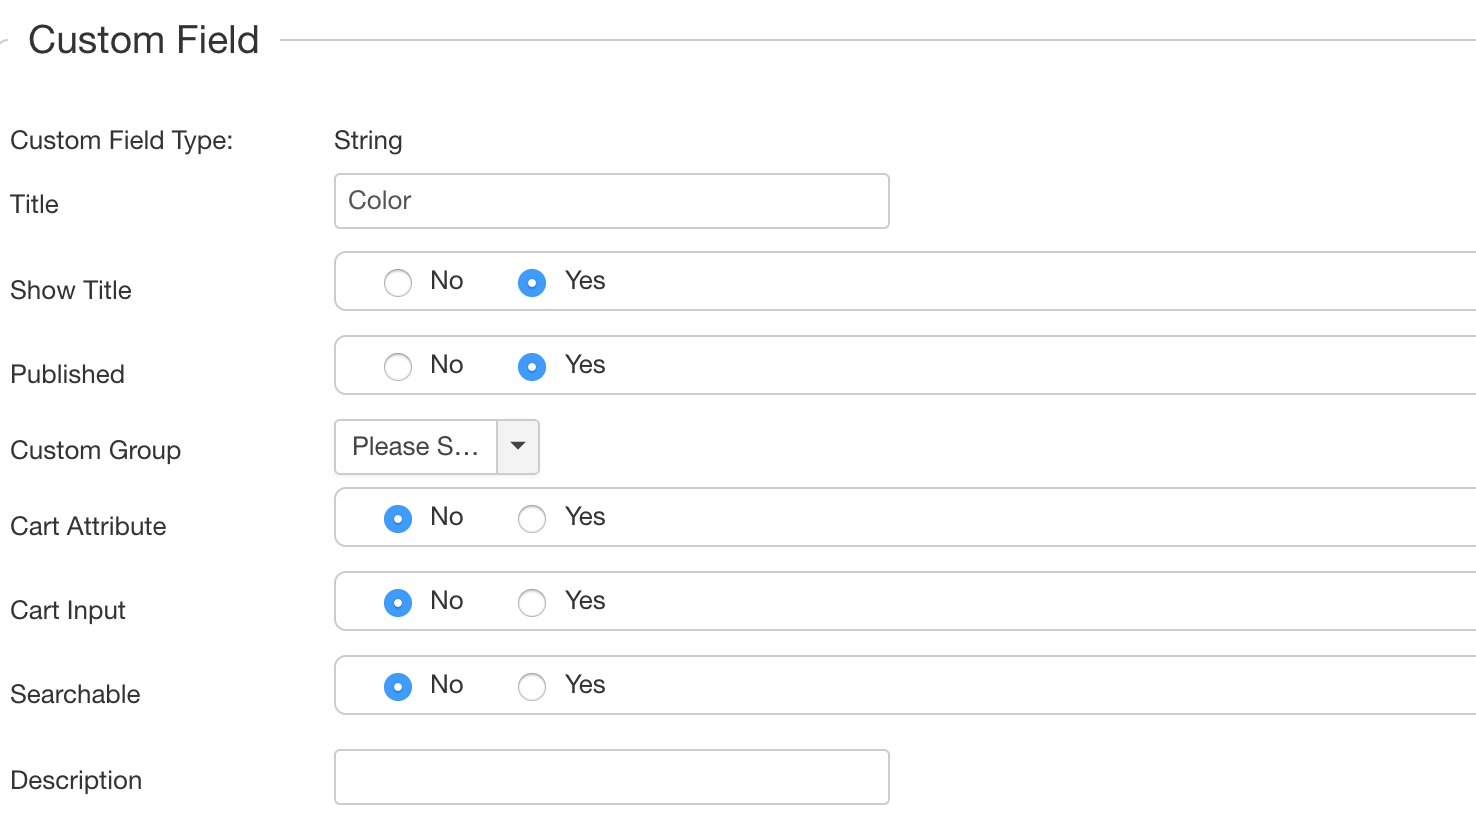
Add Color custom field by following the below steps
- Click on Custom Fields in the left menu in the Products section in VirtueMart
- Click on New
- Fill in the following fields:
- Custom Field Type: String
- Title: Color
- Published: Yes
- Layout position: Don't change
- Admin Only: No
- Is a list?: No
- Hidden: No
- Click on Save & Close
- The Color custom field has now been created
Now add another custom field of Stockable Variant type Size and Color and add the above added string custom fields to this custom field. Take these steps to create the custom field:
- Click on Custom Fields in the left menu in the Products section
- Click on New
- Fill in the following fields:
- Custom FIeld Type: Plug-ins
- Title: Size and Color (Remember this name as you will need it later in the CSV file)
- Published: Yes
- Parent: Don't change
- Cart Attribute: Yes
- Cart Input: Yes
- Description: Don't change
- Default: Make sure this field has value stockablecustomfields
- Tooltip: Don't change
- Layout position: Don't change
- Admin Only: No
- Is a list?: No
- Hidden: No
- Select a plug-in: Stockable Customfields
- Click Save
- Go to the bottom of the page and notice there a few more options. Here you add one or more existing custom fields.
- Click on Save & Close
- The Custom field has now been created
Creating the CSV file
An example CSV file for existing products looks like this:
"product_sku","product_parent_sku","custom_title","custom_value","custom_multiple","product_name","product_price"
"10001","","Size and Color~Size and Color~Size and Color","stockablecustomfields~stockablecustomfields~stockablecustomfields","Y~Y~Y","Parent product","123"
"10001brbl","10001","Size~Color","M~Green",,"Child Medium Green",
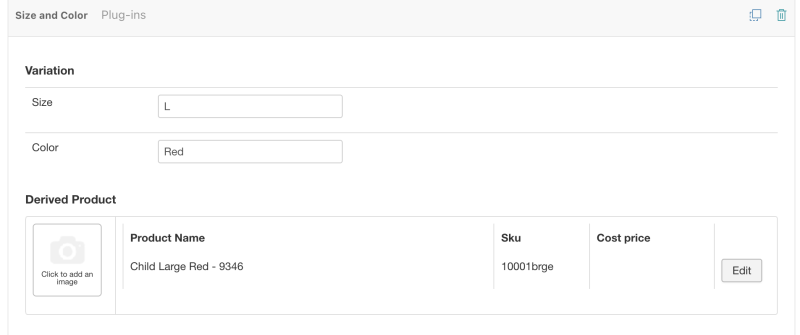
"10001brge","10001","Size~Color","L~Red",,"Child Large Red",
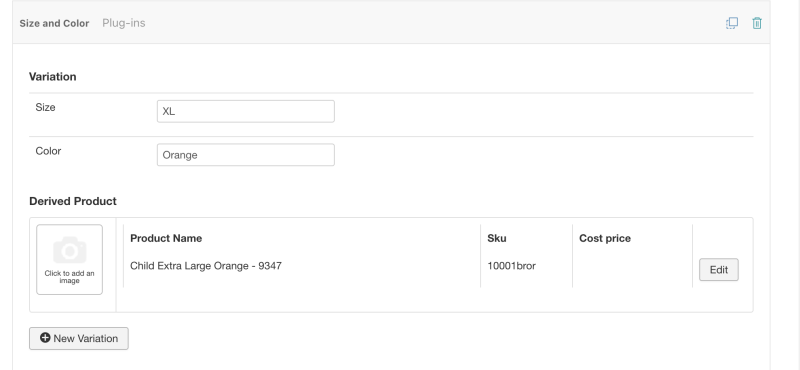
"10001bror","10001","Size~Color","XL~Orange",,"Child Extra Large Orange",Let's have a closer look at the fields
product_sku
This is the unique code for a product.
product_parent_sku
This is the SKU of the parent product.
custom_title
The name of the custom field. The correct name can be found on the Custom Fields page in VirtueMart in the column named Title. This is the name used in step 3.1 when creating the custom field.
custom_value
Parent product
This must always be stockablecustomfields for the parent product, as many times as there are child products. Each value separated with the ~-symbol.
Child product
The child products contain the values of the actual field. Each value separated with the ~-symbol. In this case we added 2 fields, Size and Color to the stockable customfield, so each child product gets two values.
custom_multiple
This is only needed for the parent product and is always Y, as many times as there are child products. Each value separated with the ~-symbol.
product_name
The name of the product.
product_price
The price of the product. This field is required for the parent product otherwise the selections will not show up.
Results after import
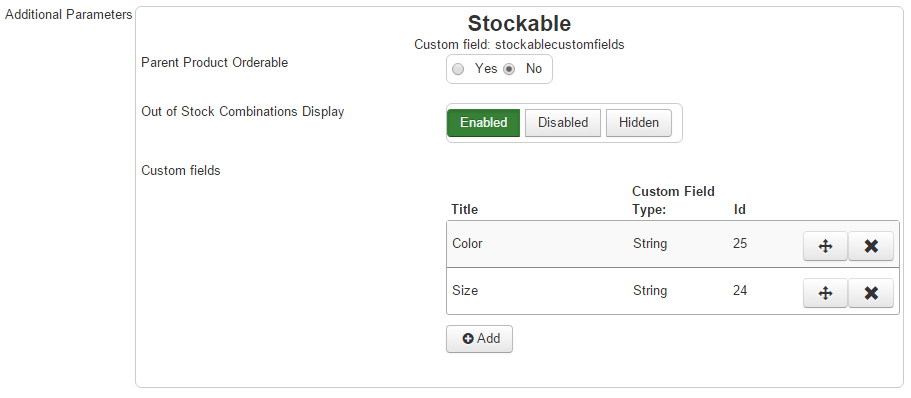
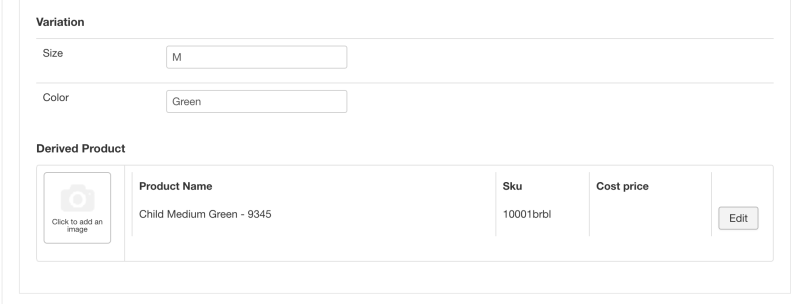
On VirtueMart Product edit page on Custom fields tab check the results for parent product as shown in images below
Parent product as derived
To set parent as derived
-
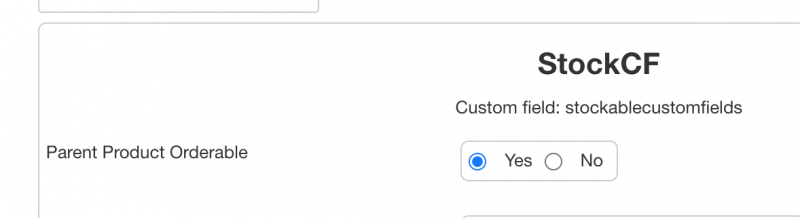
In VirtueMart custom fields page for Stockable custom field set Parent Product Orderable as Yes. Save the custom field.
-
In import file add product_as_derived field and for parent product row set value as 1.
An example CSV file with parent product set to derived:
"product_sku","product_parent_sku","custom_title","custom_value","custom_multiple","product_name","product_price","product_as_derived","custom_parent_title","custom_parent_value"
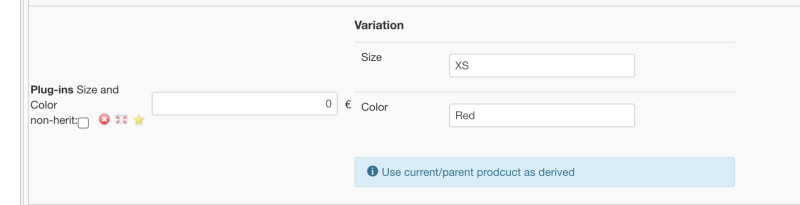
"10001","","Size and Color~Size and Color~Size and Color","stockablecustomfields~stockablecustomfields~stockablecustomfields","Y~Y~Y","Parent product","123",1,"Size~Color","XS~Red"
"10001brbl","10001","Size~Color","M~Green",,"Child Medium Green",,,
"10001brge","10001","Size~Color","L~Red",,"Child Large Red",,,
"10001bror","10001","Size~Color","XL~Orange",,"Child Extra Large Orange",,,You can also set parent product as a variant by setting parent product as derived. Use fields custom_parent_title and custom_parent_value to set value to parent product along with product_as_derived field set to 1.The main use of setting parent product as derived is that there is a variation selected once user visits the product details page.
Results after import
Custom fields for all with Stockable custom fields
The Size and Color custom fields shown above is of custom type String, CSVI also supports customfieldsforall custom fields type in Stockable custom fields. The procedure is same as above, add a customfieldsforall field in VirtueMart custom fields page and add the field to Stockable custom fields custom field.
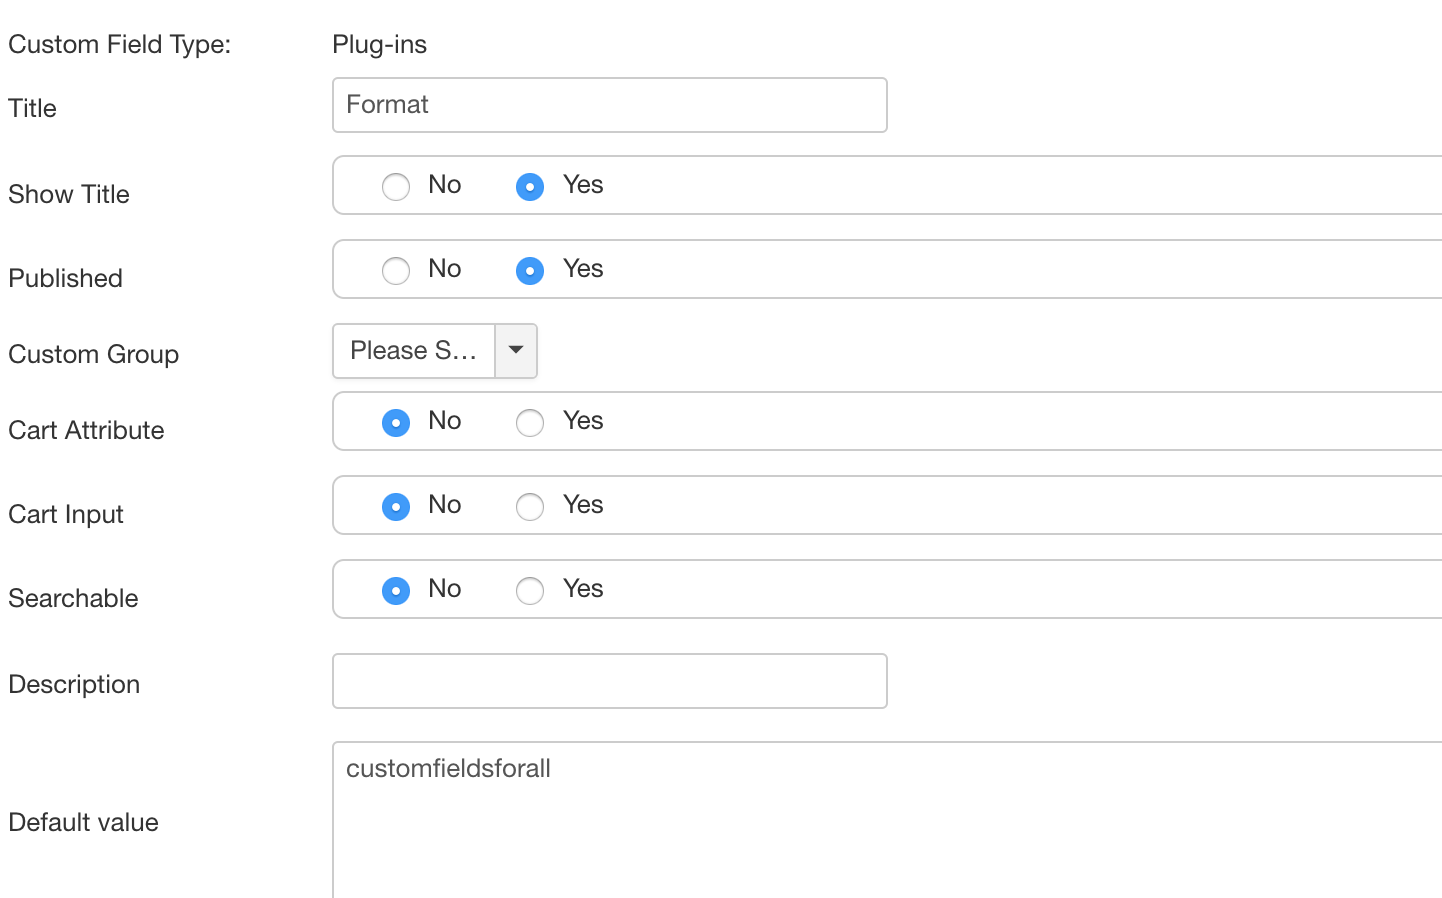
Add Format custom field of type Custom fields for all by following the below steps
- Click on Custom Fields in the left menu in the Products section in VirtueMart
- Click on New
- Fill in the following fields:
- Custom Field Type: Plug-ins
- Title: Format
- Published: Yes
- Parent: Don't change
- Description: Don't change
- Default: Don't change
- Tooltip: Don't change
- Layout position: Don't change
- Admin Only: No
- Is a list?: No
- Hidden: No
- Select a plug-in: Custom fields for all
- Click Save
- Click on Save & Close
- The Custom field for custom fields for all has now been created
-
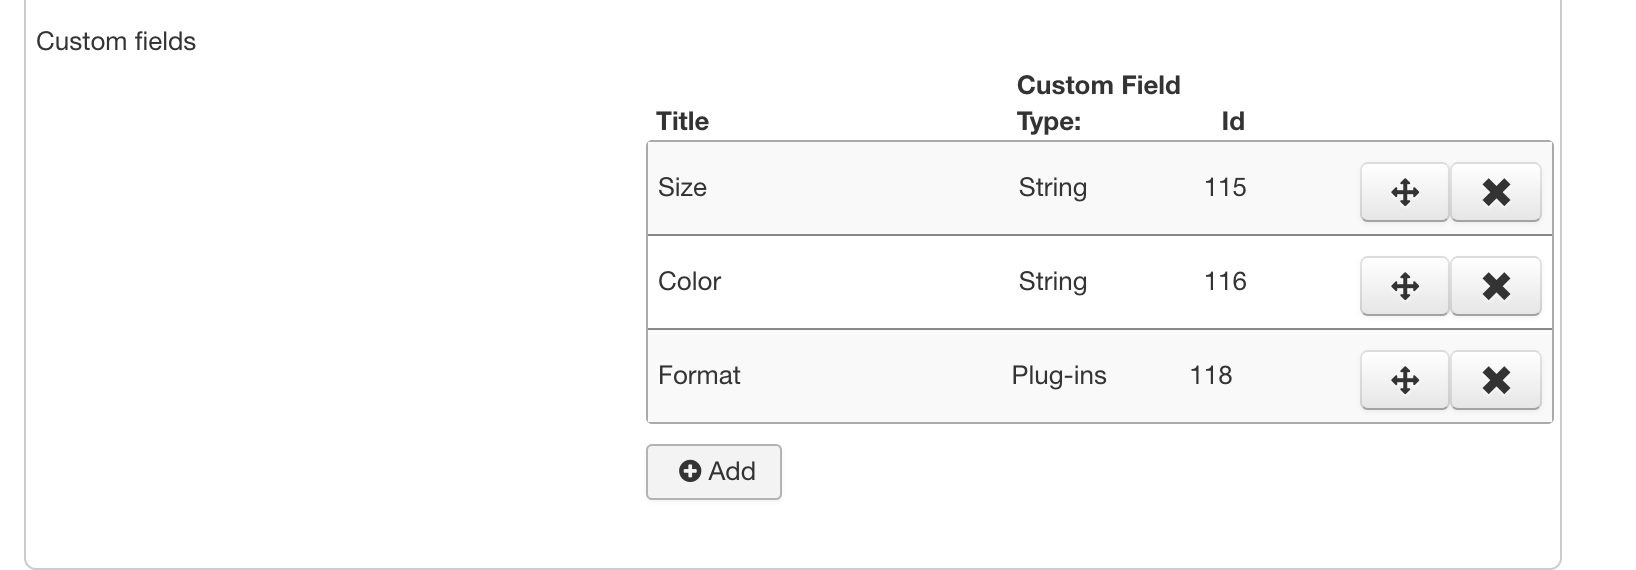
- Add the custom fields for all custom field to Stockable custom field Size and Color.
"product_sku","product_parent_sku","custom_title","custom_value","custom_multiple","product_name","product_price"
"10001","","Size and Color~Size and Color~Size and Color","stockablecustomfields~stockablecustomfields~stockablecustomfields","Y~Y~Y","Parent product","123"
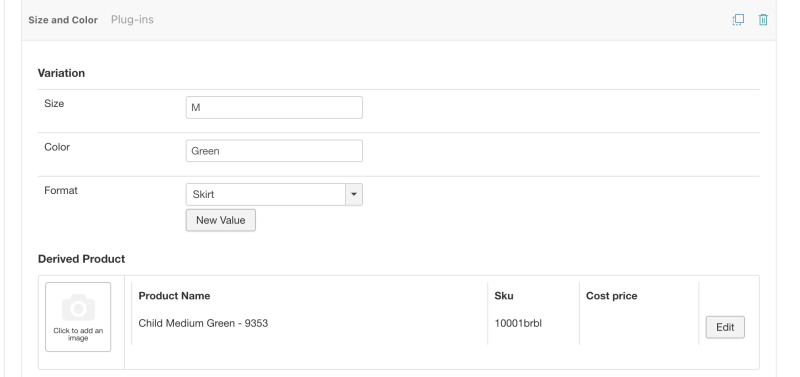
"10001brbl","10001","Size~Color~Format","M~Green~Skirt",,"Child Medium Green",
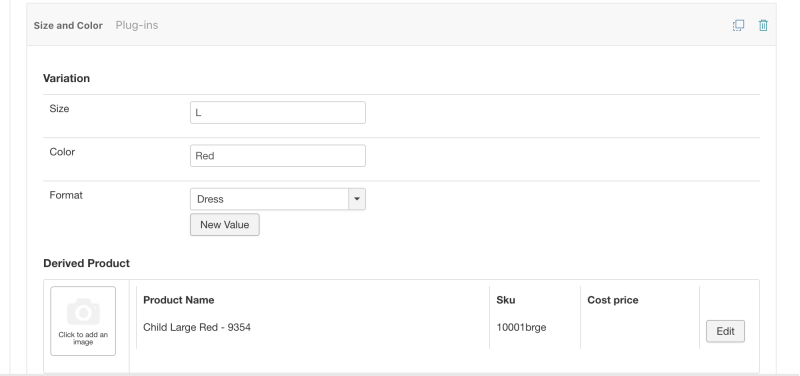
"10001brge","10001","Size~Color~Format","L~Red~Dress",,"Child Large Red",
"10001bror","10001","Size~Color~Format","XL~Orange~Shirt",,"Child Extra Large Orange",Results after import
On VirtueMart Product edit page on Custom fields tab check the results for parent product as shown in images below
Some important notes
- Only a parent product can be used to import stockable information
It is also possible to import customfieldsforall with stockablecustomfields in one import file with proper use of custom fields. An example would be like below
"product_sku";"product_parent_sku";"custom_title";"custom_value";"custom_multiple";"custom_param";"product_name";"product_in_stock";"product_price"
"10001";"";"Type~Material~Size and Color~Size and Color~Size and Color";"customfieldsforall~customfieldsforall~stockablecustomfields~stockablecustomfields~stockablecustomfields";"~~Y~Y~Y";"Semi soft~Plastic";"Product with filter";"0";"100"
"10001brbl";"10001";"Type~Material~Size~Color";"customfieldsforall~customfieldsforall~M~Green";"";"Soft~Foam";"Child Medium Green";
"10001brge";"10001";"Type~Material~Size~Color";"customfieldsforall~customfieldsforall~L~Red";"";"Hard~Metal";"Child Medium Red";
"10001bror";"10001";"Size~Color";"XL~Orange";"";"";"Child Extra Large Orange";
More articles on this subject
Import VirtueMart images
Background information
To import images into VirtueMart there are a few things you need to know before hand. The default location of images in VirtueMart is images/stories/virtuemart/, from here images are grouped by their type e.g.:
- product
- category
- etc.
All product images reside in the folder images/stories/virtuemart/product. How does RO CSVI know where to locate your images? This is a combination of 2 settings:
- Path set in the template
- Name in the CSV file
On import RO CSVI combines these 2 settings to get the full path to the image. As an example the path in the template is set to images/stories/virtuemart/product and the file_url field in the CSV file is set to example.jpg. This will create a full path of images/stories/virtuemart/product/example.jpg. This is the correct path.
Preparing the template
Load the template you want to use for import. If you don't have a template yet, see the Create a template tutorial on how to create one.
Adding the fields
Your template might already have some fields, for the images we need to add 2 more fields:
- file_url
- file_url_thumb
Optional field (Available as of CSVI Pro 6.6.0)
- media_published
You can publish media files by using the media_published field with a value of Yes/yes/Y/y/1 to publish or No/no/N/n/0 to unpublish. If this field is not added in import, product's published field value will be taken else default value is 0, which is unpublish state.

Let's tell RO CSVI which fields you want to import.
- Under the Field name column, select the field file_url
- The other options we leave empty as they are fine
- Click on the Save or Save&Close button
- Repeat step 1 - 3 for the file_url_thumb

To make sure we don't lose anything, click on Save again to save your template.
Setting the template image options
The Image tab has a lot of options for managing your images. For now we will look at the general options. The most important option here is the Process images.
- Yes
This means that RO CSVI will perform all the image options set for example, create a thumbnail - No
This means that RO CSVI will not do any image processing.
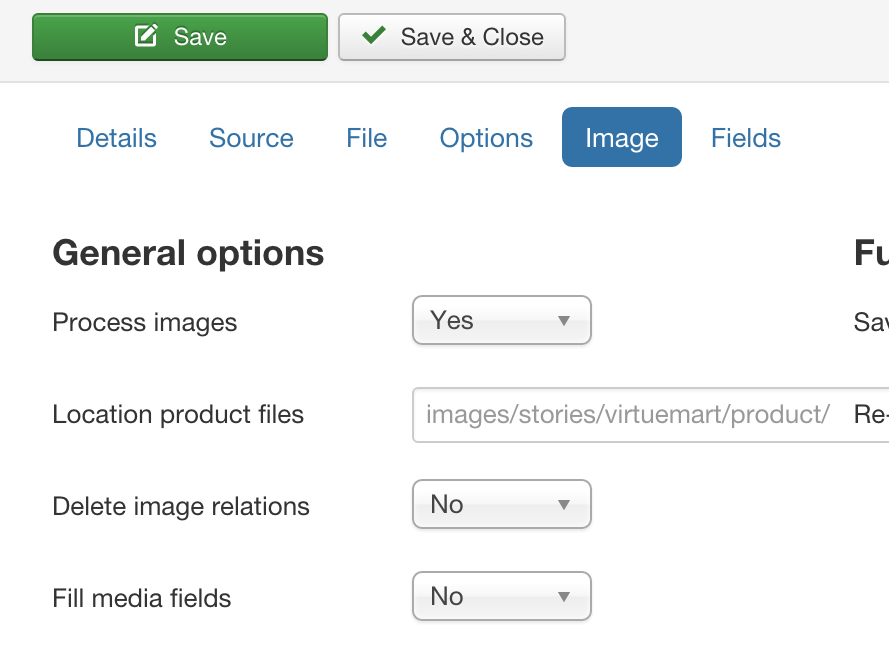
We set the Process images to Yes and then configure the thumbnail settings because we want to let RO CSVI create a thumbnail.
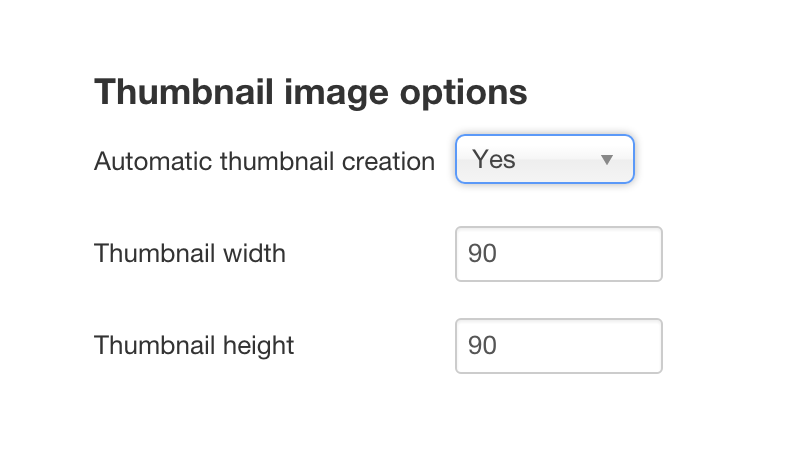
To enable the thumbnail creation set the option Automatic thumbnail creation to Yes and if you want set the thumbnail size you would like.
Creating the import file
In your import file, you need to add 2 more columns:
- file_url
Here you put the name of the main image for example hammer.png. Multiple images separated by |. - file_url_thumb
Here you put the name of the thumbnail image, always prefixed by resized for example resized/hammer.png. Multiple images separated by |.
Let's create our CSV file:
"product_sku", "product_name", "category_path", "product_desc", "file_url", "file_url_thumb", "file_title", "file_description", "file_meta", "file_ordering"
"H01", "Hammer", "Hand Tool/Indoors", "A great hammer to let out all your frustration", "hammer.png", "resized/hammer.png", "Hammer", "A great hammer", "hammer,tool","1"
Save these 2 lines in a file or download the file by clicking here.
This completes the second step of the image path, we now have a complete path of images/stories/virtuemart/product/hammer.png
To be able to create a thumbnail upload an image called hammer.png to your server in the folder images/stories/virtuemart/product.
Import time
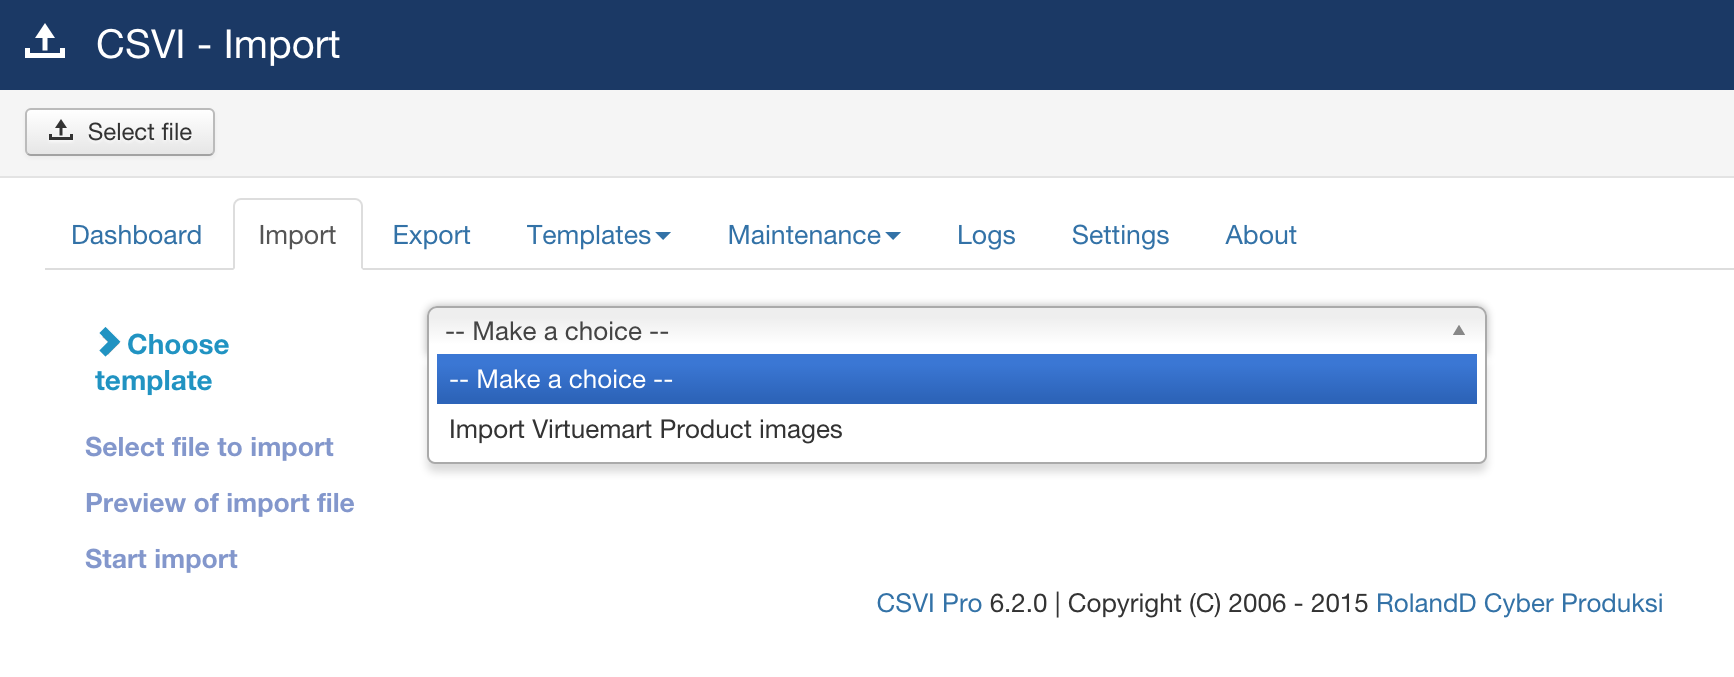
With our template configured and our file created, we are ready to import. Select the template from the import tab.
Click on Select File.
On the source option we will load the file from our computer. Click on Choose File and select your import file. Then click on the Preview button in the top right hand corner.
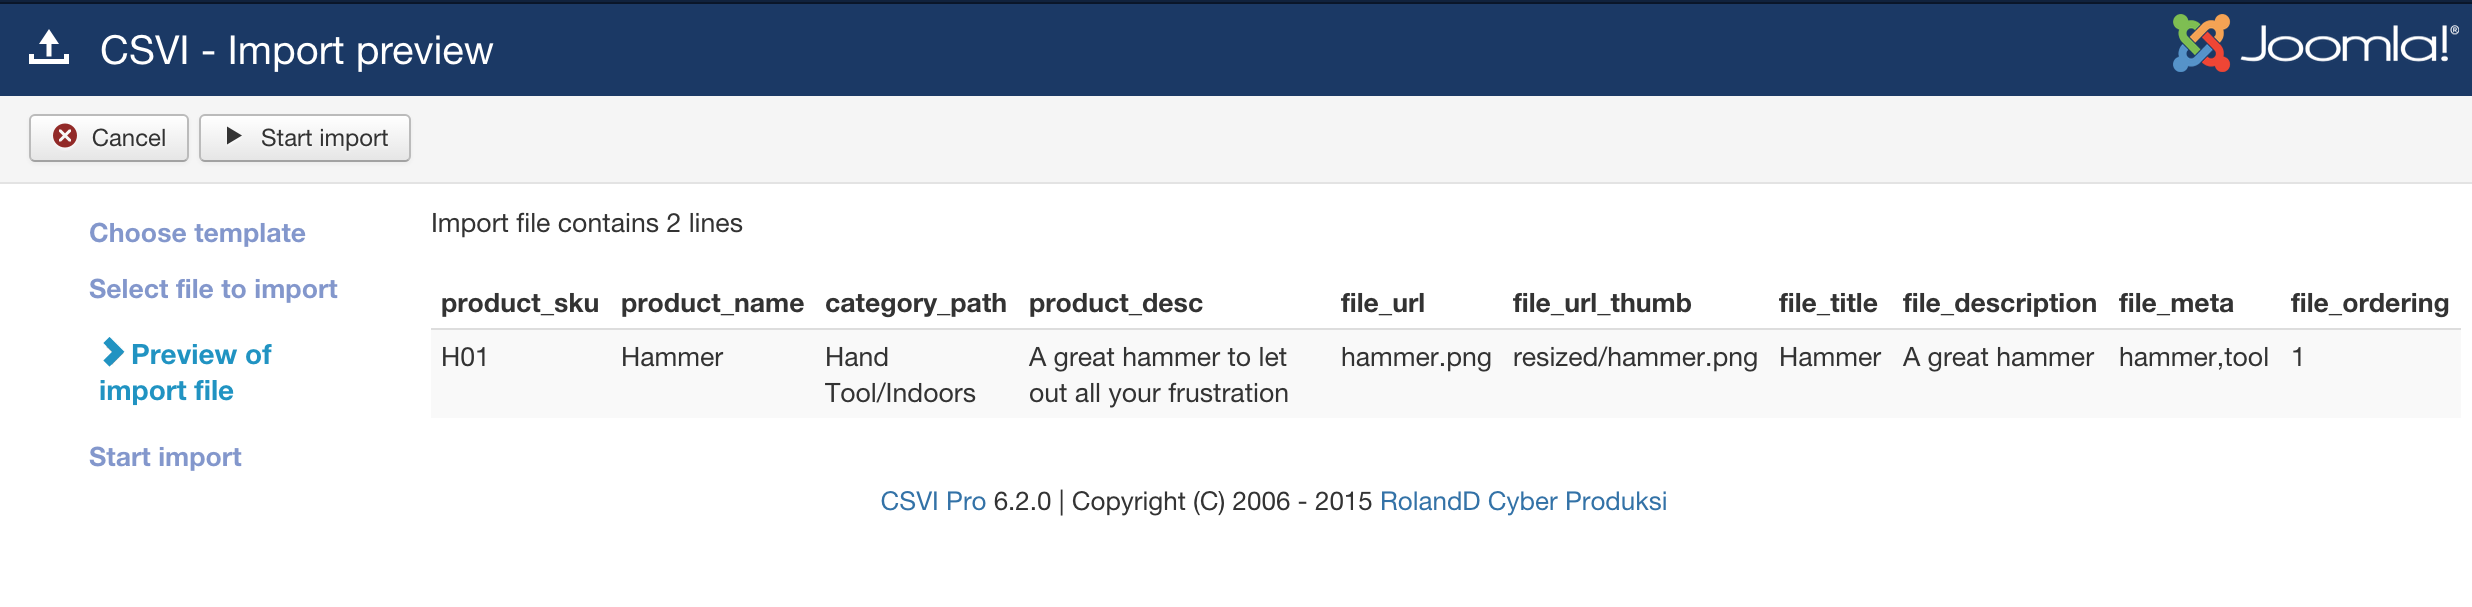
The list of fields in CSV would be shown as preview. Now click on Start import in the top right hand corner.
The result
When the import is done you will see a screen like this:
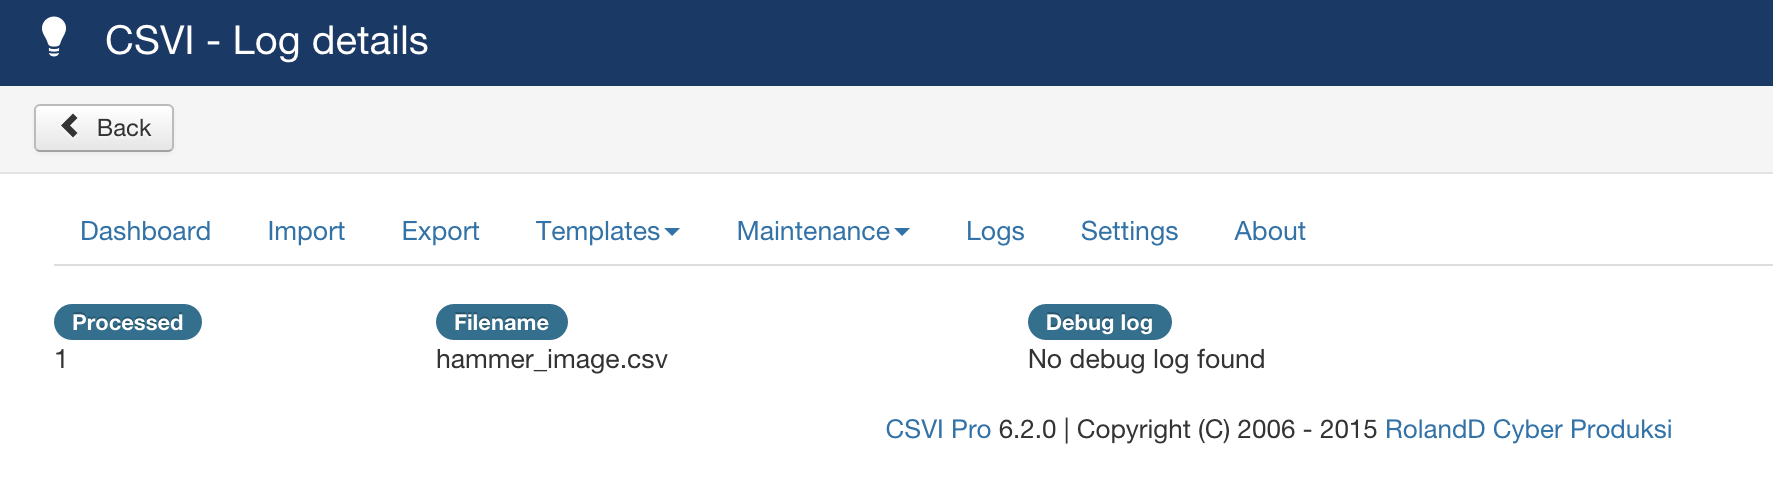
The final page shows that the processed file count and the name of the file with debug information. There you go, you have succesfully done a VirtueMart image import.
What's next?
The next thing you can do is, experiment. There are a lot of more features in RO CSVI you can use for example:
- Watermark images
- Store remote images on your server
- Resize large images
Troubleshooting
Even after succesful import if the images are not shown on VirtueMart backend, check the extension of the image. VirtueMart checks for image with extension as lowercase like .jpg or .gif. Make sure to change the case of your images and then import so VirtueMart can find the images.
Further reading
Other good sources of information are:
Shipment method
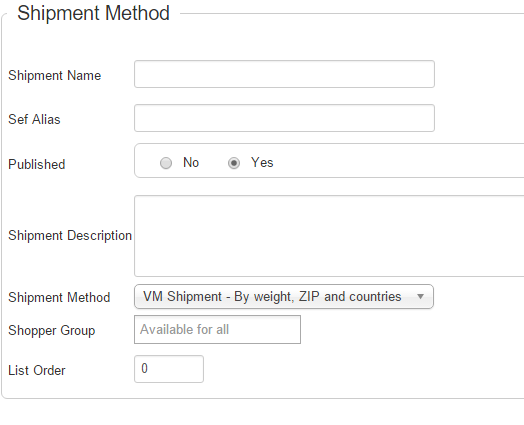
| VirtueMart | CSVI Import | CSVI Export |
|---|---|---|
| Shipment Name | shipment_name | shipment_name |
| Published | published | published |
| Shipment Description | shipment_desc | shipment_desc |
| Shipment Method | shipment_element | shipment_element |
| Shopper Group | virtuemart_shoppergroup_id | virtuemart_shoppergroup_id |
| List Order | ordering | ordering |
Import Generic child variant for VirtueMart
Generic child variant for VirtueMart would help you to show products with different size settings keeping one product as a base which would be the parent product. All you need to do is create generic child variant custom field type in VirtueMart and link it among your products. Generic variant is a individual product by itself so it has its own description, images and details as how a normal product would do.
VirtueMart Prices import
A template can be created by following these steps:
- Go to Components -> RO CSVI -> Templates
- Click New
- Give the template a name, say for example VirtueMart Price import
- Set Action to Import
- Set Component to VirtueMart
- Set Operation to Price
- Click Next: Select Source
- Source is set default to Load from your computer. No need for change.
- Click Next: Select options
- The default values are OK, change if needed.
- Click Next: Select fields
- Nothing needed here as we set to Use column headers as configuration in step 10.
- Click Next: Finalize
- All done here
- Click Close to return to the list of templates or Edit if you want to fine-tune the template further.

- Go to Components -> RO CSVI -> Templates
- Click on Template fields
- In the Search Tools select your template
- Click on New to add a single field or click on Quick Add to add multiple fields.
Quick Add
The Quick Add Option allows you to quickly add multiple fields to a template. It is not possible to set any settings per field here but that can be done after the fields have been added to the template.

- product_sku
- shopper_group_name
- product_currency
- price_quantity_start
- price_quantity_end
- product_price
The import can be run by following these steps:
- Go to Components -> RO CSVI -> Import
- Select the template created earlier with name VirtueMart price import
- Click Select file
- Select the file to import
- Click Preview
- You now see a preview of the file as to how CSVI sees the file
- Click Start import
- The import is run
- The Log details page will be shown with information regarding the import if the Enable logging is enabled in the template

Example fields to update shopper group
"product_sku";"shopper_group_name";"shopper_group_name_new";"product_currency";"price_quantity_start";"price_quantity_end";"product_price"
"H01";"-default-";"Gold Level";"EUR";"1";"10";"20"
"H01";"-default-";"Gold Level";"EUR";"11";"21";"18" "H01";"Gold Level";"*";"EUR";"0";"0";"18"
Example fields to update price
"product_sku";"shopper_group_name";"product_currency";"price_quantity_start";"price_quantity_end";"product_price";"product_price_new"
"H01";"-default-";"EUR";"1";"10";"20";"22.50"
"H01";"-default-";"EUR";"11";"21";"18";"19,50"
"H01";"Gold Level";"EUR";"0";"0";"18";"19"
To delete a price of a product add field price_delete and set the value to Y. CSVI will then delete the price during import.
Delete a price
"product_sku";"shopper_group_name";"product_currency";"price_quantity_start";"price_quantity_end";"product_price";"price_delete"
"H01";"-default-";"EUR";"1";"10";"20";"Y"
"H01";"Gold Level";"EUR";"0";"0";"18";"Y"