VirtueMart
Using VatTax percent for Virtuemart order export
Requirements
- CSVI 6.5+
- Joomla 3.0+
- VirtueMart 3.0
Most of the times user wants to export tax percent as separate columns in the export file for Virtuemart order export. This article explains on how to acheive these tax results as separate columns.
For example if there are three VatTax percent in Virtuemart as shown below
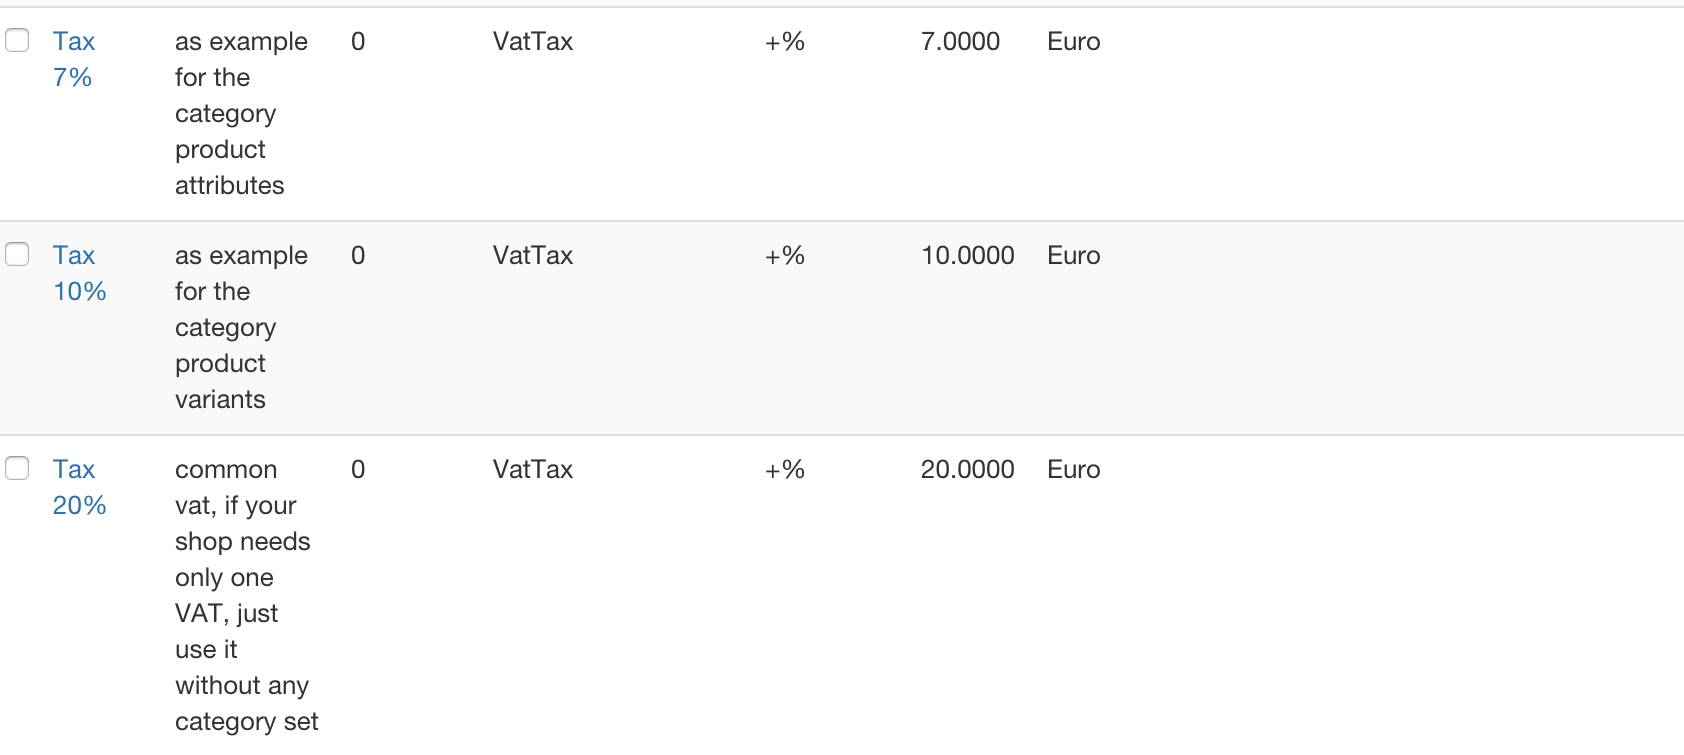
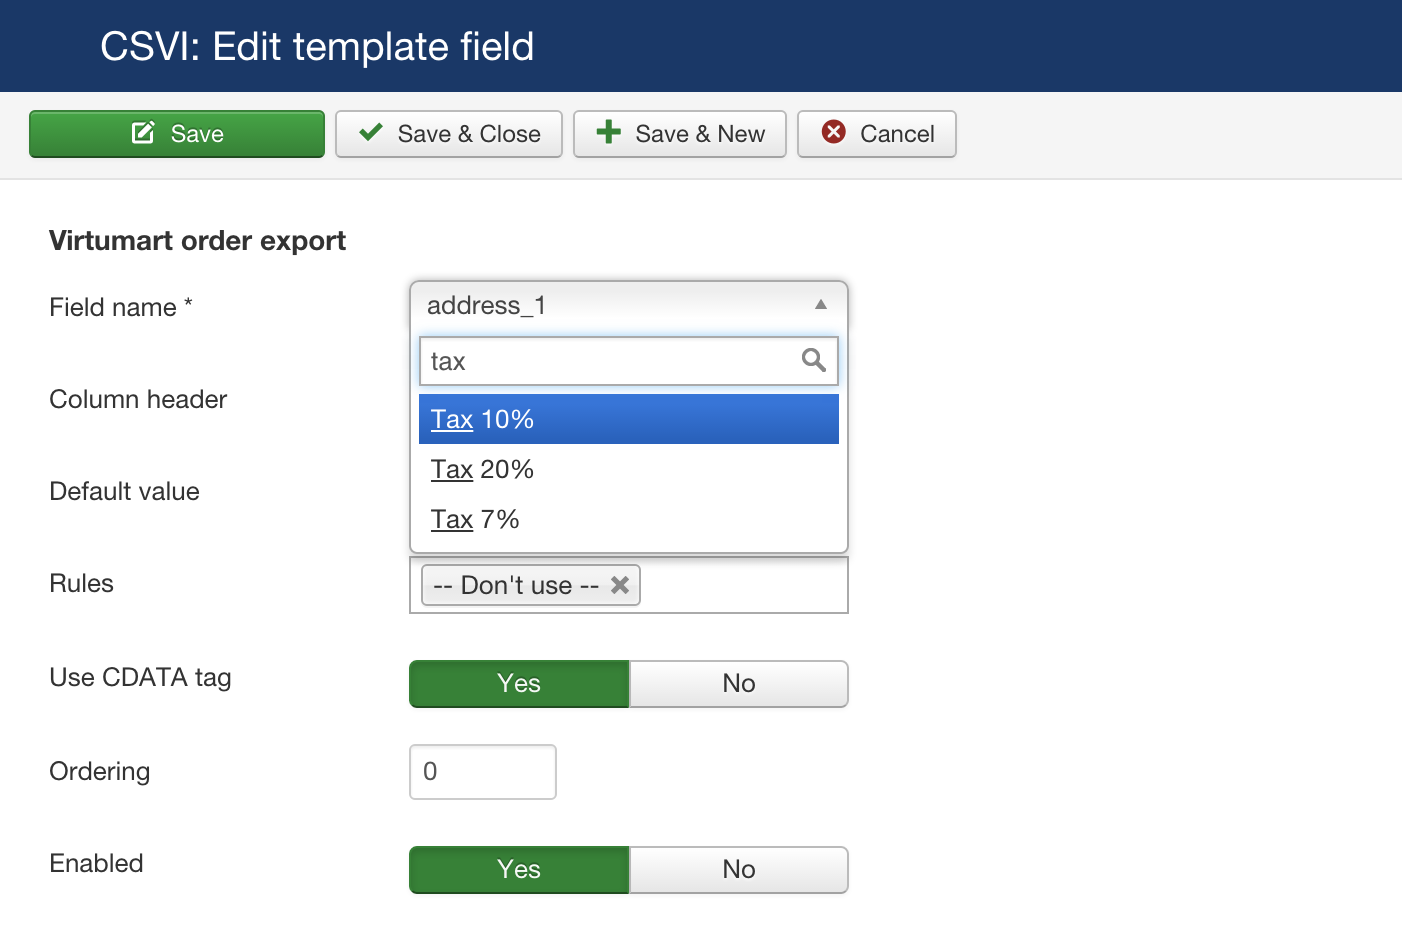
To get these columns in export file, First Update available fields, so these tax percent comes in the list of template fields for Virtuemart order export template. Then these fields can be selected as normal template fields.
Virtuemart stores these tax percent values in order_billTax field if present. CSVI will retrieve these tax values from order_billTax field for added tax percentage for export. A sample export file data is listed below.
| virtuemart_order_id | Tax 20% | Tax 7% | Tax 10% |
| 1 | 42.25 | 7.29 | 0 |
| 2 | 41.25 | 0 | 0 |
| 3 | 0 | 7.29 | 0 |
Export VirtueMart retail prices
Exporting retail prices in VirtueMart is a little complicated because of the shopper groups that prices are assigned to. Since we cannot ask VirtueMart for a price for a specific shopper group we need to workaround that, and this is explained here. This is only related to retail prices, not the product_price field since the product_price field has no calculations applied.
Retail price fields which can be exported are
- basepricewithtax
- discountedpricewithouttax
- pricebeforetax
- salesprice
- taxamount
- discountamount
- pricewithouttax
Preparing the template
The first step is to select a shopper group for which you want to export the retail prices.
- Load the product export template you want to use or make a new one.
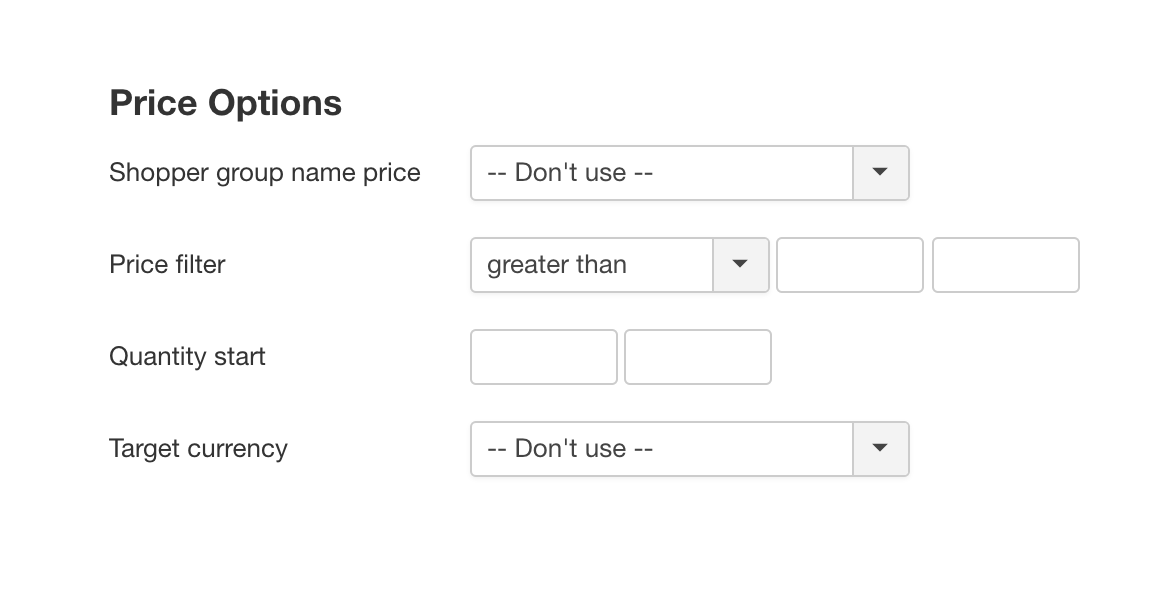
- Click on the Options tab
- Set the Shopper group name price option to the shopper group you want to export. In this example that is the -default- group.
- Save your template
Preparing the user account
Since we cannot tell VirtueMart directly which shopper group to use we must do so indirectly. This is done by changing the shopper group settings of the user account that is going to perform the export.
- Go go to VirtueMart
- Click on Orders & Shoppers
- Click on Shoppers
- Find the user account that is going to perform the export or create one
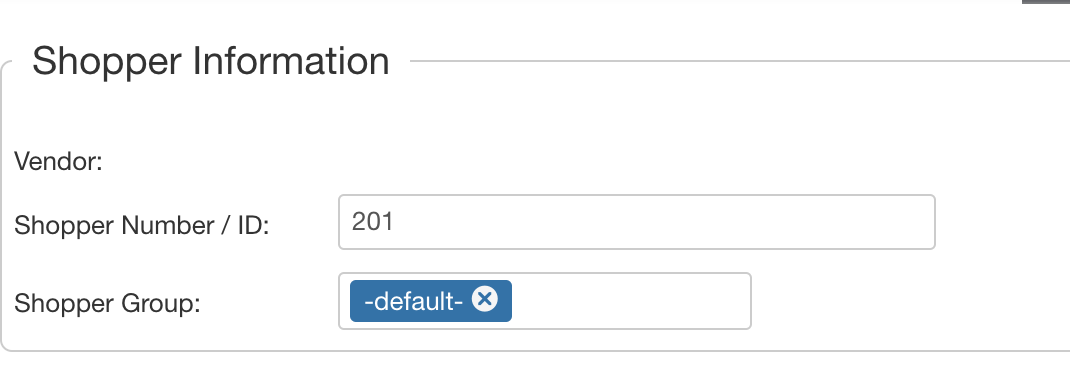
- Edit the user account
- In the option Shopper Group choose the exact same group as you chose in your export template. In this example that is the -default- group. You can only choose 1 shopper group here, if there are multiple only the last shopper group will be used.
- Save the user account
Note: If you have chosen All shopper groups in your export template, you must choose a shopper group here that has no prices assigned to it. It is recommended to create a shopper group just for this purpose.
Running the export
Now that the template and user account have been setup we can run the export to get the retail prices.
- Login to the website with the user account that needs to run the export
- Go to Components -> CSVI Pro -> Export
- Load the export template
- Click on Export
- The exported file will now contain the retail prices of the -default- shopper group
To get the prices of other shopper groups repeat this process for each shopper group you want to export.
Managing multiple shopper groups
In case there are multiple shopper groups for which you need to run exports it is recommended to create a specific user account for each shopper group so you don't have to keep changing the account settings.
Export shows product without tax
Sometimes an export looks like it has no tax. This could actually be correct.
What is happening?
When a file is uploaded and there is no product tax included in the upload, the product gets a product_tax_id of 0. After checking the product in VirtueMart, it does show a tax rate.
However, the database still says 0. After saving the product, the database will still be 0. This happens because the tax rate has not been changed in anyway, so VirtueMart leaves it as it is. There are 2 ways to make this work:
-
Change the tax on the product page to another value and then change it back. VirtueMart will then save the new tax value.
-
Import a tax rate or tax id via CSV Improved
Now CSV Improved can export a product price with tax.
No product SKU found
The message "No product SKU found" is a very common one and the cause is almost always the same. Delimiters.
When importing a file, usually a CSV file in this case, the data is separated by delimiters. For CSV Improved to understand the file that is being imported it needs to be told what delimiters the file is using. Let me show you with an example.
The delimiter setting in CSV Improved:

The file:
~product_sku~^~product_name~^~category_path~
~Wb1~^~Product1~^~Home/New Products~
~Wb2~^~Product2~^~Home/Products~
~Wb3~^~Product3~^~Home/Products~
The ^ separates the fields and the ~ encloses the text. Now CSV Improved knows how to read the file. Make sure both delimiters always match.
Debugging Google Base Export
Many people have reported issues with the Google Base upload after exporting products using CSV Improved. In most cases it is not CSV Improved exporting a bad file but the file containing characters Google Base does not like. These characters are often not even easily visible but they can be discovered using the right tools.
Procedure
This guide is based on a Linux operating system, same or similar tools might be available on Windows but no guarantees.
Manual mode: Locating the offending character
The first step is to check if your XML file is well-formed. This means it only checks if there are no open tags as a bonus we also get a message if it finds offending characters. The same characters Google doesn't like.
To do this, log into your system and go to where your XML file is. Once there, execute the following command:
xmlwf myfile.xml
In case the file is perfectly fine, you will receive no message. This means your file is ready to upload to Google Base. If there is a problem with the file you will receive a message that includes both the line number and the character position of the offending character. This is important information because now it is clear where the problem is. The message looks like this:
myfile.xml:7:291: not well-formed (invalid token)
In this example the offending character is on line 7 and position 291.
Semi-automatic: Locating the offending character
For this task I have written an analyze script in bash and PHP. What the code does is look for any errors the xmlwf generates and analyze the XML file for the error. The offending character is then put into a logfile. Here is the bash script:
#!/bin/sh
# Set some variables
FOLDER='/home/mysite/jobs/'
FILE='myfile.xml'
LOGFILE='filecheck.log'
ANALYZEFILE='analyze.log'
ANALYZESCRIPT='analyze.php'

# Lets go to the appropiate folder
cd $FOLDER

# Check if a new file has been created
if [ -e $FILE ]; then {
    # Check if the file is well formed
    `/usr/bin/xmlwf $FOLDER/$FILE | grep -q 'not well-formed'`

    if [ $? -eq 0 ] ; then {
                echo "XML not valid" >> $FOLDER/$LOGFILE
                message=`/usr/bin/xmlwf $FOLDER/$FILE`
                echo $message >> $FOLDER/$LOGFILE

                # Analyze the error
                TEXT=${message%%:*}; rest=${message#*:}
                # Get the line number
                LINEPOS=${rest%%:*}; rest=${rest#*:}
                # Get the position where the error is
                CHARPOS=${rest%%:*};

                # Put the offending line in a file to be analyzed
                `sed $LINEPOS'q;d' $FOLDER/$FILE > $ANALYZEFILE`

                # Analyze the file
                `/usr/bin/php -f $FOLDER/$ANALYZESCRIPT analyzefile="$ANALYZEFILE" charpos="$CHARPOS" >> $FOLDER/$LOGFILE`
        }
        fi
}
fi

# Add a linebreak
echo "" >> $FOLDER/$LOGFILE
Here is the PHP script:
/* Get the variables */
list(,$analyzefile) = explode("=", $argv[1]);
list(,$charpos) = explode("=", $argv[2]);
list(,$all) = explode("=", $argv[3]);

/* Read the file to be analyzed */
$content = file_get_contents($analyzefile);

if (!$all) {
        /* Output the offending character */
        echo "Position: ".$charpos." ";
        echo "Character: ".substr($content, $charpos, 1);
        echo " ";
        echo "Ordinal: ".ord(substr($content, $charpos, 1));
        echo "\n";
}
else {
$counter = 1;
        while (strlen($content) > 0) {
        echo "Position: ".$counter." ";
        $counter++;
        echo "Character: ".substr($content, 0, 1);
        echo " ";
        echo "Ordinal: ".ord(substr($content, 0, 1));
        echo "\n";
        $content = substr($content, 1, strlen($content));
        }
}
?>
Recommended is to save the bash script to a file called checkfile.sh and the PHP script to a file named analyze.php.
Using the scripts
Save both files in the same location and copy the offending XML file to the location to. The bash script has a few settings:
# Set some variables
FOLDER='/home/mysite/jobs/'
FILE='myfile.xml'
LOGFILE='filecheck.log'
ANALYZEFILE='analyze.log'
ANALYZESCRIPT='analyze.php'
Adjust the variables as needed. The logfiles will be created if they do not exist.
FOLDER = location where the scripts and XML file are
FILE = the name of the XML file to check
LOGFILE = file where the result is saved
ANALYZEFILE = temporary file used to store the offending line
ANALYZESCRIPT = PHP script that analyzes the ANALYZEFILE
To run the script execute the following command:
sh +x checkfile.sh
The result can be found in the file called filecheck.log. This file can be viewed with the following command:
vi filecheck.log
The output can look like this:
XML not valid
/home/mysite/jobs/myfile.xml:7:291: not well-formed (invalid token)
Position: 291 Character: Â Ordinal: 160
Now it is easy to find this character in the offending XML file by opening the XML file like this:
vi myfile.xml
This opens the VI editor and show the myfile.xml file. Jump to the problem line 7 with this command:
:7
Press enter after that. Now it is time to look for the strange character that was shown in the filecheck.log.
Alternatively the analyze.log file can be opened which contains only the single line with the offending character, like this:
vi analyze.log
Now it might be possible to remove the problem character here from the XML file, it is better to remove it from the source (database/VirtueMart/spreadsheet), otherwise a newly created XML file will still contain this problem. The advantage now is, you know where to look for the file.