J2Store
J2Store Product Image Import
| J2Store
This tutorial explains how to setup and run a J2Store product image import. First we will show how to create the template and the needed fields. Finally the import is run and shows the results of the import.
J2Store Product File Import
| J2Store
Requirements
The Product file import is to import files for downloadable product type.
Creating the template
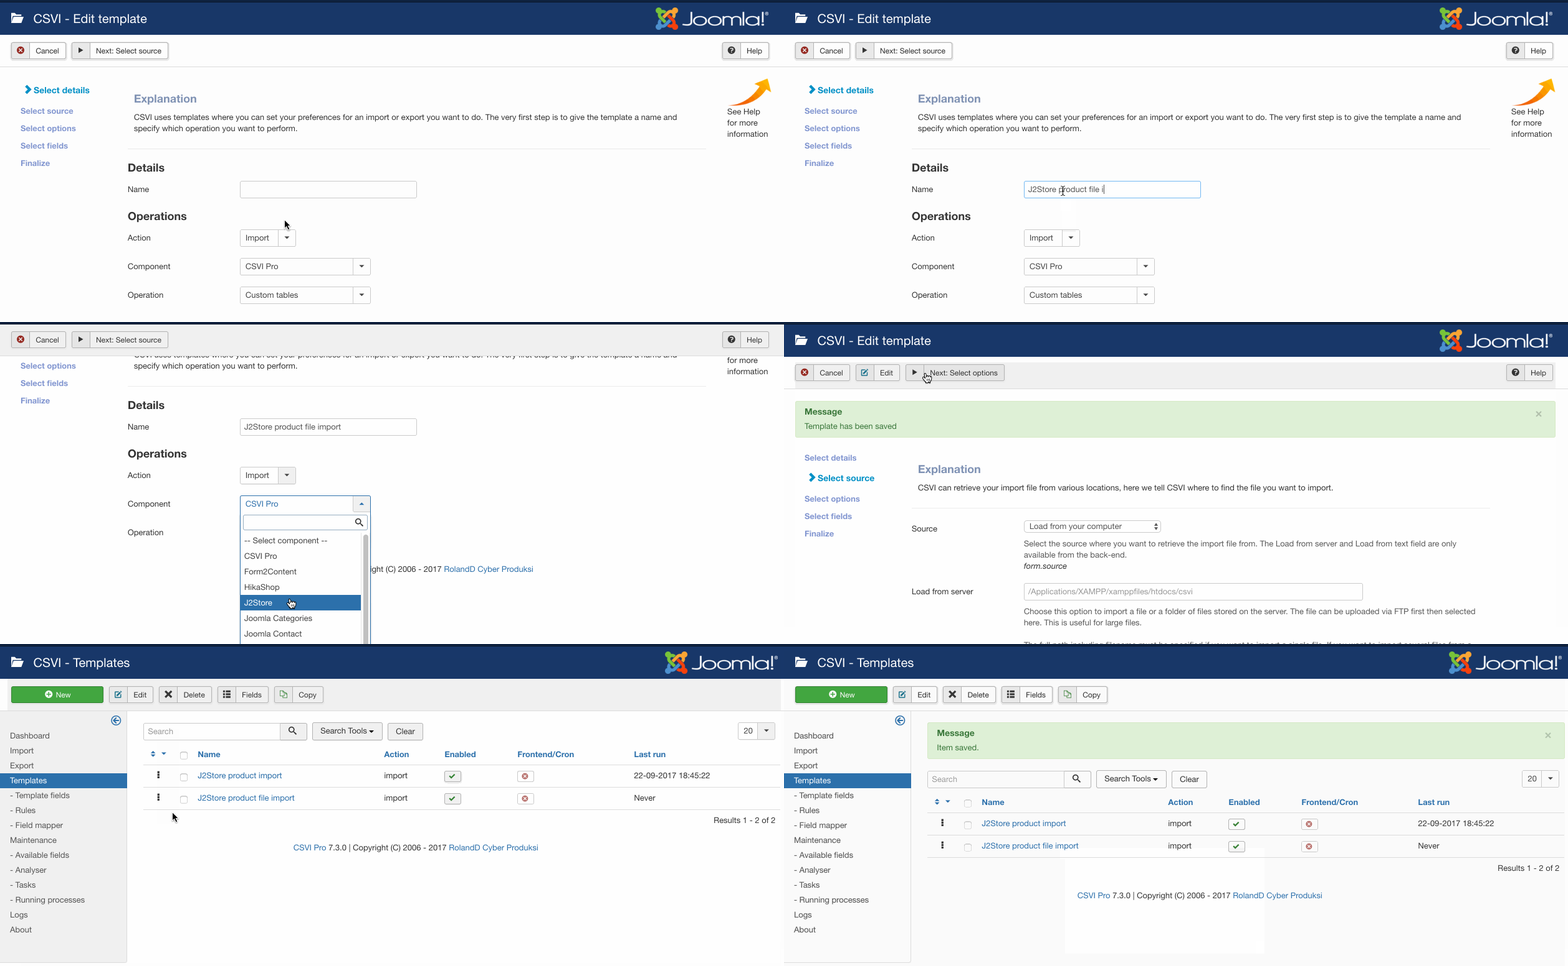
A template can be created by following these steps:
- Go to Components -> CSVI Pro -> Templates
- Click New
- Give the template a name, say for example J2Store product file import
- Set Action to Import
- Set Component to J2Store
- Set Operation to Product file
- Click Next: Select Source
- Source is set default to Load from your computer. No need for change.
- Click Next: Select options
- The default values are OK, change if needed.
- Click Next: Select fields
- Nothing needed here as we set to Use column headers as configuration in step 10.
- Click Next: Finalize
- All done here
- Click Close to return to the list of templates or Edit if you want to fine-tune the template further.
Adding the template fields
Template fields can be added by following these steps:
- Go to Components -> CSVI Pro -> Templates
- Click on Template fields
- In the Search Tools select your template
- Click on New to add a single field or click on Quick Add to add multiple fields.
Quick Add
The Quick Add Option allows you to quickly add multiple fields to a template. It is not possible to set any settings per field here but that can be done after the fields have been added to the template.
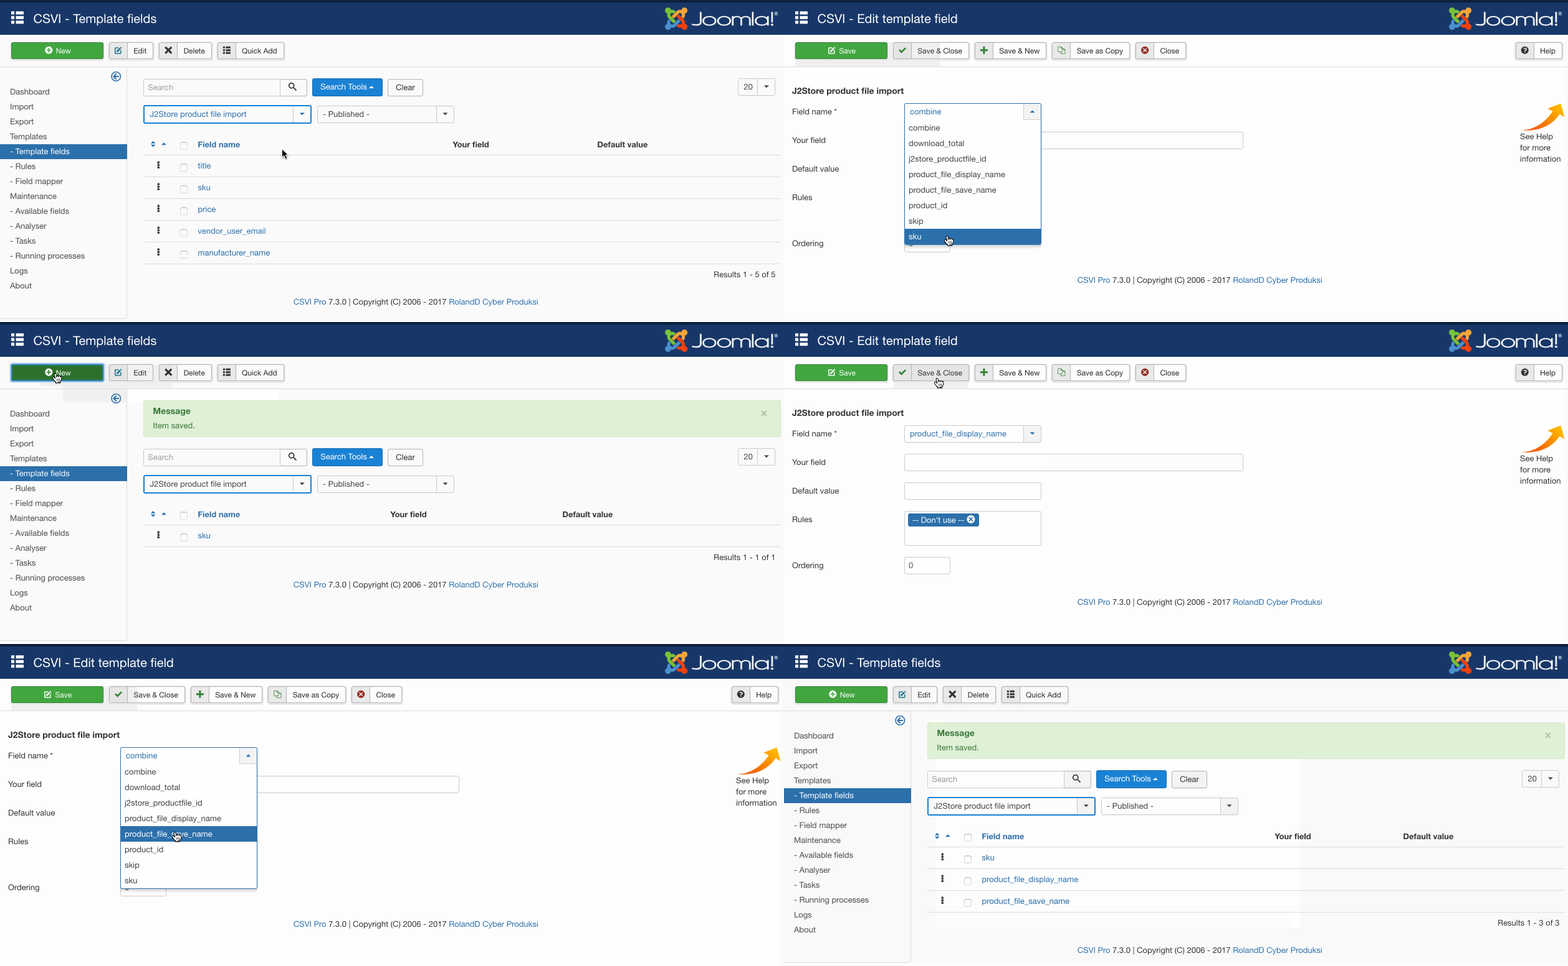
Required fields
- sku
Criteria
- sku
Run the import
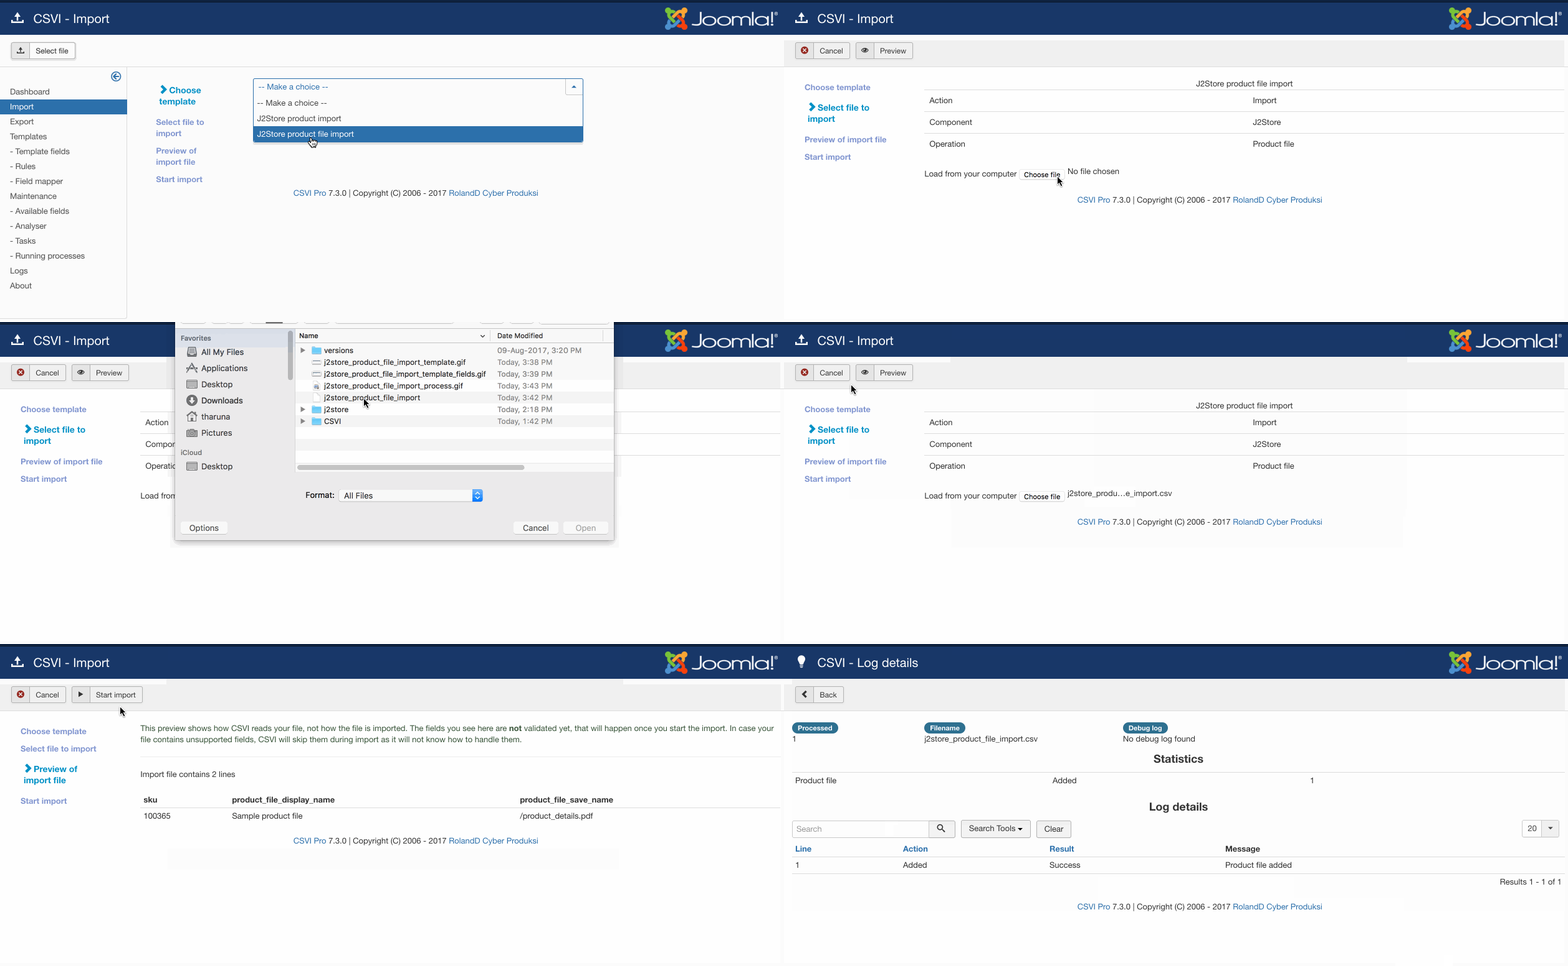
The import can be run by following these steps:
- Go to Components -> CSVI Pro -> Import
- Select the template created earlier
- Click Select file
- Select the file to import
- Click Preview
- You now see a preview of the file as to how CSVI sees the file
- Click Start import
- The import is run
- The Log details page will be shown with information regarding the import if the Enable logging is enabled in the template
Examples
"sku";"product_file_display_name";"product_file_save_name" "100365";"Sample product file";"product_details.pdf"
Example file
J2Store Product Import
| J2Store
Requirements
Creating the template
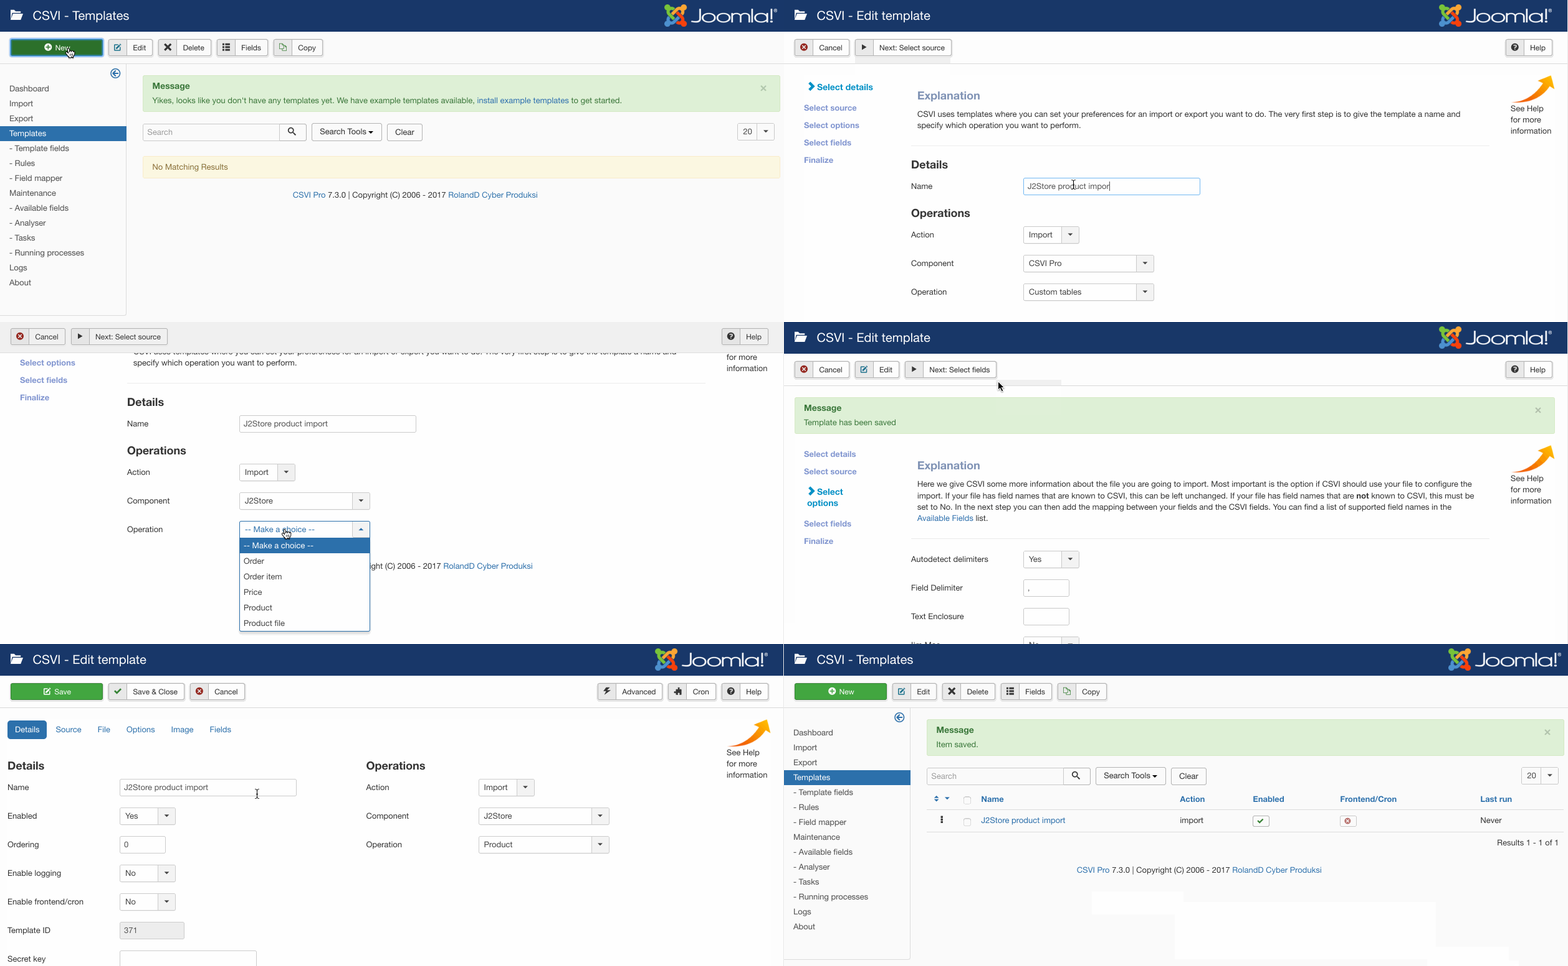
A template can be created by following these steps:
- Go to Components -> RO CSVI -> Templates
- Click New
- Give the template a name
- Set Action to Import
- Set Component to J2Store
- Set Operation to Product
- Click Next: Select Source
- Source is set default to Load from your computer. No need for change.
- Click Next: Select options
- The default values are OK, change if needed.
- Click Next: Select fields
- Nothing needed here as we set to Use column headers as configuration in step 10.
- Click Next: Finalize
- All done here
- Click Close to return to the list of templates or Edit if you want to fine-tune the template further.
Adding the template fields
Template fields can be added by following these steps:
- Go to Components -> RO CSVI -> Templates
- Click on Template fields
- In the Search Tools select your template
- Click on New to add a single field or click on Quick Add to add multiple fields.
Quick Add
The Quick Add Option allows you to quickly add multiple fields to a template. It is not possible to set any settings per field here but that can be done after the fields have been added to the template.
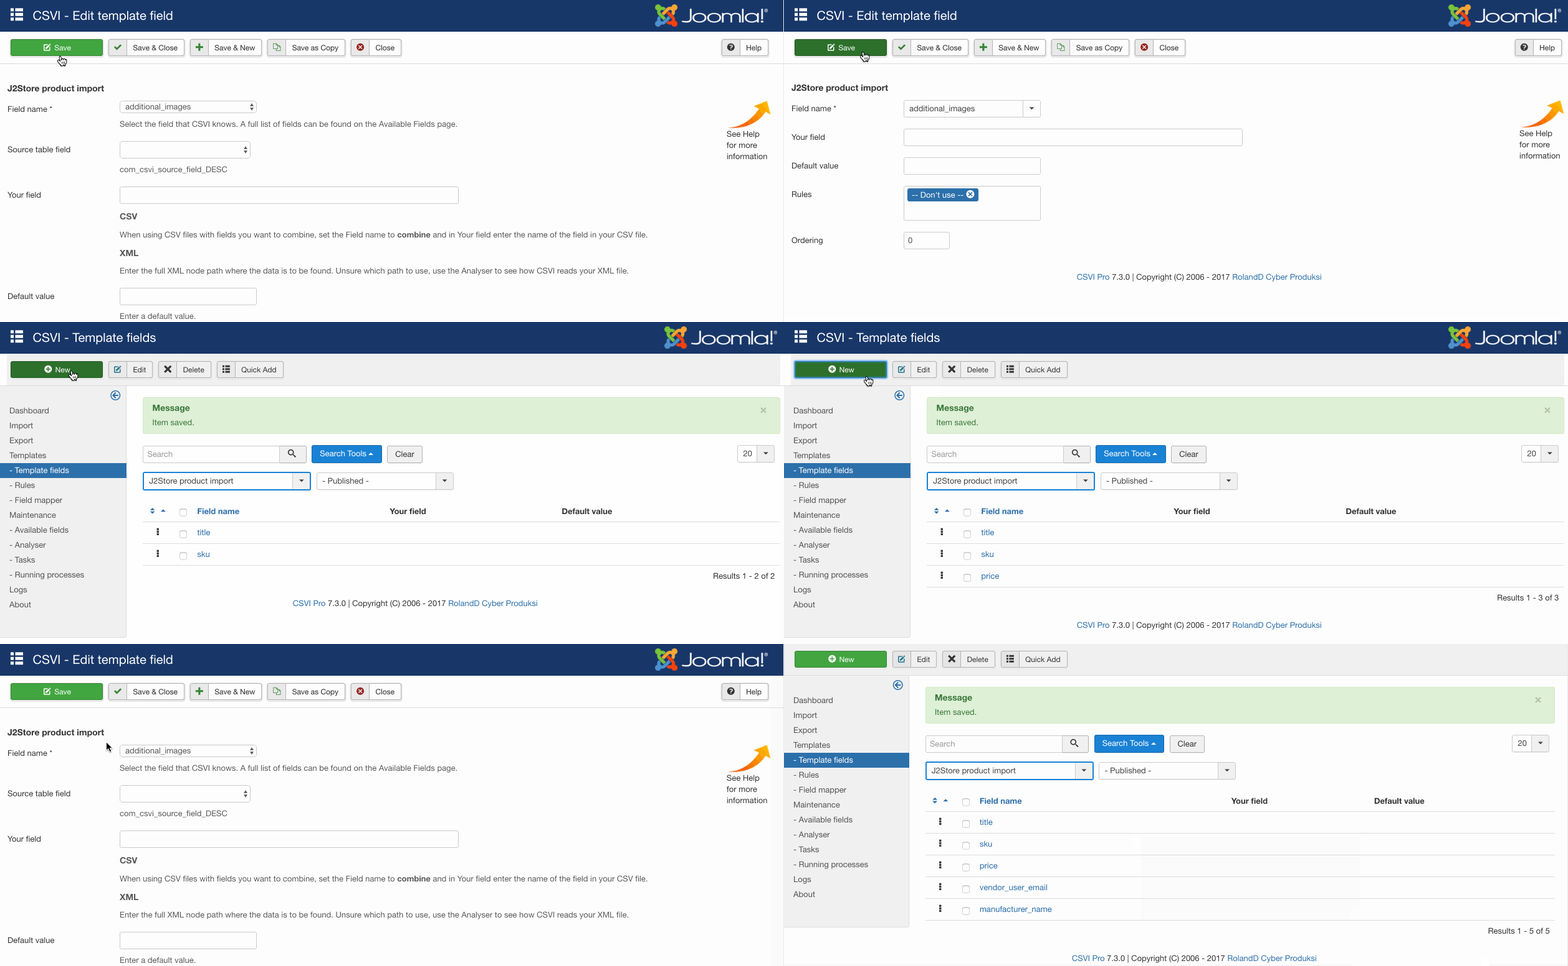
Required fields
- sku
Criteria
- sku
Creating the import file
CSVI uses alias and catid field in order to find the existing Joomla content associated with a product. So to update an existing content you also need to add alias and catid or category_path field along with sku field in import file. This way alias and catid or category_path fields are used to identify the Joomla article for a J2Store product and sku is used to find the product_id of the J2Store product.
For a new product if there are no title or alias field set in import file then sku field will be used as title and alias and the catid or category_path of default category Uncategorised which is usually ID 2 is used for Joomla article for a J2Store product.
Run the import
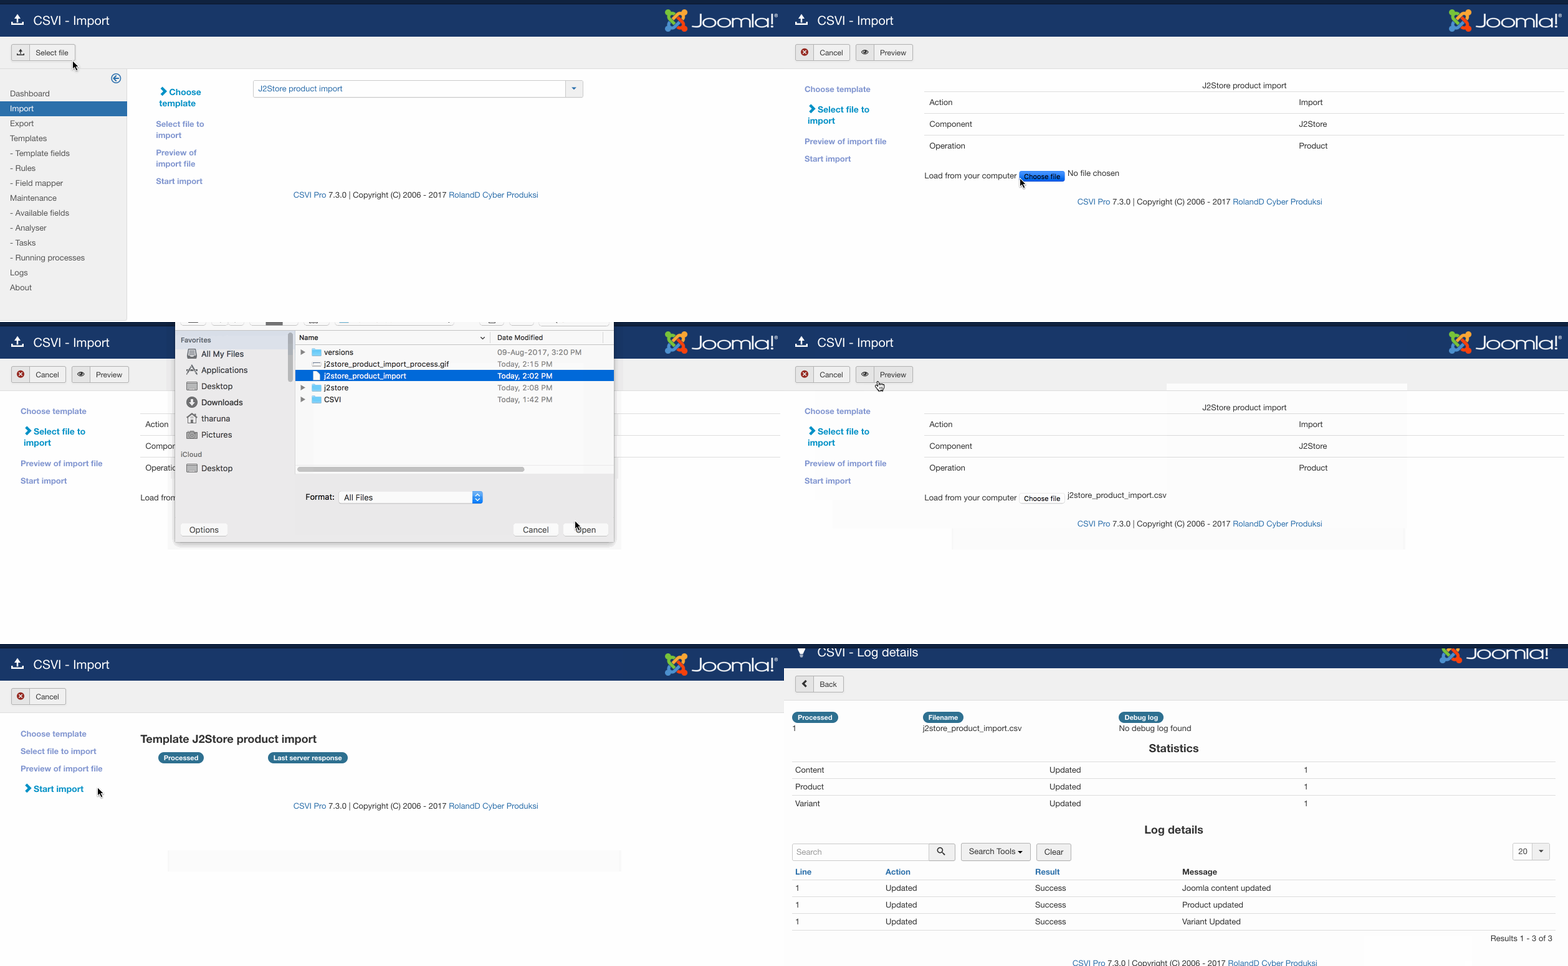
The import can be run by following these steps:
- Go to Components -> RO CSVI -> Import
- Select the template created earlier
- Click Select file
- Select the file to import
- Click Preview
- You now see a preview of the file as to how RO CSVI sees the file
- Click Start import
- The import is run
- The Log details page will be shown with information regarding the import if the Enable logging is enabled in the template
Examples
"title";"sku";"price";"vendor_user_email";"manufacturer_name"
"Sample product";"100365";"140";"user1@localhost.loc";"Test Manufacturer"
Example file
J2Store Order Import
| J2Store
Requirements
Creating the template
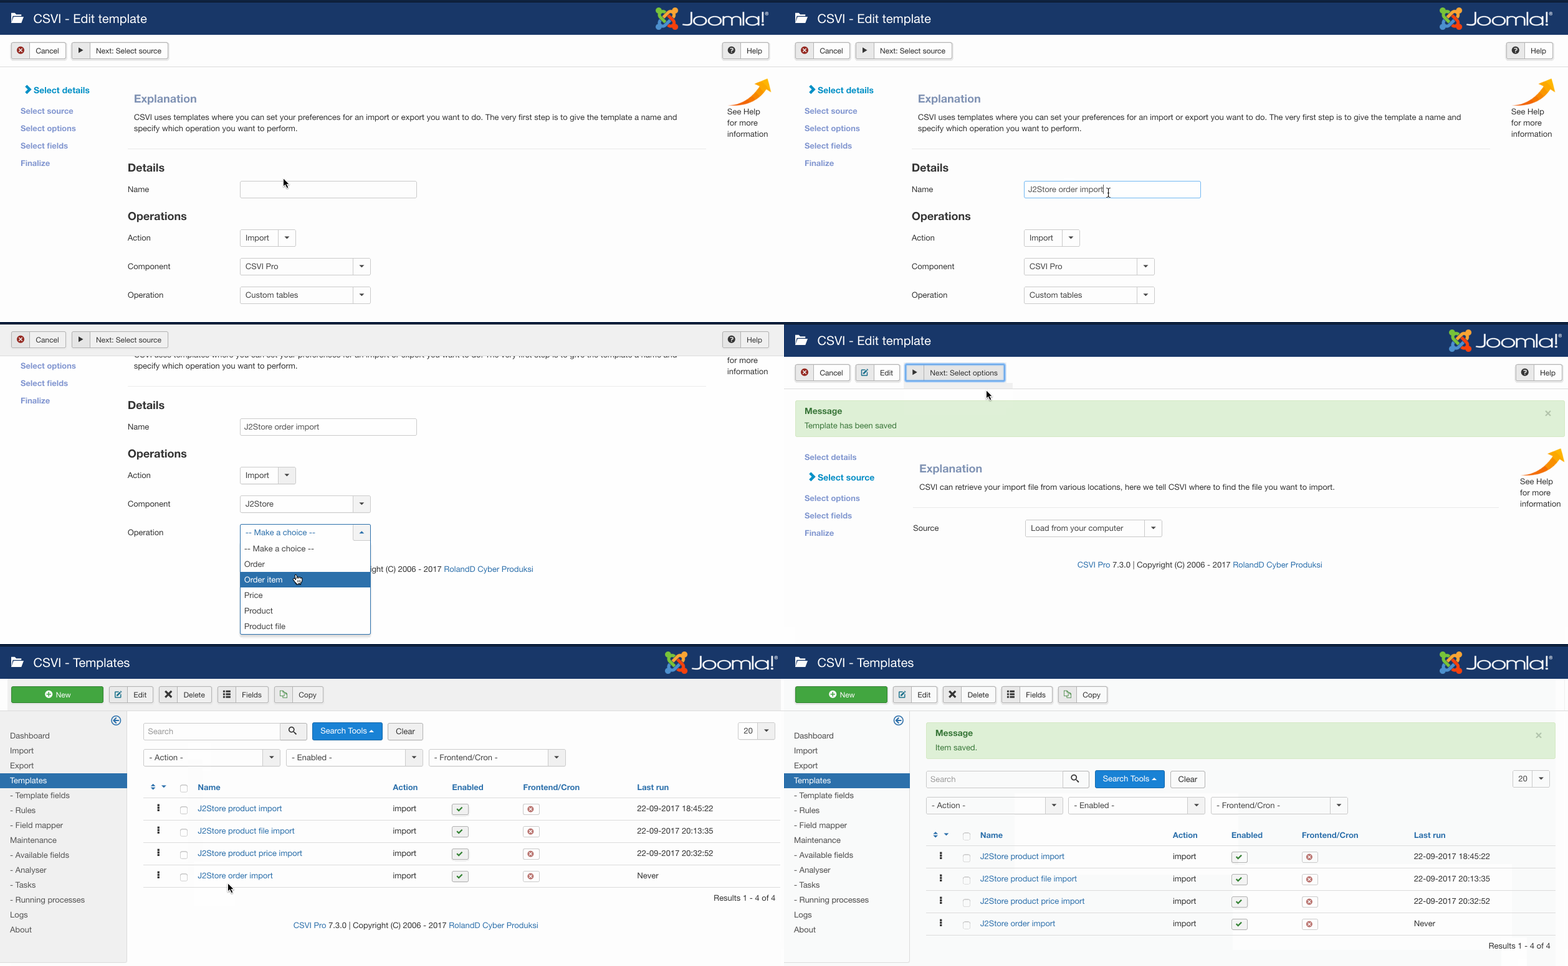
A template can be created by following these steps:
- Go to Components -> RO CSVI -> Templates
- Click New
- Give the template a name, say for example J2Store Order import
- Set Action to Import
- Set Component to J2Store
- Set Operation to Order
- Click Next: Select Source
- Source is set default to Load from your computer. No need for change.
- Click Next: Select options
- The default values are OK, change if needed.
- Click Next: Select fields
- Nothing needed here as we set to Use column headers as configuration in step 10.
- Click Next: Finalize
- All done here
- Click Close to return to the list of templates or Edit if you want to fine-tune the template further.
Adding the template fields
Template fields can be added by following these steps:
- Go to Components -> RO CSVI -> Templates
- Click on Template fields
- In the Search Tools select your template
- Click on New to add a single field or click on Quick Add to add multiple fields.
Quick Add
The Quick Add Option allows you to quickly add multiple fields to a template. It is not possible to set any settings per field here but that can be done after the fields have been added to the template.
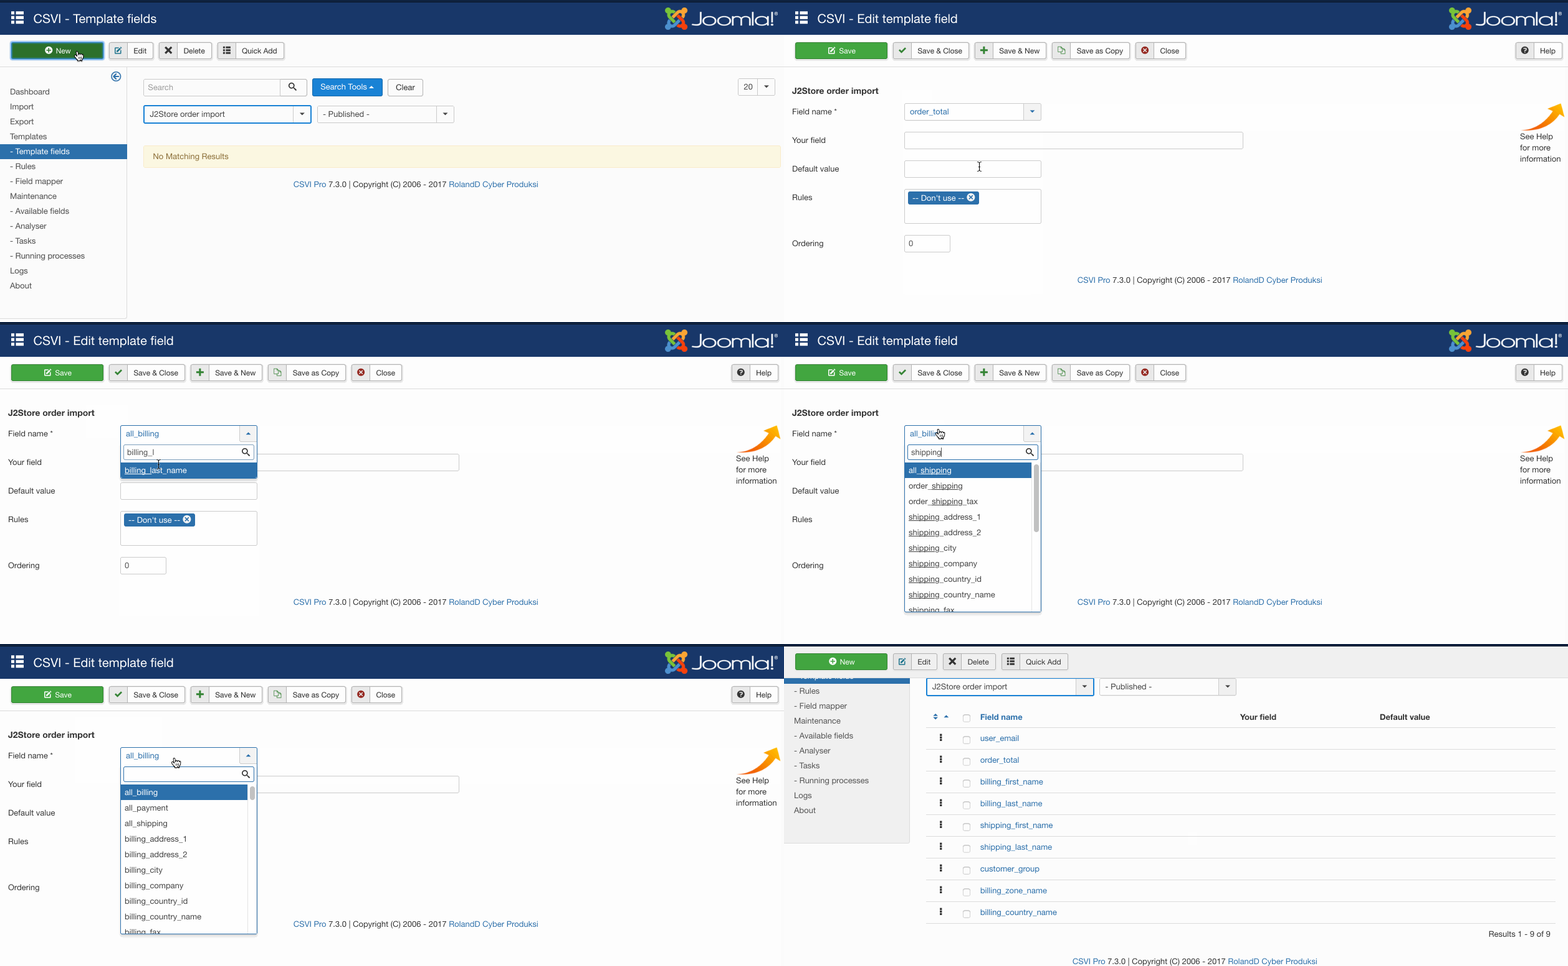
Required fields
- order_id
- user_email
Criteria
- order_id
- user_email
Run the import
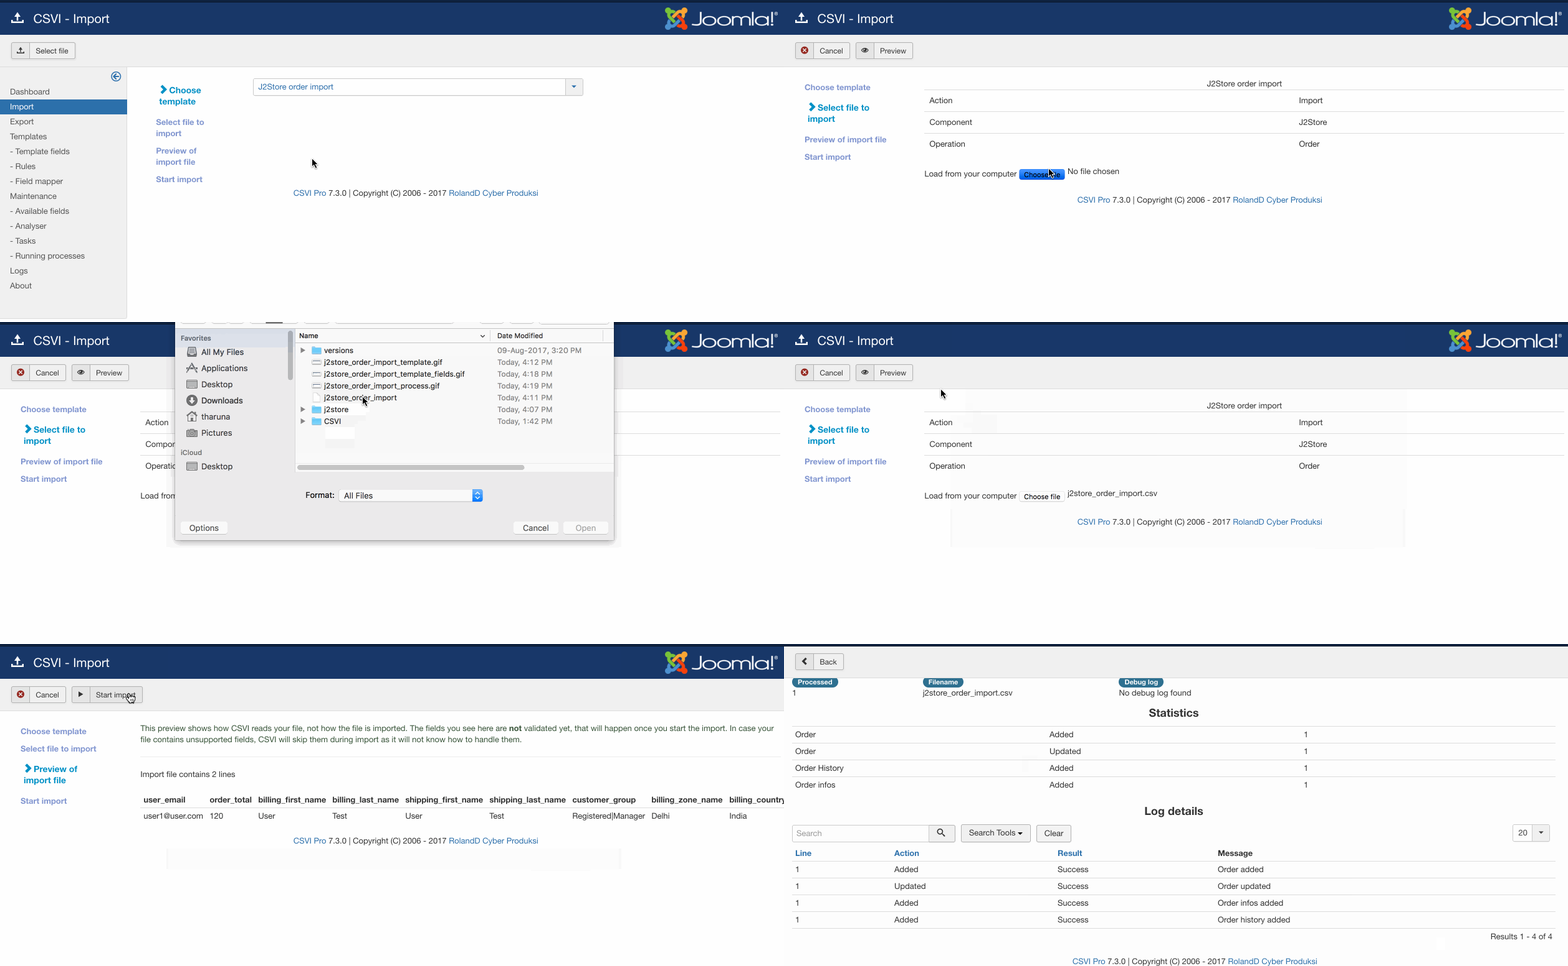
The import can be run by following these steps:
- Go to Components -> RO CSVI -> Import
- Select the template created earlier with name Hikashop Brands import
- Click Select file
- Select the file to import
- Click Preview
- You now see a preview of the file as to how RO CSVI sees the file
- Click Start import
- The import is run
- The Log details page will be shown with information regarding the import if the Enable logging is enabled in the template
Examples
user_email;order_total;billing_first_name;billing_last_name;shipping_first_name;shipping_last_name;customer_group;billing_zone_name;billing_country_name
user1@user.com;120;User;Test;User;Test;Registered|Manager;Delhi;India
Example file
J2Store Order Item Import
| J2Store
Requirements
Creating the template
A template can be created by following these steps:
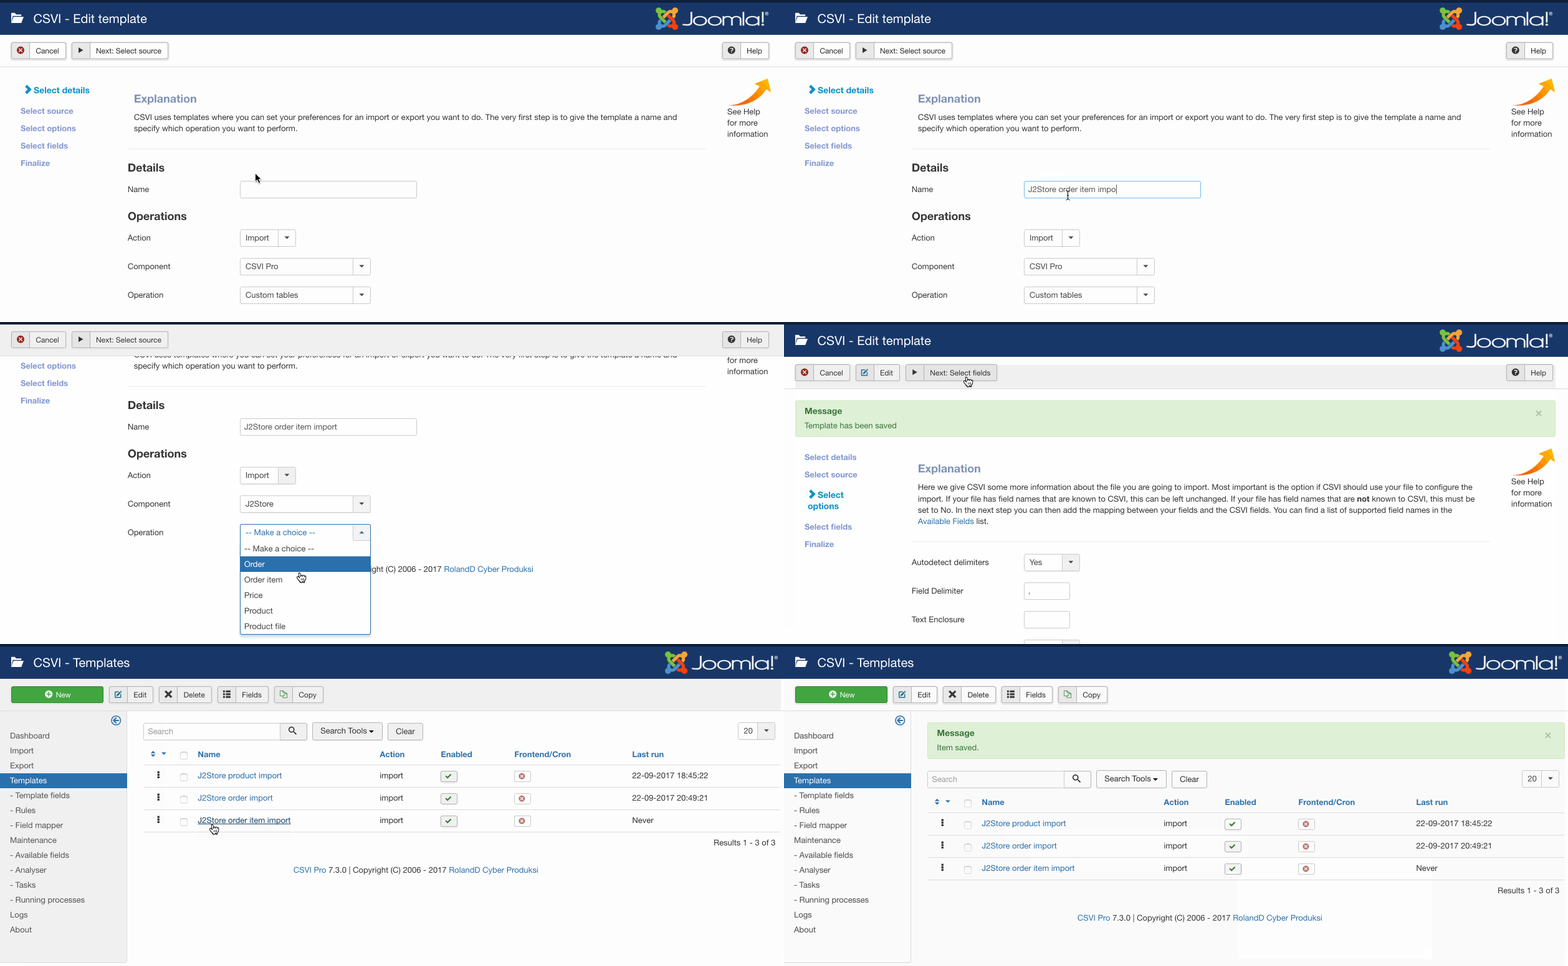
- Go to Components -> RO CSVI -> Templates
- Click New
- Give the template a name
- Set Action to Import
- Set Component to J2Store
- Set Operation to Order item
- Click Next: Select Source
- Source is set default to Load from your computer. No need for change.
- Click Next: Select options
- The default values are OK, change if needed.
- Click Next: Select fields
- Nothing needed here as we set to Use column headers as configuration in step 10.
- Click Next: Finalize
- All done here
- Click Close to return to the list of templates or Edit if you want to fine-tune the template further.
Adding the template fields
Template fields can be added by following these steps:
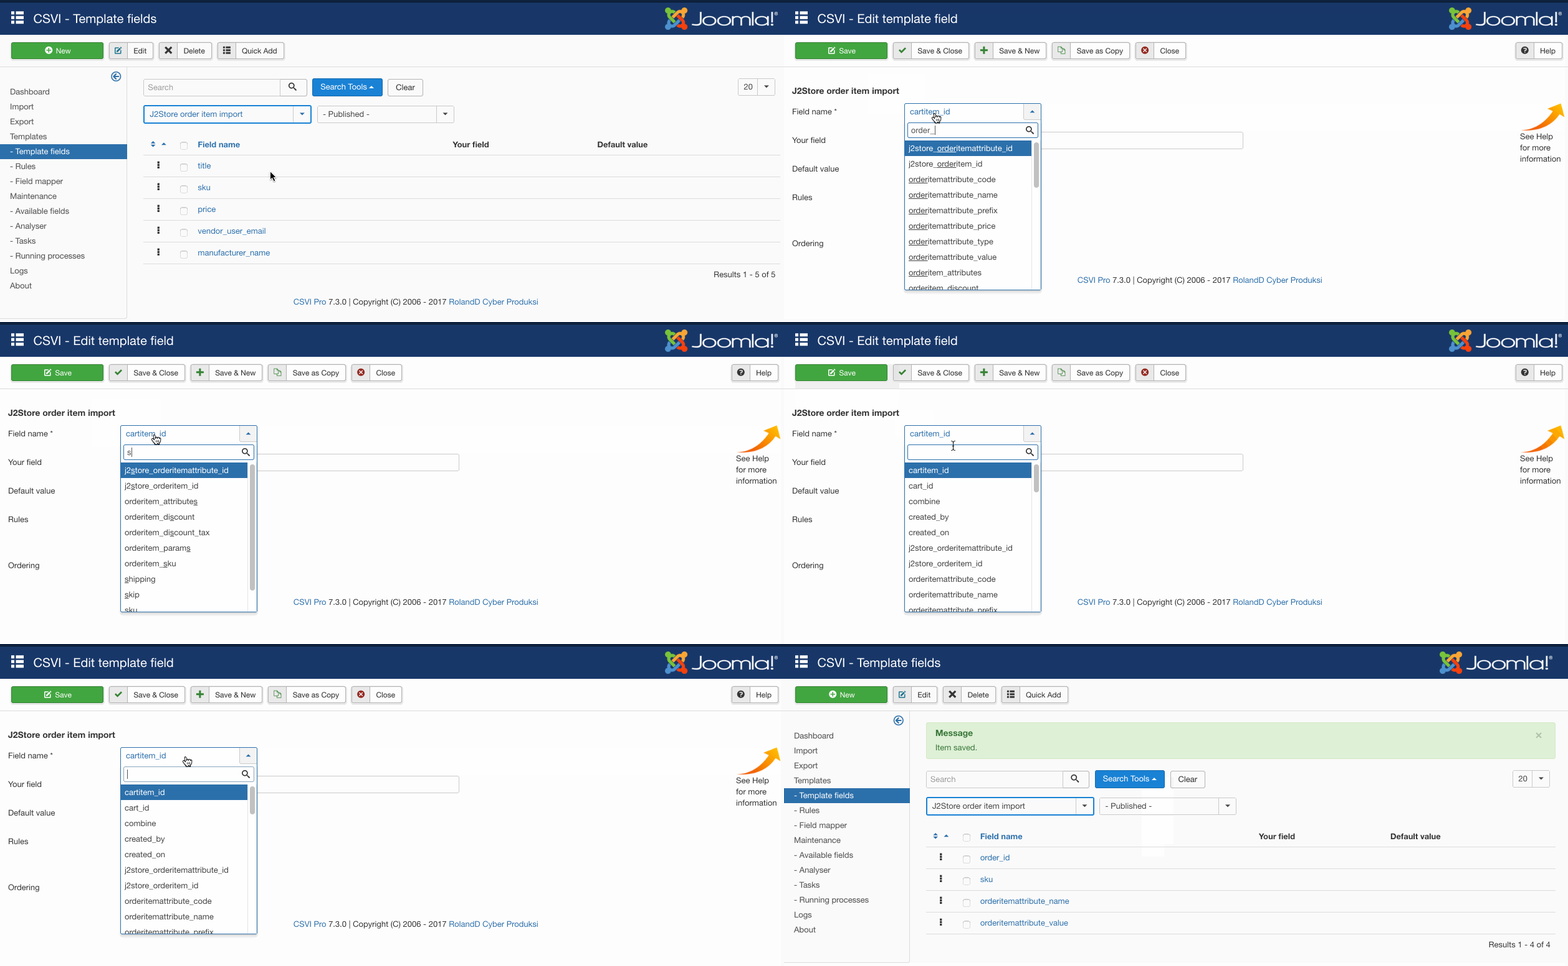
- Go to Components -> RO CSVI -> Templates
- Click on Template fields
- In the Search Tools select your template
- Click on New to add a single field or click on Quick Add to add multiple fields.
Quick Add
The Quick Add Option allows you to quickly add multiple fields to a template. It is not possible to set any settings per field here but that can be done after the fields have been added to the template.
Required fields
- order_id
- order_item_sku
Criteria
- order_id
- order_item_sku
Run the import
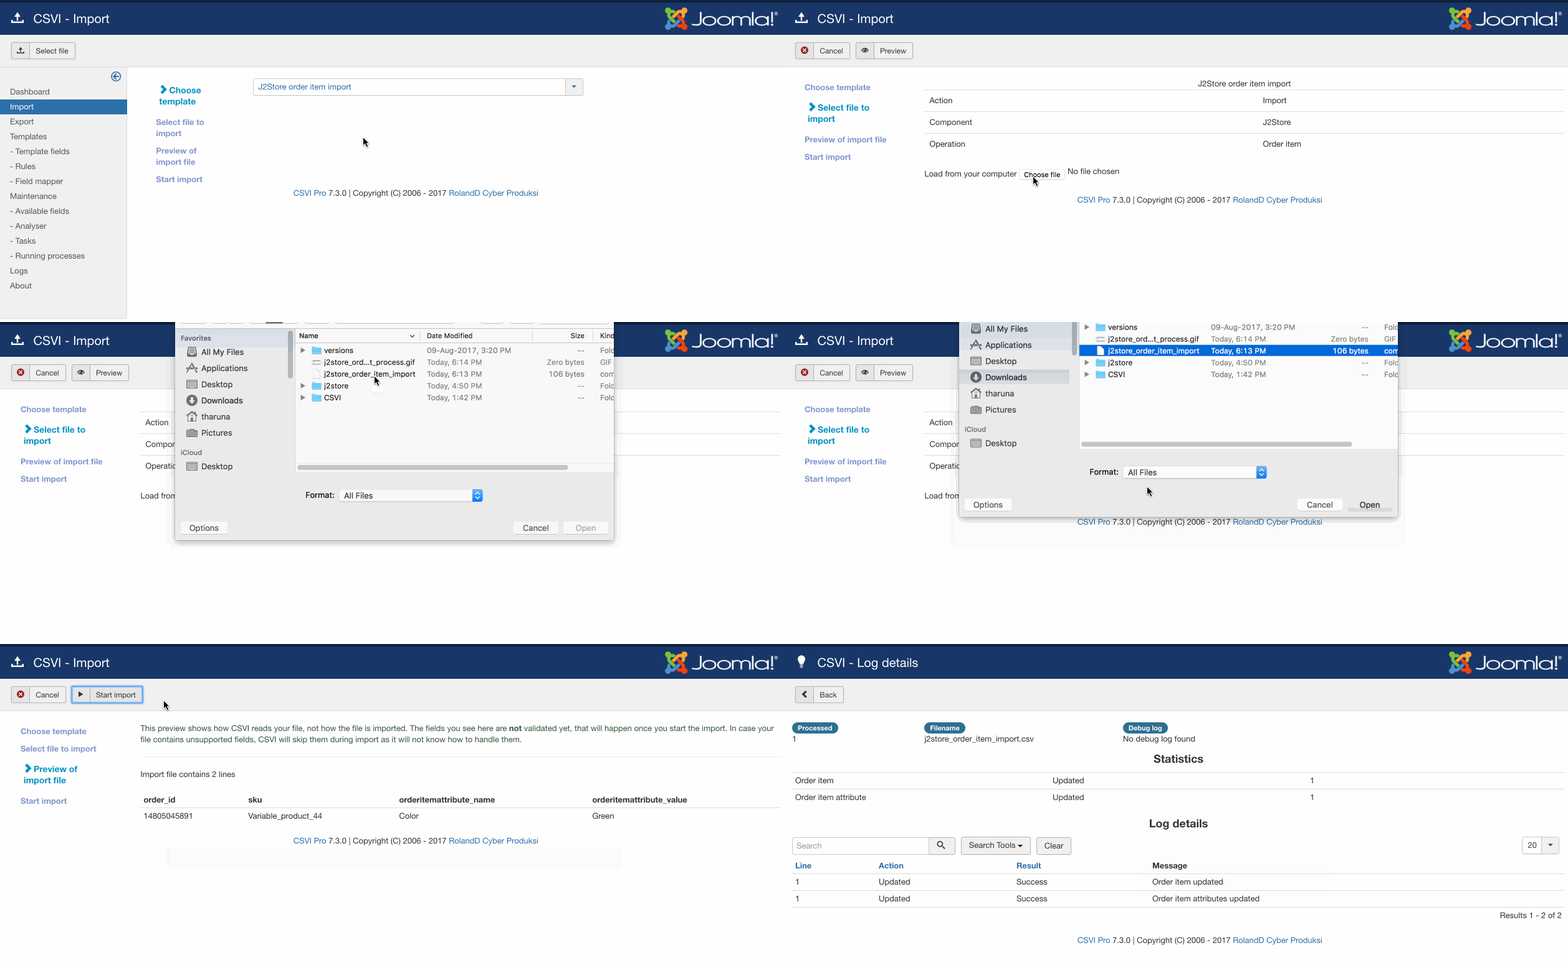
The import can be run by following these steps:
- Go to Components -> RO CSVI -> Import
- Select the template created earlier
- Click Select file
- Select the file to import
- Click Preview
- You now see a preview of the file as to how RO CSVI sees the file
- Click Start import
- The import is run
- The Log details page will be shown with information regarding the import if the Enable logging is enabled in the template
Examples
order_id;sku;orderitemattribute_name;orderitemattribute_value
14805045891;Variable_product_44;Color;Red