HikaShop
HikaShop Variants Export
| HikaShop
Requirements
Creating the export template
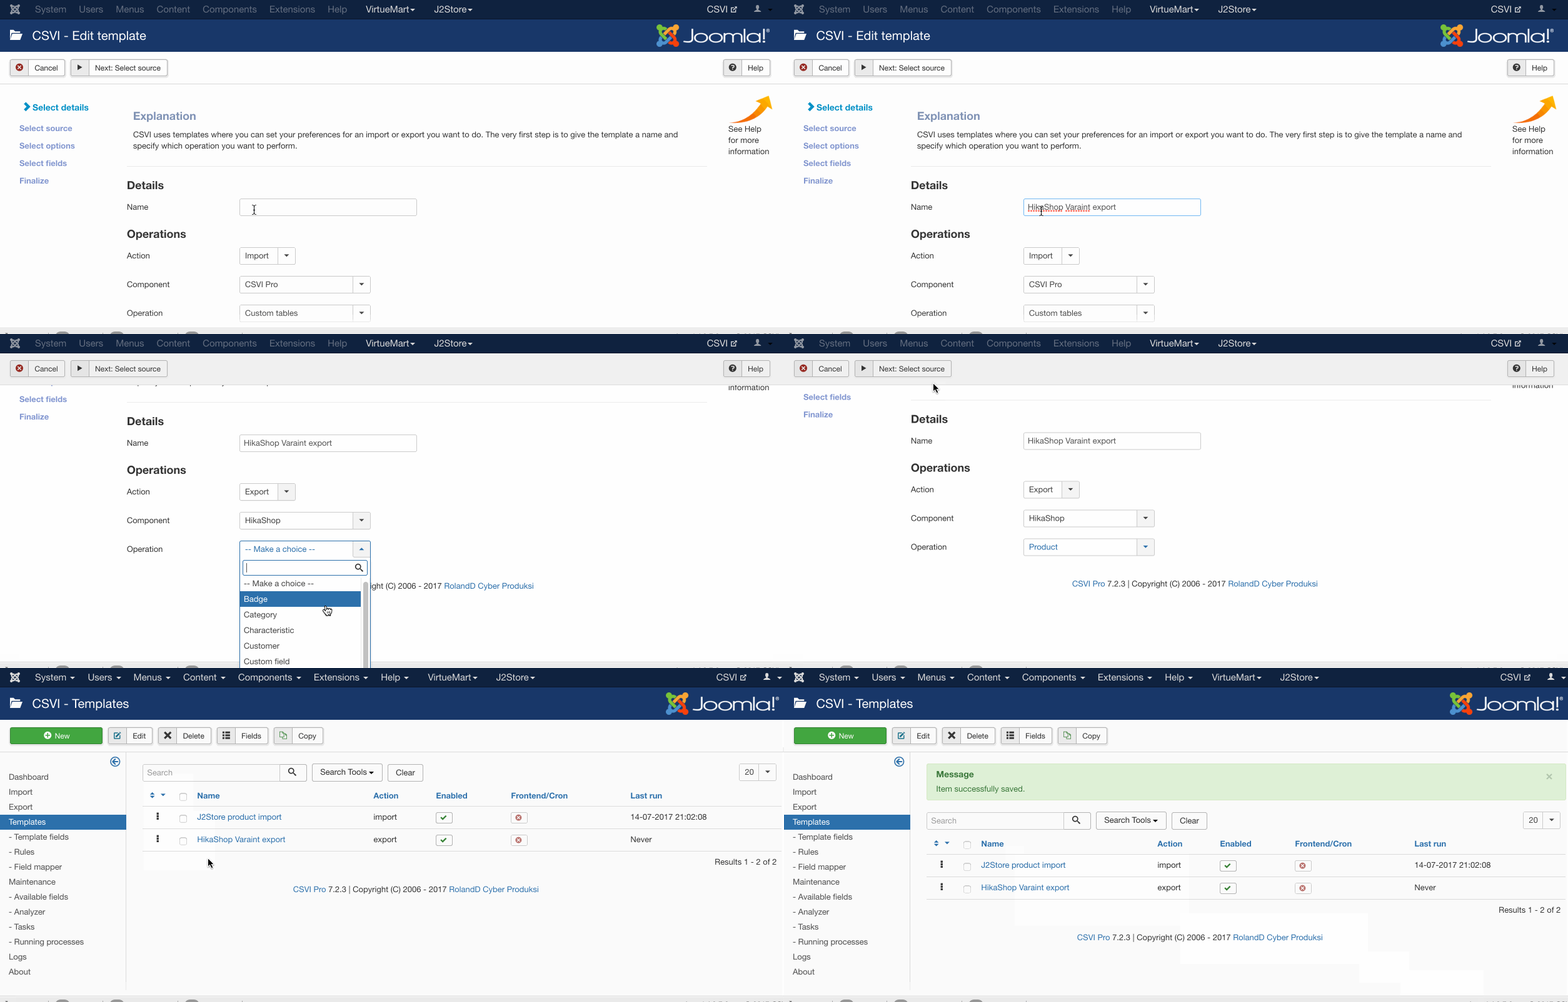
A template can be created by following these steps:
- Go to Components -> CSVI Pro -> Templates
- Click New
- Give the template a name
- Set Action to Export
- Set Component to HikaShop
- Set Operation to Product
- Click Next: Select Source
- Destination is set default to Download. No need for change.
- Click Next: Select options
- The default values are OK, change if needed.
- Click Next: Select fields
- Fields must be added otherwise there is nothing for CSVI to export. Click Edit template fields.
- A new window opens with the Template fields page. You can add new fields by clicking New or Quick Add.
- When all fields are added you can close the window
- Click Next: Finalize
- All done here
- Click Close to return to the list of templates or Edit if you want to fine-tune the template further.
Add the fields to export
Template fields can be added by following these steps:
- Go to Components -> CSVI Pro -> Templates
- Click on Template fields
- In the Search Tools select your template
- Click on New to add a single field or click on Quick Add to add multiple fields.
Quick Add
The Quick Add Option allows you to quickly add multiple fields to a template. It is not possible to set any settings per field here but that can be done after the fields have been added to the template. 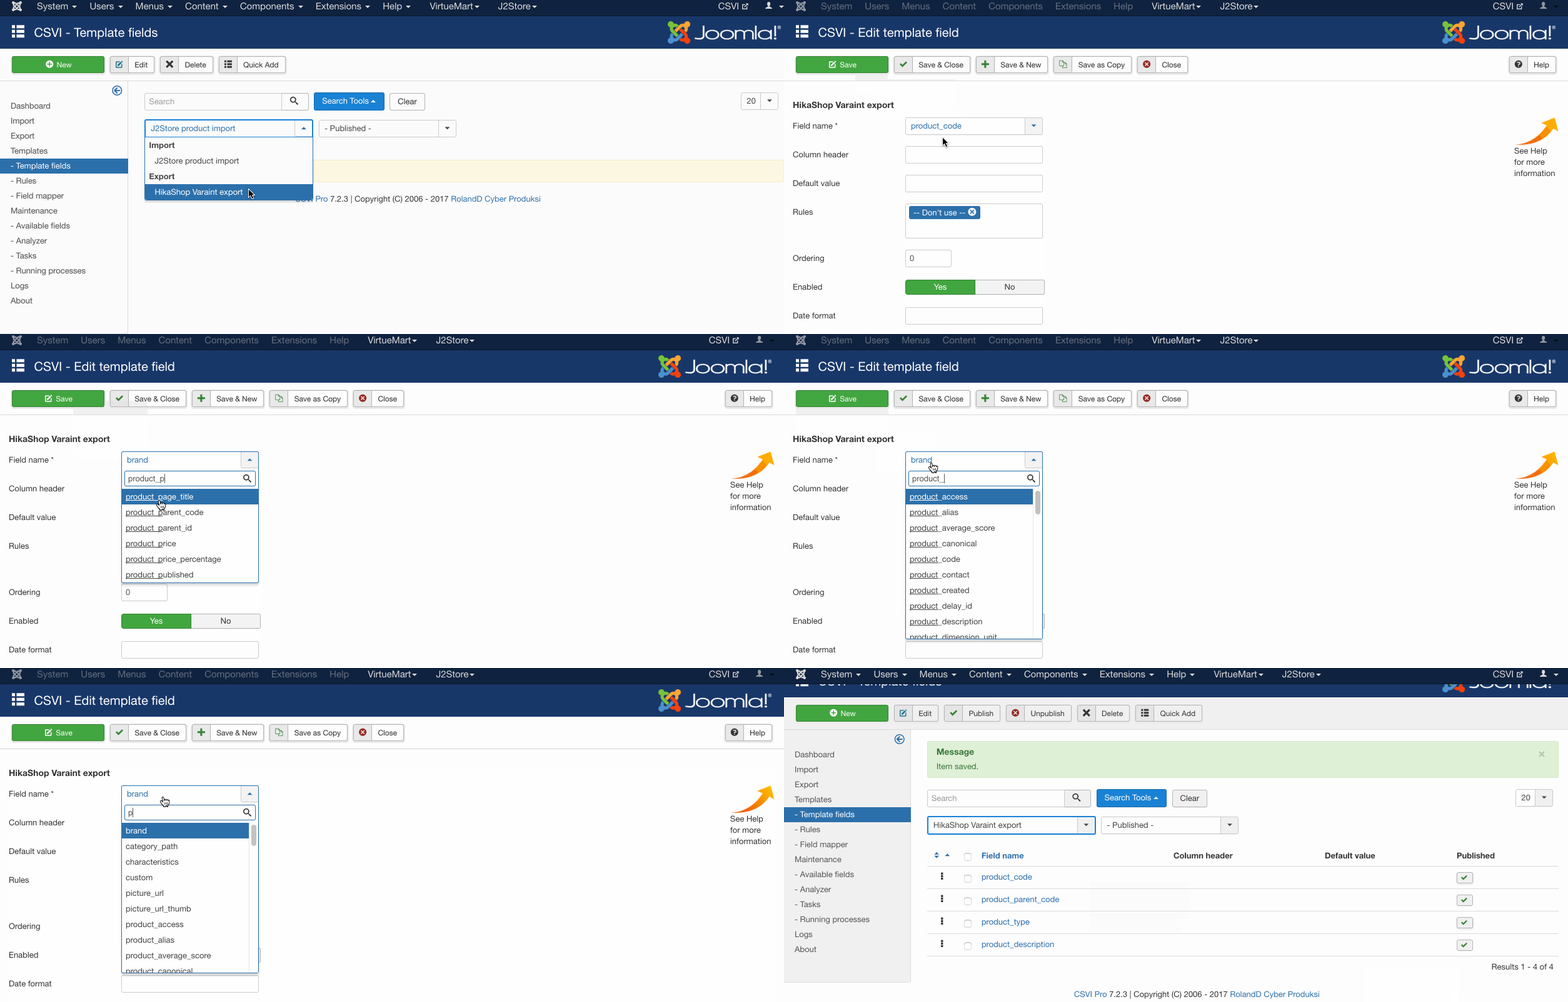
Run the export
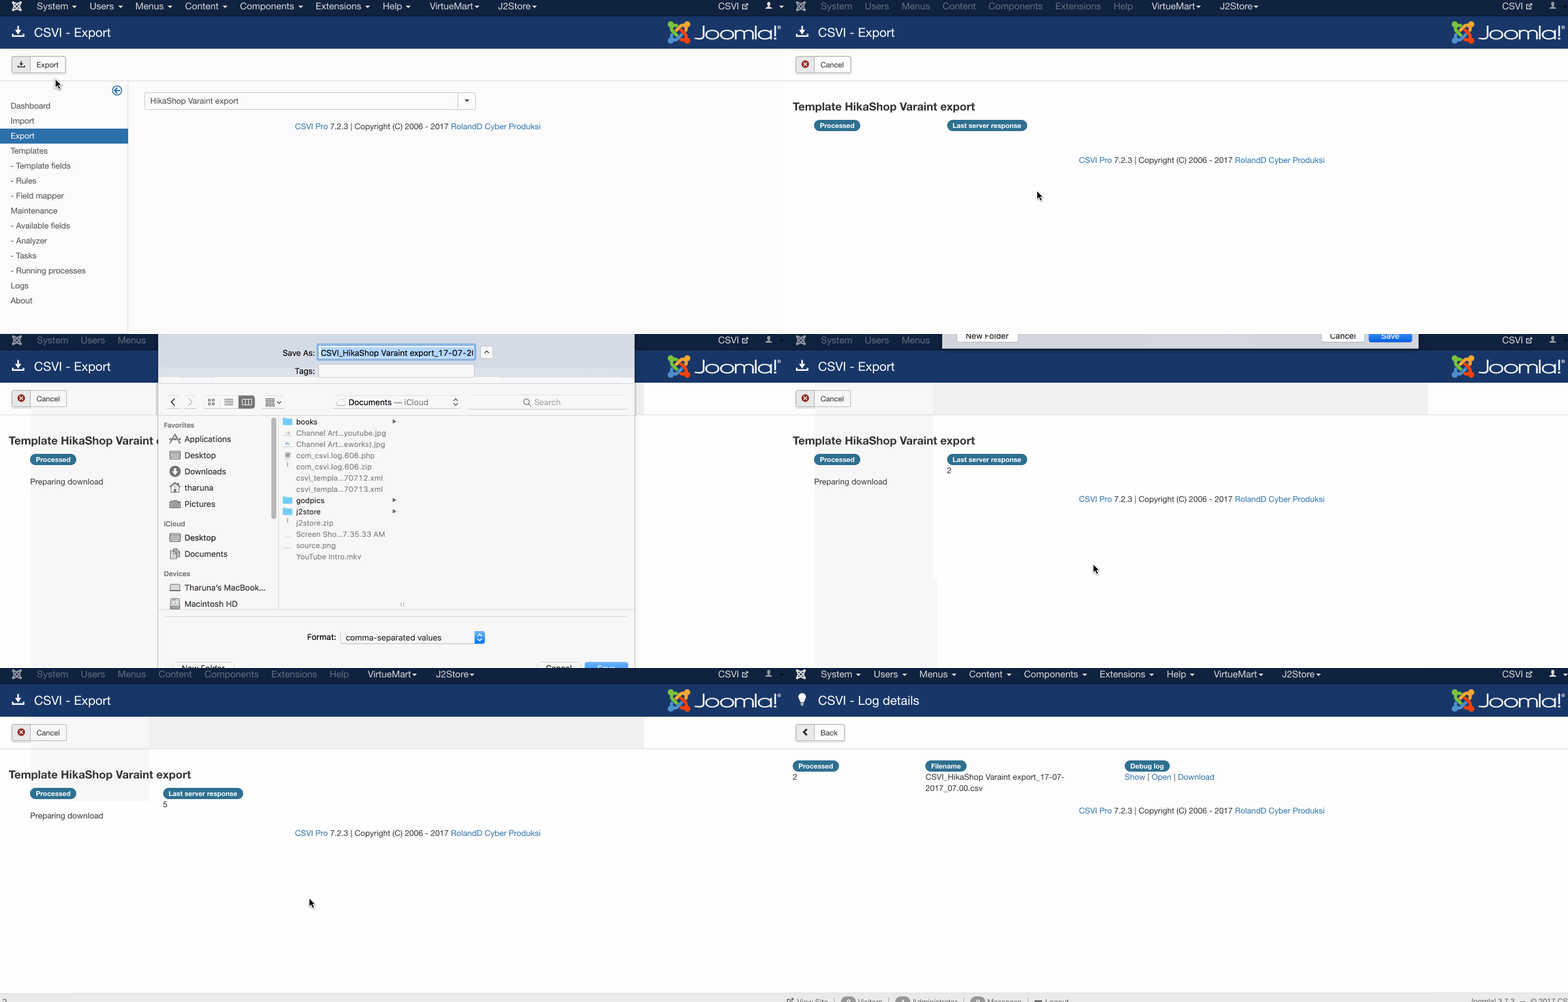
The export can be run by following these steps:
- Go to Components -> CSVI Pro -> Export
- Select the template created earlier
- Click Export
- The export is run
- The Log details page will be shown with information regarding the export if the Enable logging is enabled in the template
Export VirtueMart data and import to HikaShop
| HikaShop
This tutorial explains on how to export VirtueMart data using CSVI and import it to HikaShop.
Step by step procedure to export products, user, order and order item is explained below. Example templates are attached with each process.
Users migration from VirtueMart to HikaShop
1. Add template for VirtueMart user export
The following are the steps followed to create user export template
- Go to Components -> RO CSVI -> Templates
- Click New
- Give the template a name, say for example VirtueMart User export
- Set Action to Export
- Set Component to VirtueMart
- Set Operation to Userinfo
- Click Next: Select Destination
- Destination is set default to Download.
- Click Next: Select options
- The default values are OK, change if needed.
- Click Next: Select fields
- Add the fields to be exported
- Click Next: Finalize
- All done here
- Click Close to return to the list of templates or Edit if you want to fine-tune the template further.
2. Add template fields for VirtueMart user export
Template fields can be added by following these steps:
- Go to Components -> RO CSVI -> Templates
- Click on Template fields
- In the Search Tools select your template
- Click on New to add a single field or click on Quick Add to add multiple fields.
Quick Add
The Quick Add Option allows you to quickly add multiple fields to a template. It is not possible to set any settings per field here but that can be done after the fields have been added to the template.
Fields added for example VirtueMart user export and equivalent HikaShop customer import fields are
| No. | VirtueMart Fields | HikaShop Fields |
| 1 | address_1 | address_street |
| 2 | address_2 | address_street2 |
| 3 | city | address_city |
| 4 | company | address_company |
| 5 | country_name | country_name |
| 6 | user_email | |
| 7 | first_name | address_firstname |
| 8 | last_name | address_lastname |
| 9 | password | password |
| 10 | phone_1 | address_telephone |
| 11 | phone_2 | address_telephone2 |
| 12 | usergroup_name | usergroup_name |
| 13 | username | username |
| 14 | zip | address_post_code |
Click to get example user export template.
To know how to use the example template check RESTORE TEMPLATE section in Restore templates documentation.
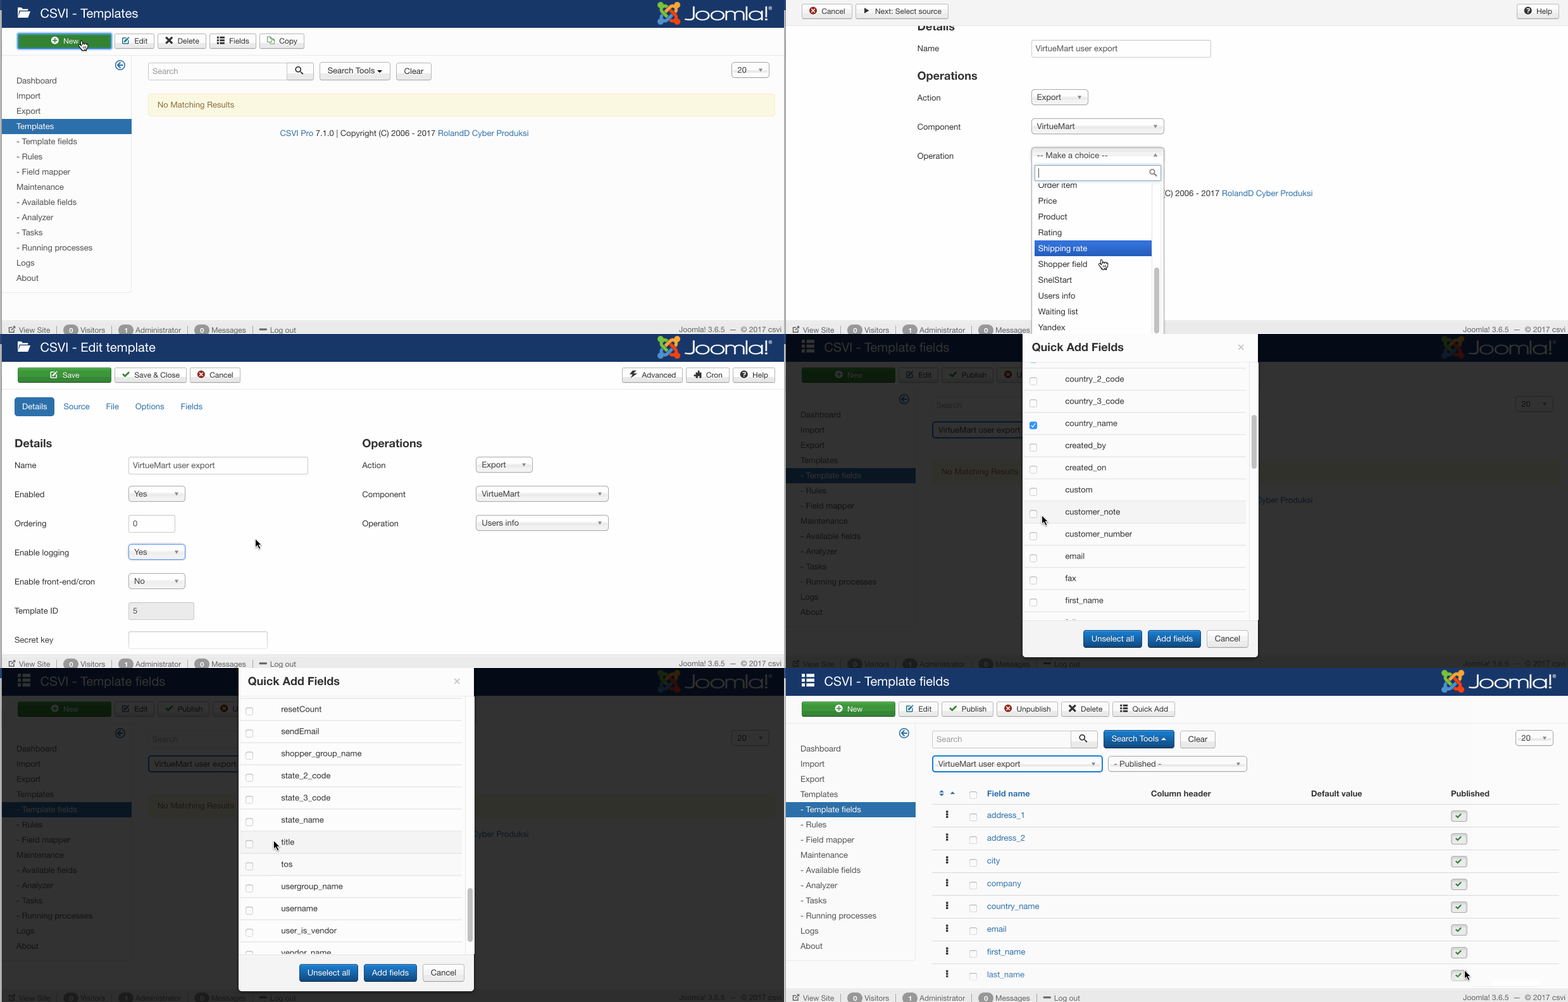
3. Run the VirtueMart user export
- Go to Components -> RO CSVI -> Export
- Select VirtueMart User export
- Click on Export
- Save the file
4. Run the HikaShop user import
A template can be created by following these steps:
- Go to Components -> RO CSVI -> Templates
- Click New
- Give the template a name, say for example Hikashop user import
- Set Action to Import
- Set Component to HikaShop
- Set Operation to Customer
- Click Next: Select Source
- Source is set default to Load from your computer. No need for change.
- Click Next: Select options
- The default values are OK, change if needed.
- Click Next: Select fields
- Nothing needed here as we set to Use column headers as configuration in step 10.
- Click Next: Finalize
- All done here
- Click Close to return to the list of templates or Edit if you want to fine-tune the template further.
Set Use file for configuration to No as CSVI should use the template fields to import the user data and not to use the column headers of import file.
Template fields can be added by following these steps:
- Go to Components -> RO CSVI -> Templates
- Click on Template fields
- In the Search Tools select your template
- Click on New to add a single field or click on Quick Add to add multiple fields.
- Save the template field
Make sure that you add the HikaShop template fields in the same order of fields as in VirtueMart export file. This way the data is matched to equivalent HikaShop field from the export file. One other way to do this would be add HikaShop fields in VirtueMart export so the export file would have HiksShop field name as column headers in VirtueMart export file.
Click to get example HikaShop user import template.
To know how to use the example template check RESTORE TEMPLATE section in Restore templates documentation.
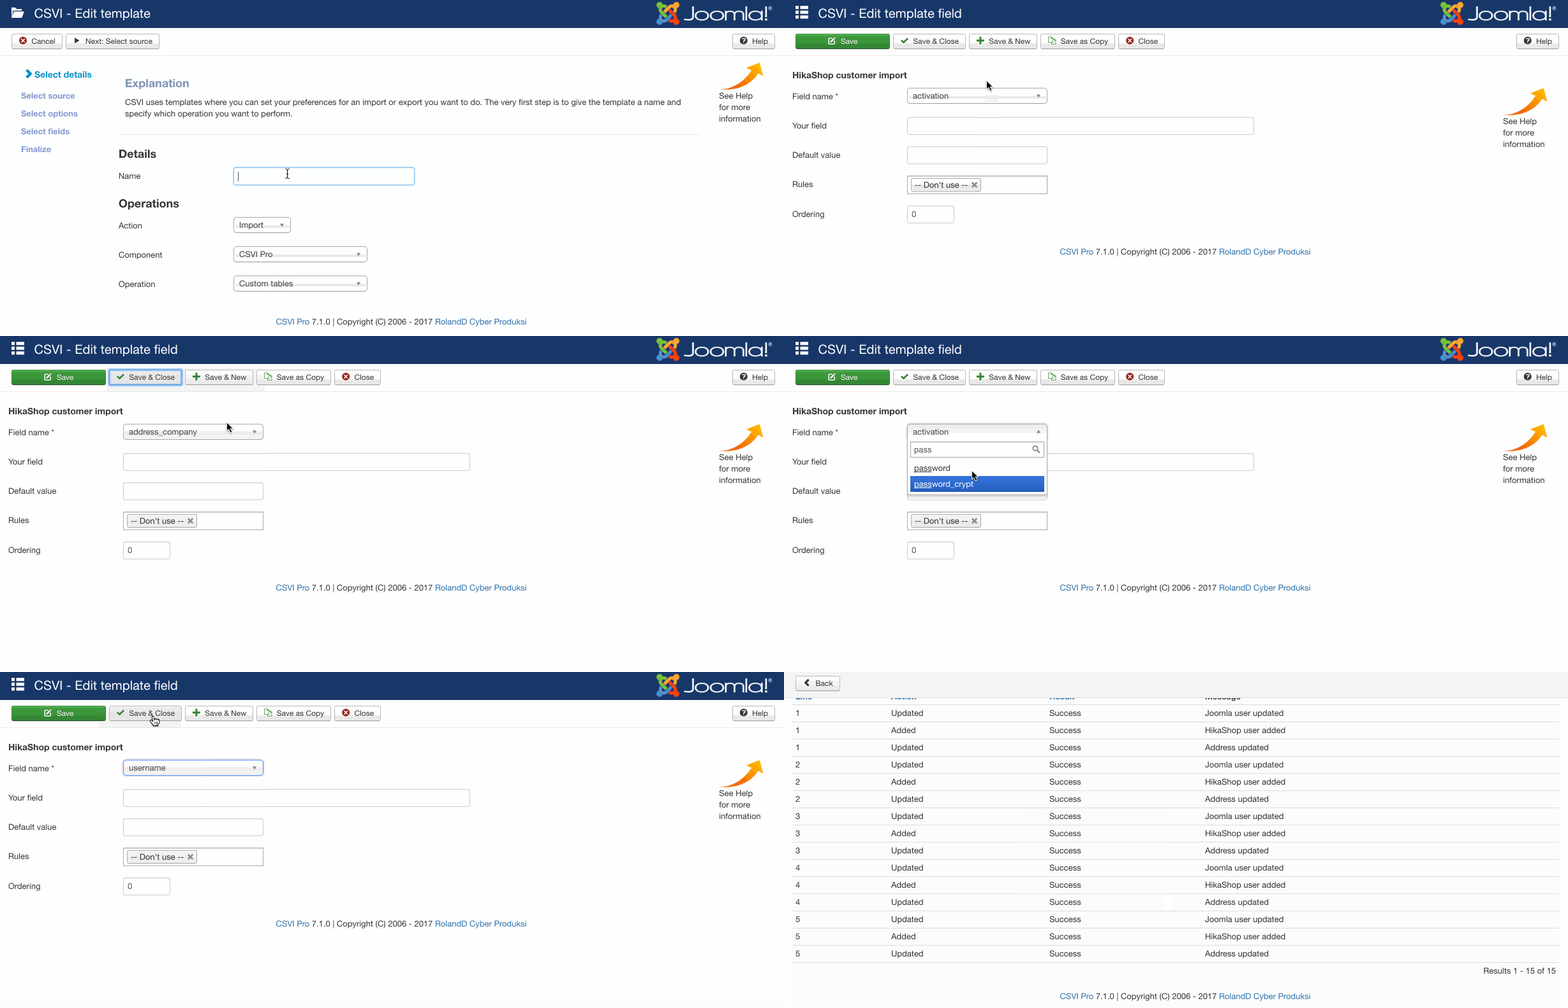
Products migration from VirtueMart to HikaShop
1. Create VirtueMart product export template
To create a product export template follow the below steps
- Go to Components -> RO CSVI -> Templates
- Click New
- Give the template a name, say for example VirtueMart product export template
- Set Action to Export
- Set Component to VirtueMart
- Set Operation to Product
- Click Next: Select Destination
- Destination is set default to Download.
- Click Next: Select options
- The default values are OK, change if needed.
- Click Next: Select fields
- Add the fields to be exported
- Click Next: Finalize
- All done here
- Click Close to return to the list of templates or Edit if you want to fine-tune the template further.
2. Add template fields for VirtueMart product export
Template fields can be added by following these steps:
- Go to Components -> RO CSVI -> Templates
- Click on Template fields
- In the Search Tools select your template
- Click on New to add a single field or click on Quick Add to add multiple fields.
Quick Add
The Quick Add Option allows you to quickly add multiple fields to a template. It is not possible to set any settings per field here but that can be done after the fields have been added to the template.
The example fields added for VirtueMart product export and equivalent fields for HikaShop product import are
| No. | VirtueMart Fields | HikaShop Fields |
| 1 | product_desc | product_description |
| 2 | product_name | product_name |
| 3 | product_sku | product_code |
| 4 | category_path | category_path |
| 5 | manufacturer_name | brand |
| 6 | product_price | product_price |
| 7 | product_currency | currency_code |
Click to get example product export template.
To know how to use the example template check RESTORE TEMPLATE section in Restore templates documentation.
Note that the example template uses English(en-GB) as the primary language. Different language can be set in template setting and on Options tab.
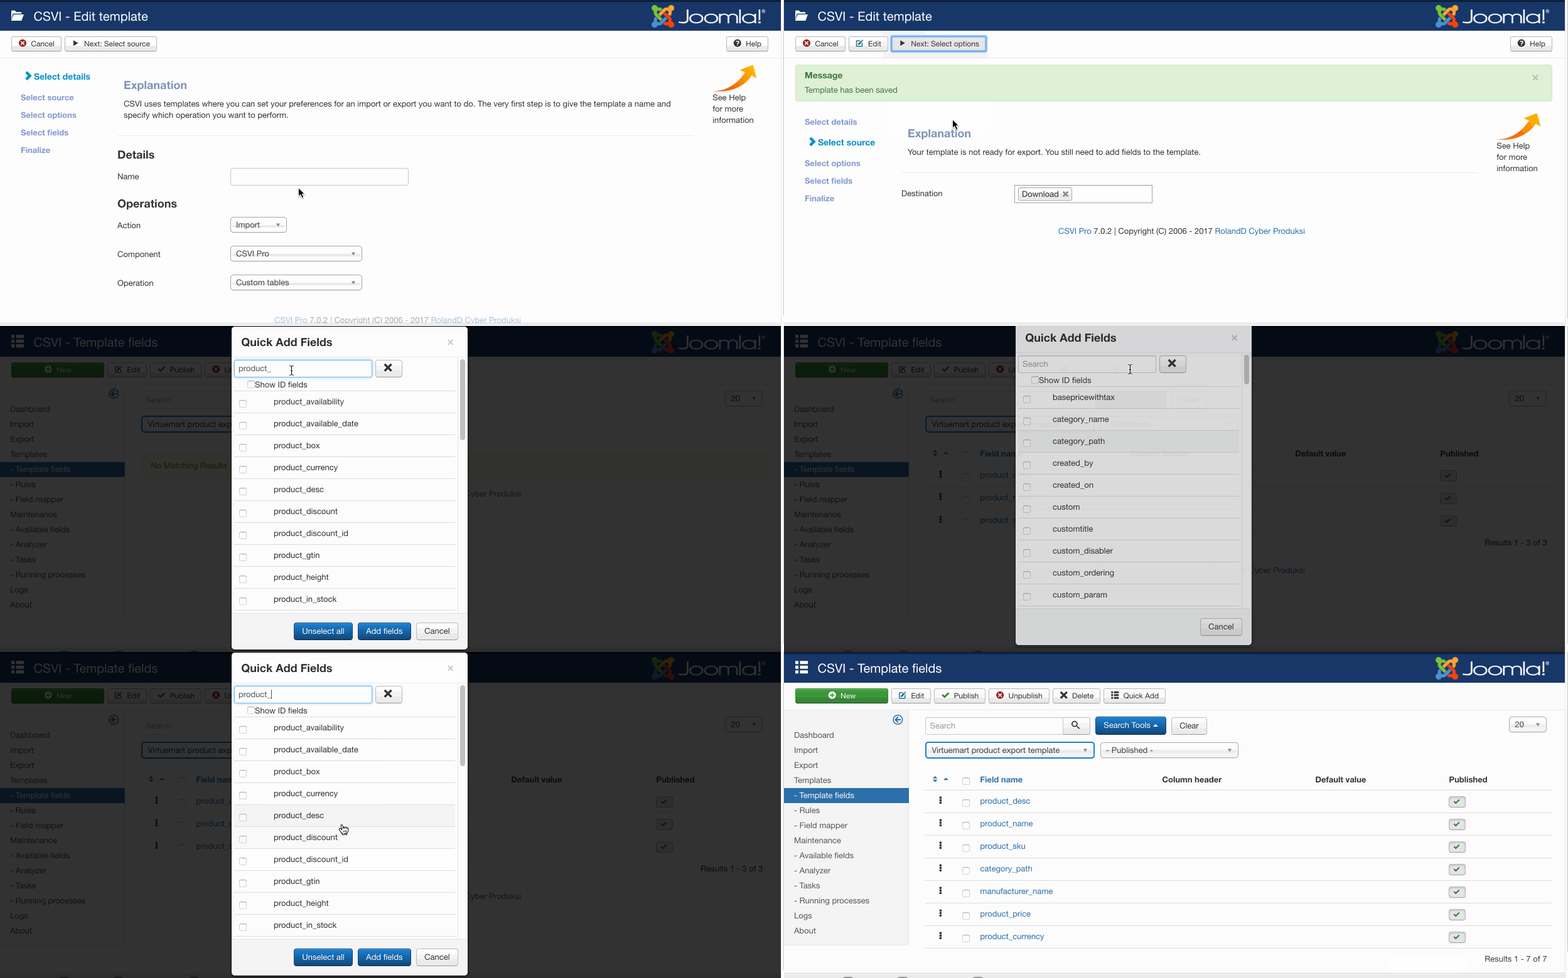
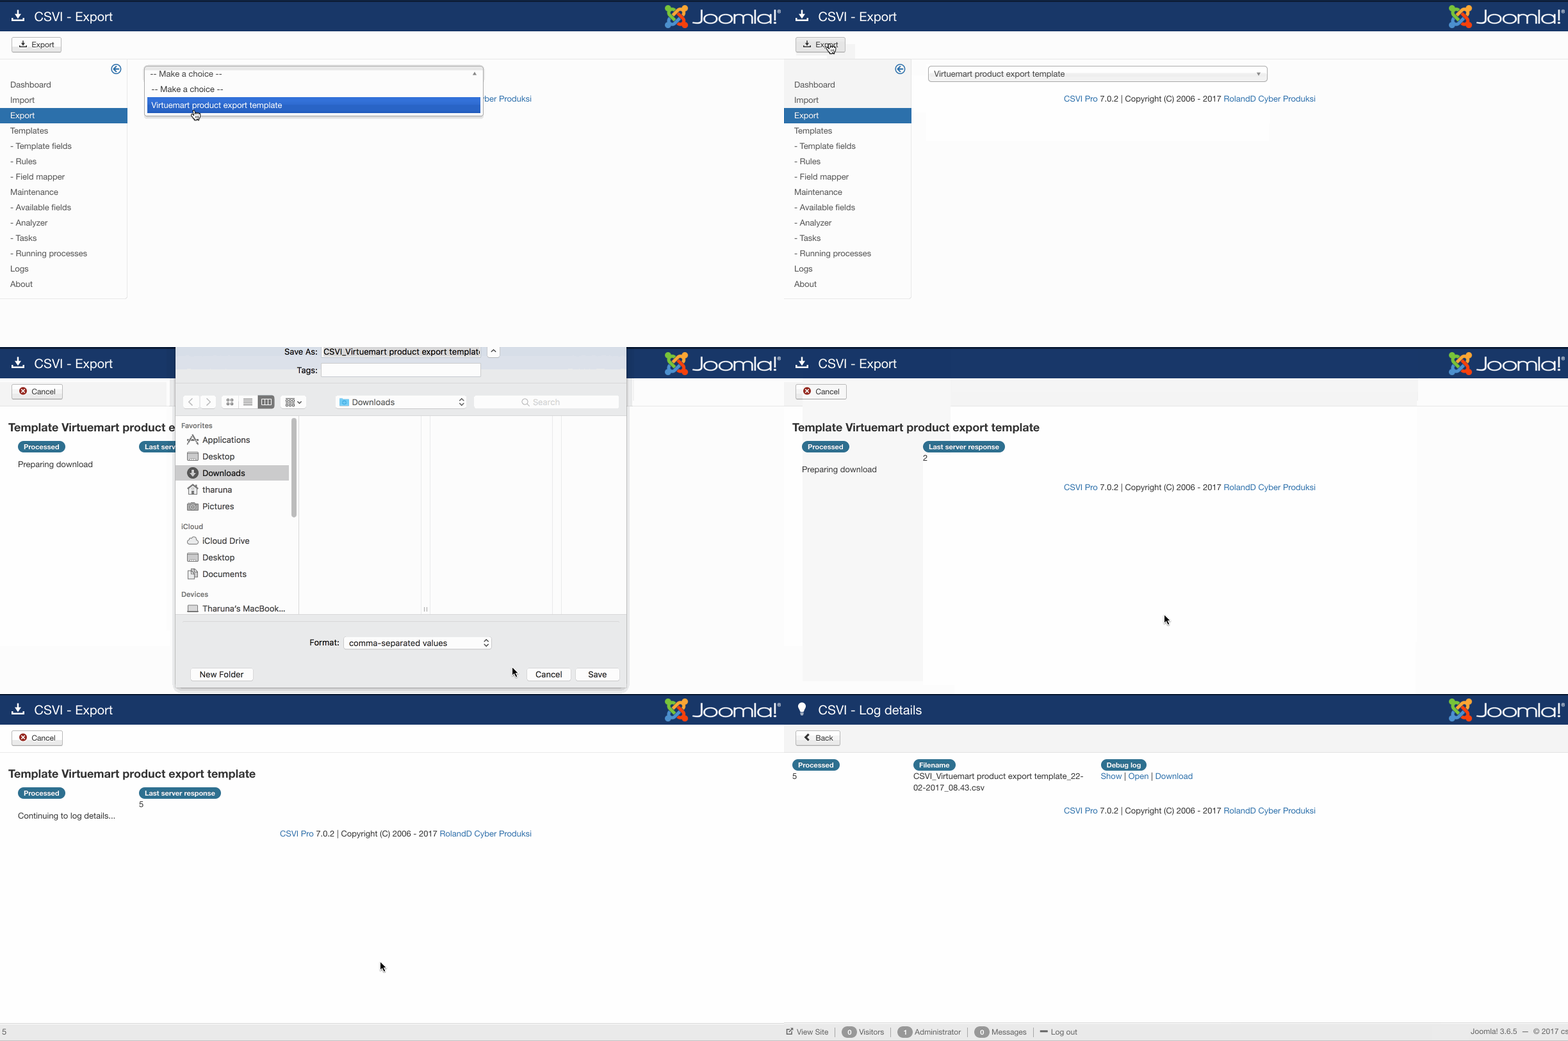
3. Run the VirtueMart product export
- Go to Components -> RO CSVI -> Export
- Select VirtueMart product export
- Click on Export
- Save the file
4. Run the HikaShop product import
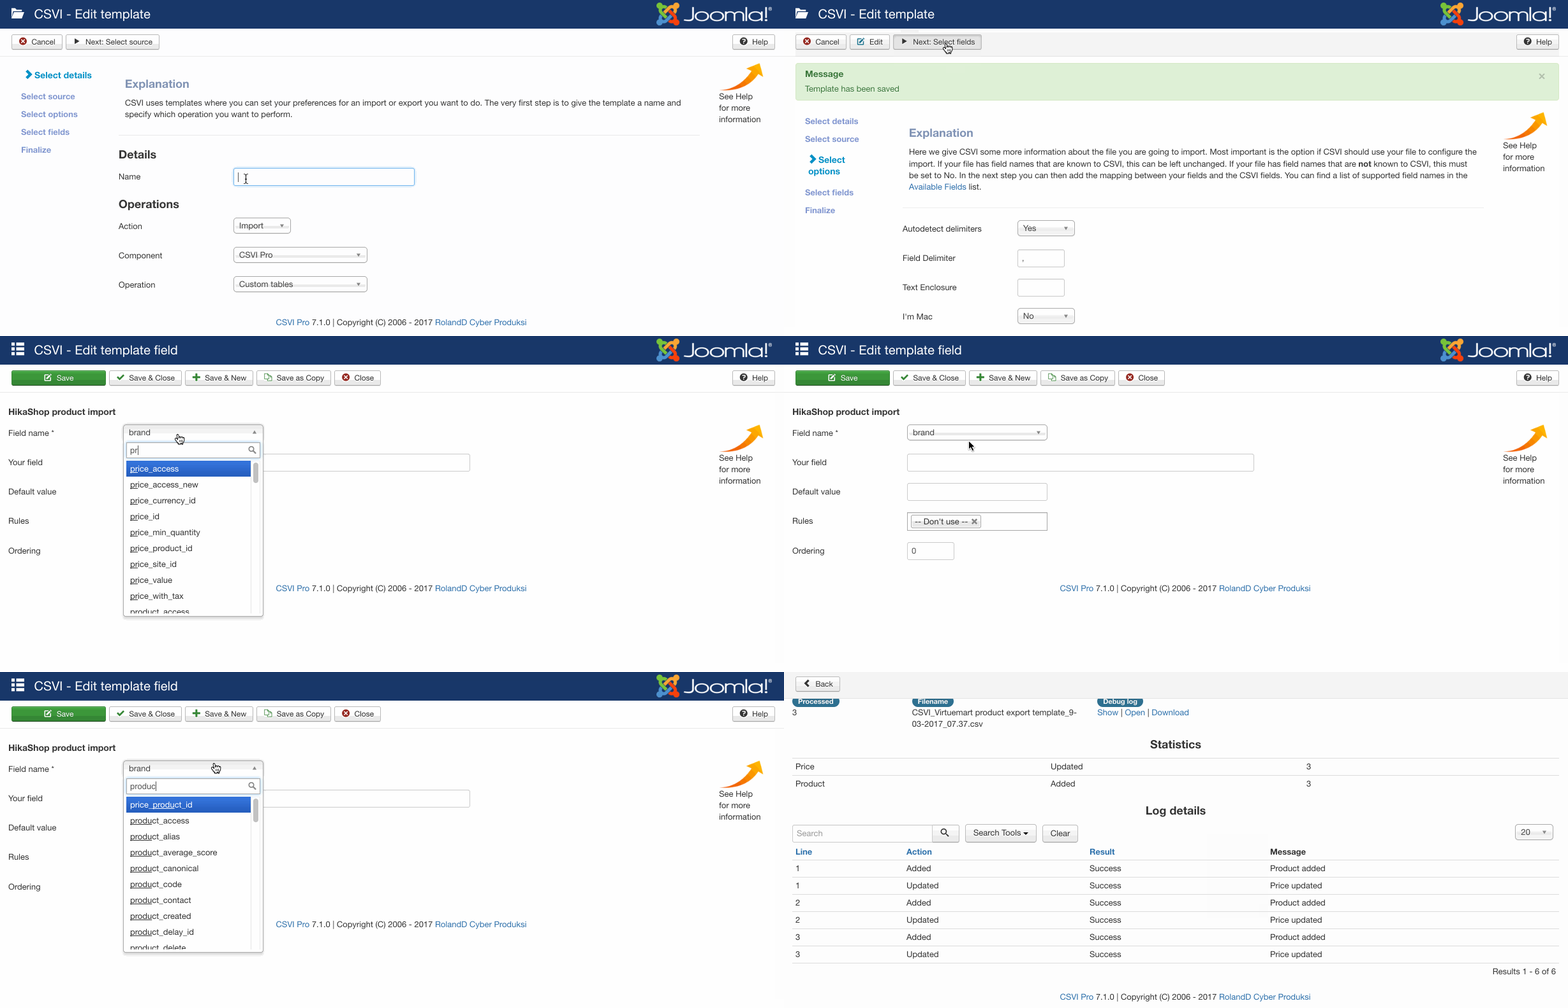
A template can be created by following these steps:
- Go to Components -> RO CSVI -> Templates
- Click New
- Give the template a name, say for example Hikashop Product import
- Set Action to Import
- Set Component to HikaShop
- Set Operation to Product
- Click Next: Select Source
- Source is set default to Load from your computer. No need for change.
- Click Next: Select options
- The default values are OK, change if needed.
- Click Next: Select fields
- Nothing needed here as we set to Use column headers as configuration in step 10.
- Click Next: Finalize
- All done here
- Click Close to return to the list of templates or Edit if you want to fine-tune the template further.
Template fields can be added by following these steps:
- Go to Components -> RO CSVI -> Templates
- Click on Template fields
- In the Search Tools select your template
- Click on New to add a single field or click on Quick Add to add multiple fields.
- Save the template field
Make sure that you add the HikaShop template fields in the same order of fields as in VirtueMart export file. This way the data is matched to equivalent HikaShop field from the export file. One other way to do this would be add HikaShop fields in VirtueMart export so the export file would have HiksShop field name as column headers in VirtueMart export file.
Click to get example HikaShop product import template.
To know how to use the example template check RESTORE TEMPLATE section in Restore templates documentation.
Orders migration from VirtueMart to HikaShop
1. Create a export template for VirtueMart order export
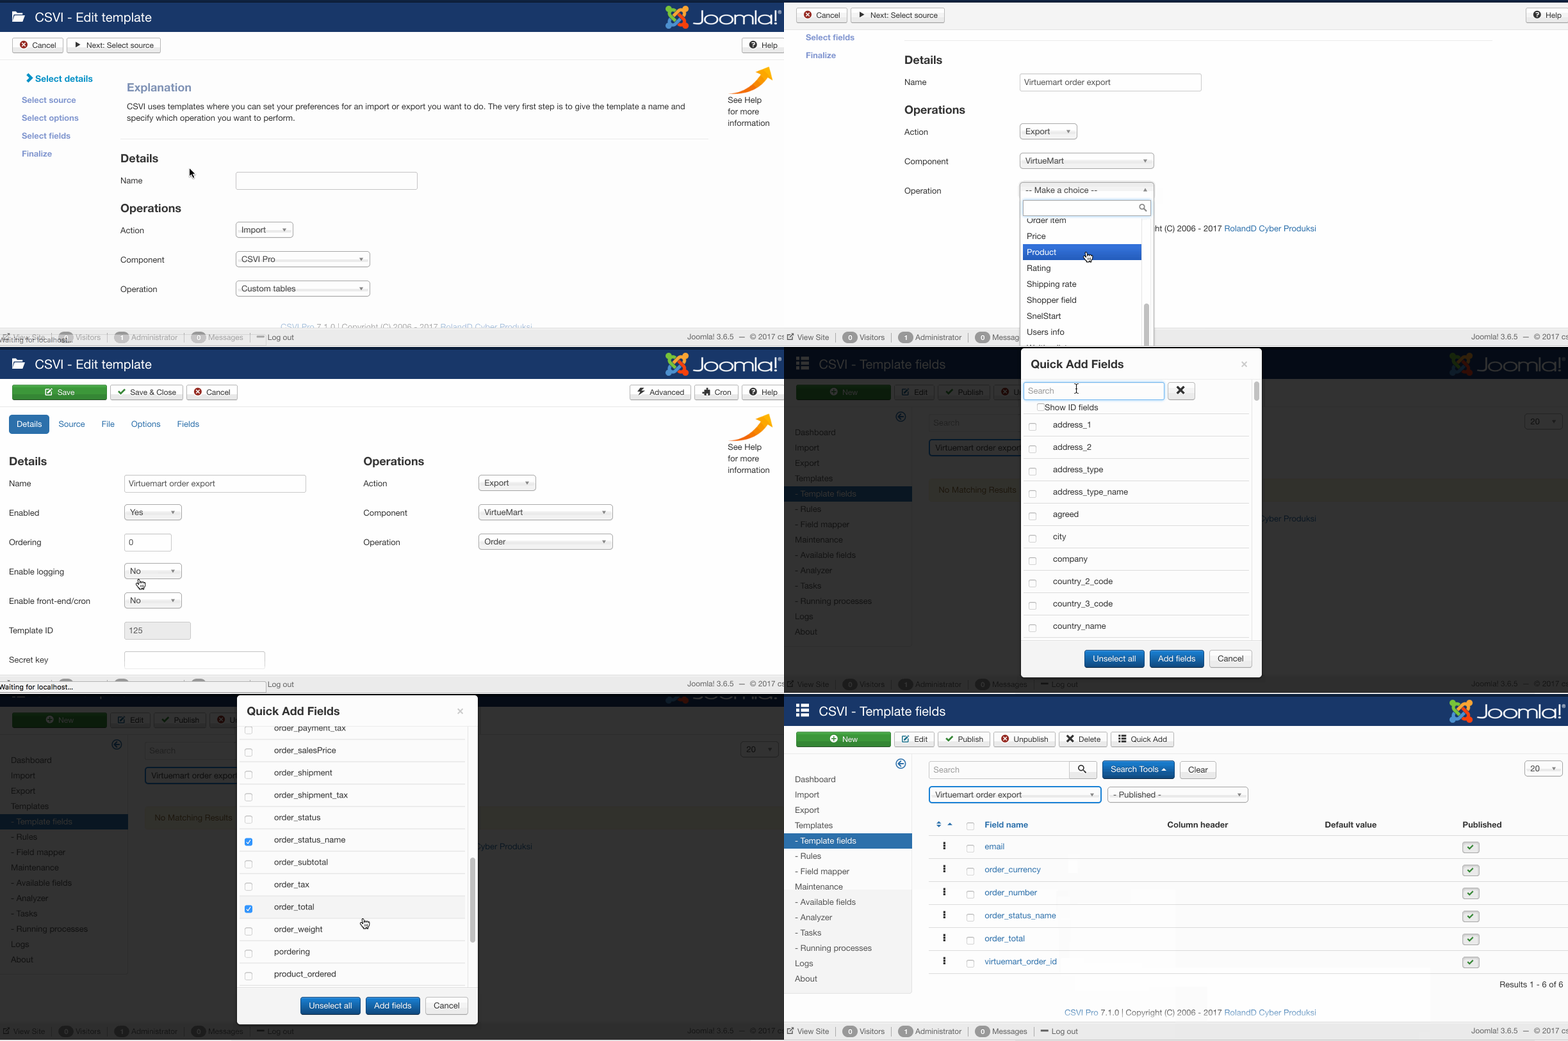
Follow the below steps to create VirtueMart order export template
- Go to Components -> RO CSVI -> Templates
- Click New
- Give the template a name, say for example VirtueMart order export
- Set Action to Export
- Set Component to VirtueMart
- Set Operation to Order
- Click Next: Select Destination
- Destination is set default to Download.
- Click Next: Select options
- The default values are OK, change if needed.
- Click Next: Select fields
- Add the fields to be exported
- Click Next: Finalize
- All done here
- Click Close to return to the list of templates or Edit if you want to fine-tune the template further.
2. Add template fields for VirtueMart order export template
Template fields can be added by following these steps:
- Go to Components -> RO CSVI -> Templates
- Click on Template fields
- In the Search Tools select your template
- Click on New to add a single field or click on Quick Add to add multiple fields.
Quick Add
The Quick Add Option allows you to quickly add multiple fields to a template. It is not possible to set any settings per field here but that can be done after the fields have been added to the template.
The example fields for VirtueMart order export and equivalent HikaShop order import are
| No. | VirtueMart Fields | HikaShop Fields |
| 1 | user_email | |
| 2 | order_currency | order_currency_id |
| 3 | order_number | order_number |
| 4 | order_status_name | order_status |
| 5 | order_total | order_full_price |
| 6 | virtuemart_order_id | order_id |
Click to get example order export template.
To know how to use the example template check RESTORE TEMPLATE section in Restore templates documentation.
Note that the example template uses English(en-GB) as the primary language. Different language can be set in template setting and on Options tab.
3. Run the VirtueMart order export
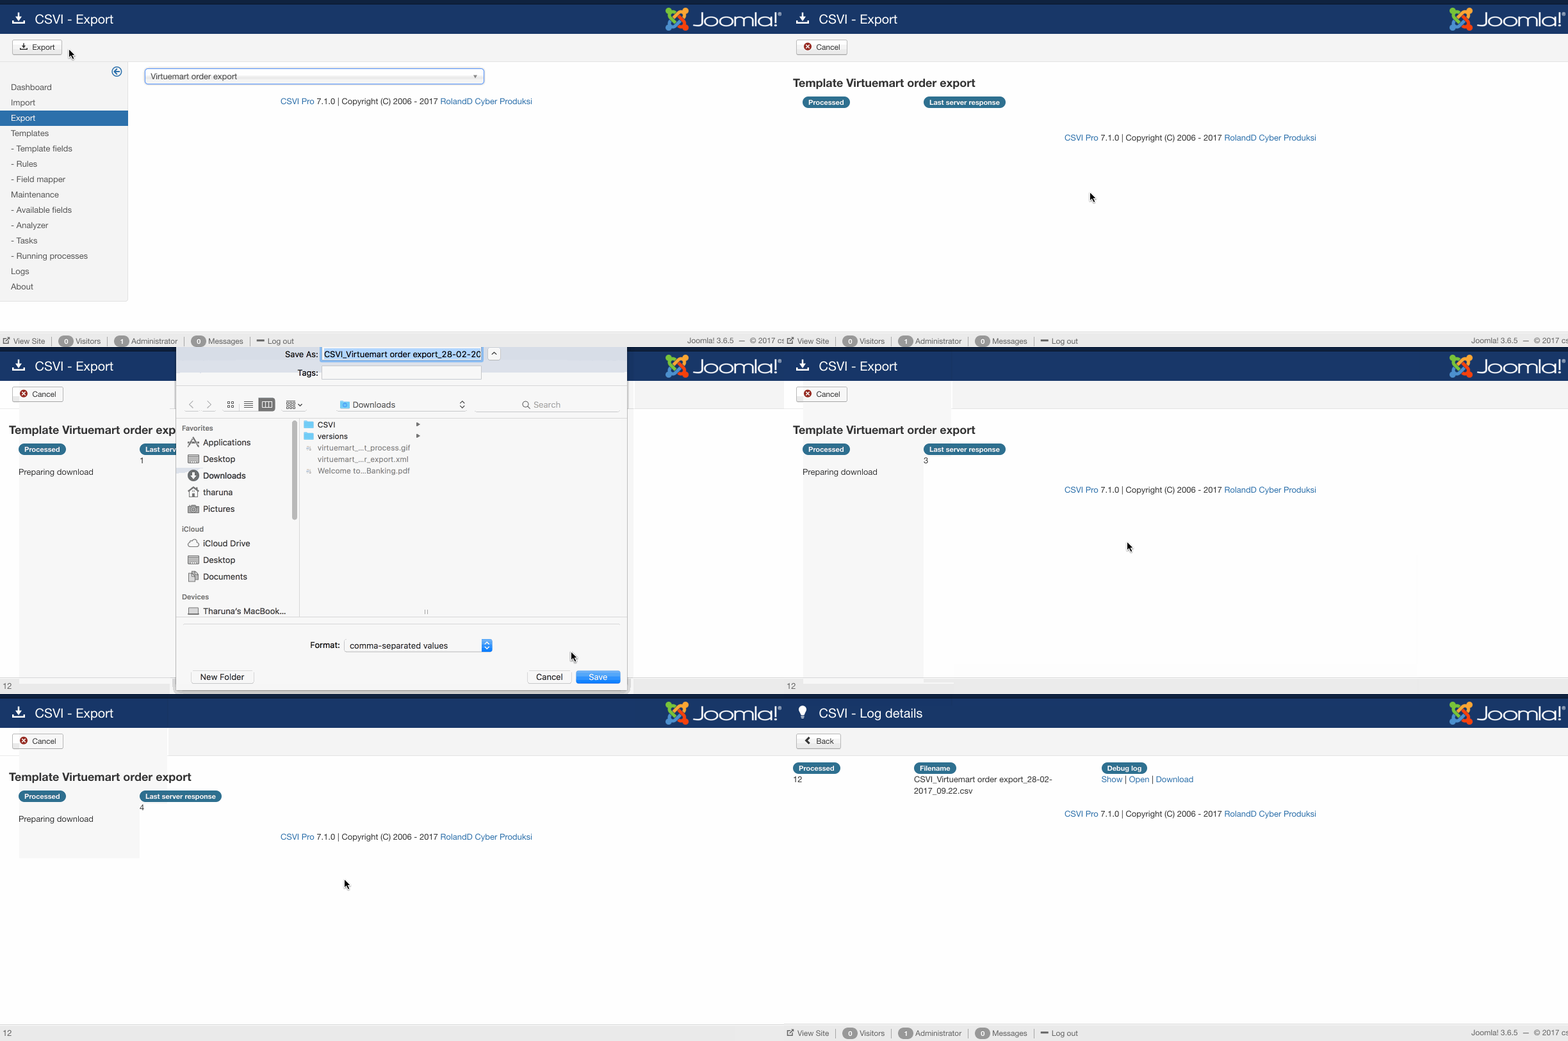
- Go to Components -> RO CSVI -> Export
- Select VirtueMart order export
- Click on Export
- Save the file
4. Run the HikaShop order import
A template can be created by following these steps:
- Go to Components -> RO CSVI -> Templates
- Click New
- Give the template a name, say for example Hikashop order import
- Set Action to Import
- Set Component to HikaShop
- Set Operation to Order
- Click Next: Select Source
- Source is set default to Load from your computer. No need for change.
- Click Next: Select options
- The default values are OK, change if needed.
- Click Next: Select fields
- Nothing needed here as we set to Use column headers as configuration in step 10.
- Click Next: Finalize
- All done here
- Click Close to return to the list of templates or Edit if you want to fine-tune the template further.
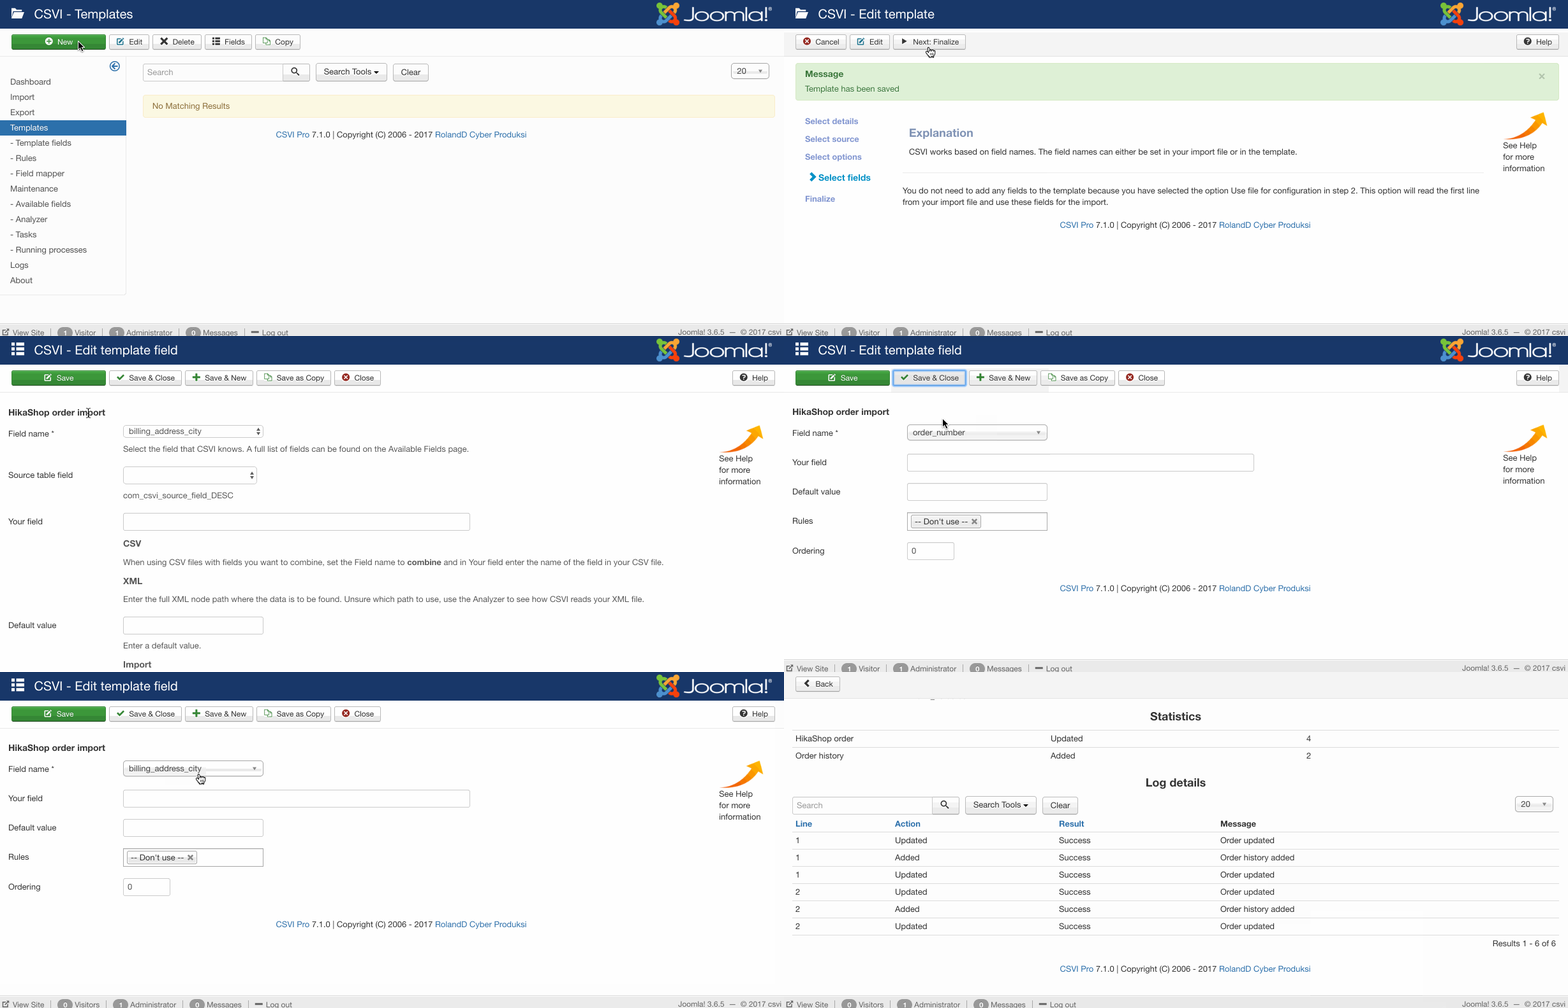
- On Options tab set Keep Order ID to Yes so this way the order_id created in HikaShop is same as virtuemart_order_id.
Template fields can be added by following these steps:
- Go to Components -> RO CSVI -> Templates
- Click on Template fields
- In the Search Tools select your template
- Click on New to add a single field or click on Quick Add to add multiple fields. The fields here should be added in the same order as they are in the VirtueMart export.
- Save the template field
Click to get example HikaShop order import template.
To know how to use the example template check RESTORE TEMPLATE section in Restore templates documentation.
Order items migration from VirtueMart to HikaShop
1.Add template for VirtueMart order items export
Follow the below steps to Create a template for VirtueMart order items import template
- Go to Components -> RO CSVI -> Templates
- Click New
- Give the template a name, say for example VirtueMart orderitems export
- Set Action to Export
- Set Component to VirtueMart
- Set Operation to Orderitems
- Click Next: Select Destination
- Destination is set default to Download.
- Click Next: Select options
- The default values are OK, change if needed.
- Click Next: Select fields
- Add the fields to be exported
- Click Next: Finalize
- All done here
- Click Close to return to the list of templates or Edit if you want to fine-tune the template further.
2.Add template fields for VirtueMart order items template
Template fields can be added by following these steps:
- Go to Components -> RO CSVI -> Templates
- Click on Template fields
- In the Search Tools select your template
- Click on New to add a single field or click on Quick Add to add multiple fields.
Quick Add
The Quick Add Option allows you to quickly add multiple fields to a template. It is not possible to set any settings per field here but that can be done after the fields have been added to the template.
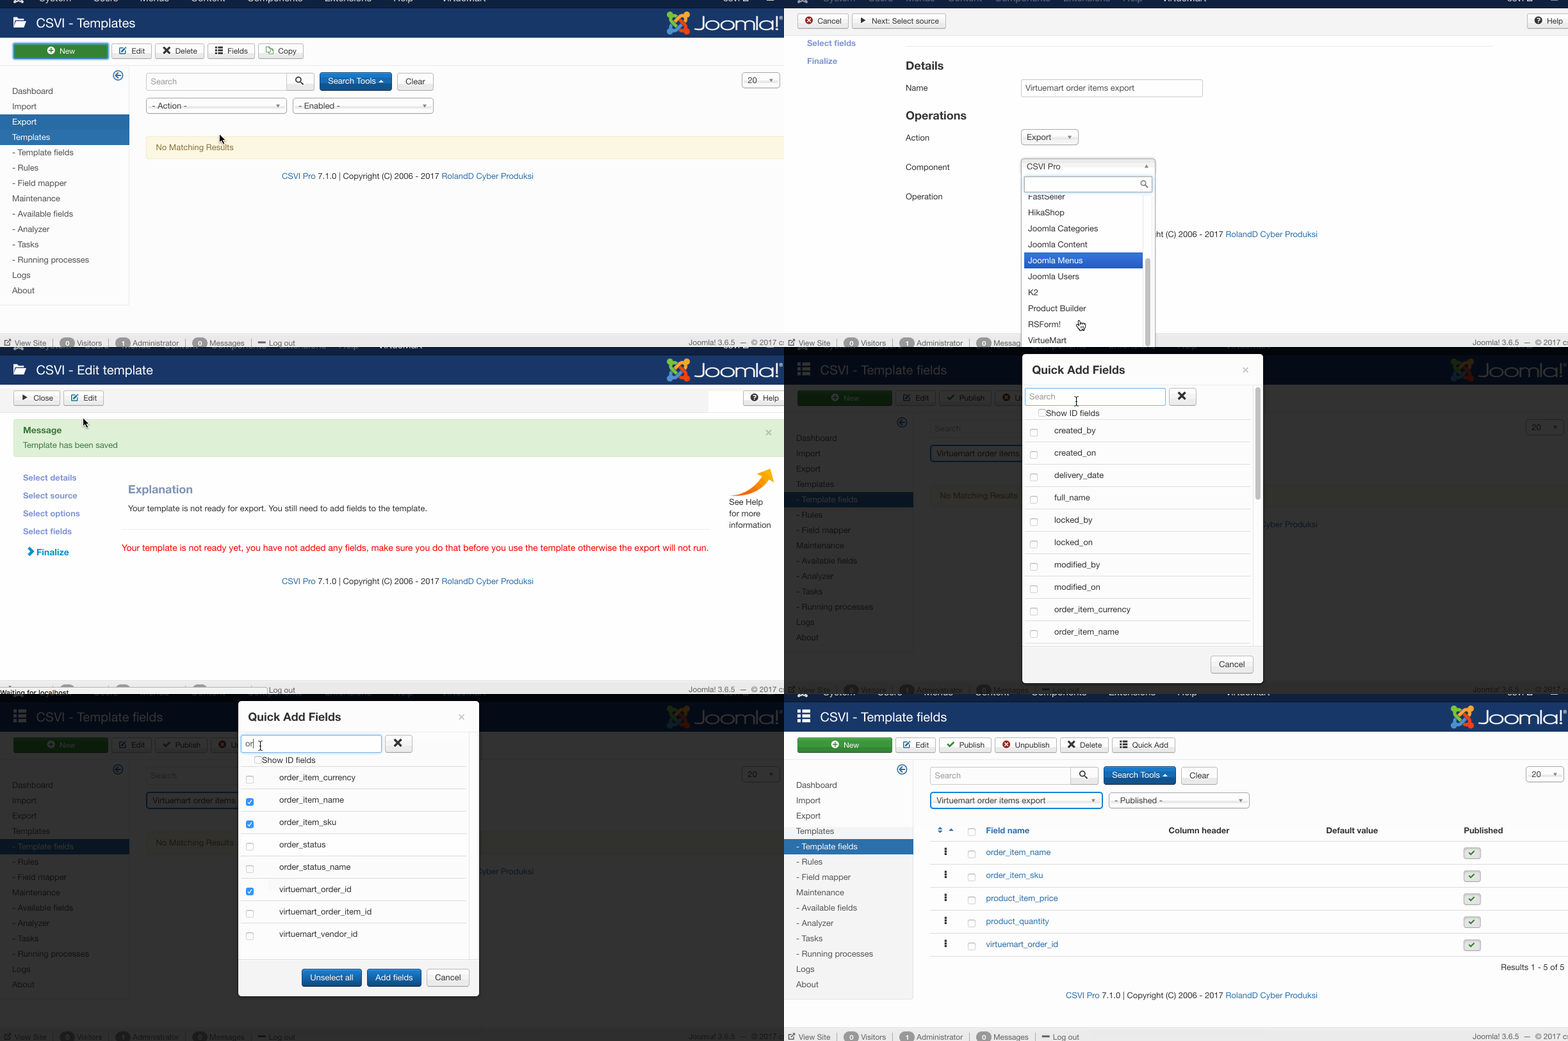
The fields added as example for VirtueMart order items export and HikaShop order product import are
| No. | VirtueMart Fields | HikaShop Fields |
| 1 | order_item_name | order_product_name |
| 2 | order_item_sku | order_product_code |
| 3 | product_item_price | order_product_price |
| 4 | product_quantity | order_product_quantity |
| 5 | virtuemart_order_id | order_id |
Click to get Example order items export template.
To know how to use the example template check RESTORE TEMPLATE section in Restore templates documentation.
3. Run the VirtueMart order items export
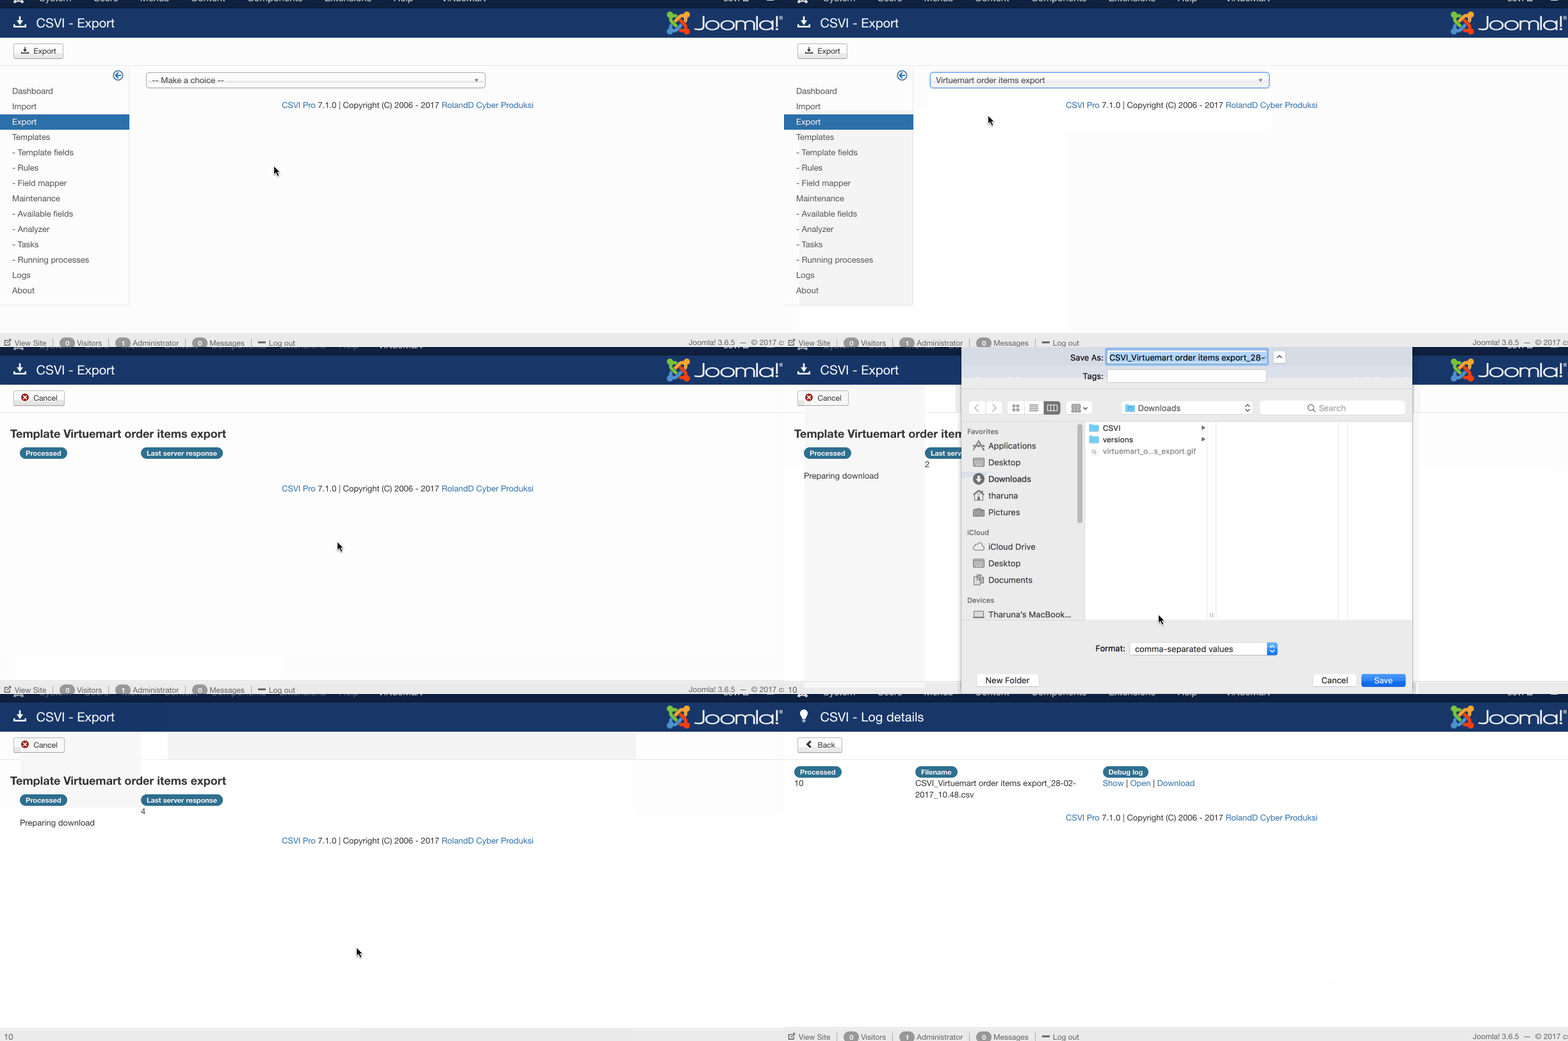
- Go to Components -> RO CSVI -> Export
- Select VirtueMart order items export
- Click on Export
- Save the file
4. Run the HikaShop Order product import
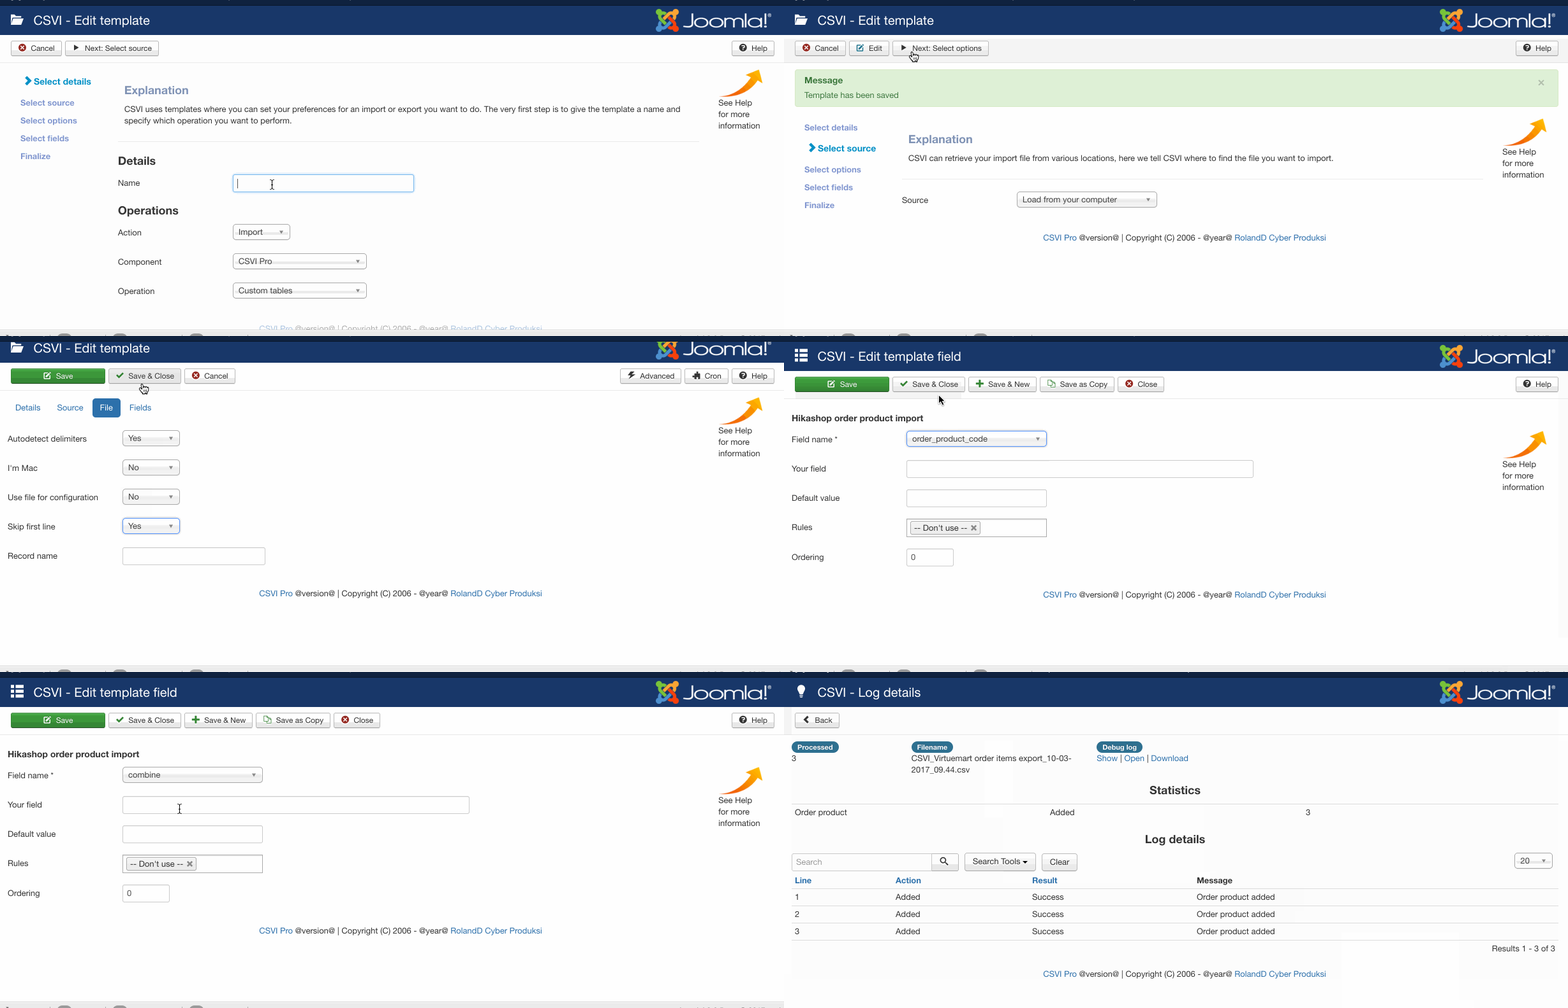
A template can be created by following these steps:
- Go to Components -> RO CSVI -> Templates
- Click New
- Give the template a name, say for example Hikashop Order product import
- Set Action to Import
- Set Component to HikaShop
- Set Operation to Order product
- Click Next: Select Source
- Source is set default to Load from your computer. No need for change.
- Click Next: Select options
- The default values are OK, change if needed.
- Click Next: Select fields
- Nothing needed here as we set to Use column headers as configuration in step 10.
- Click Next: Finalize
- All done here
- Click Close to return to the list of templates or Edit if you want to fine-tune the template further.
Template fields can be added by following these steps:
- Go to Components -> RO CSVI -> Templates
- Click on Template fields
- In the Search Tools select your template
- Click on New to add a single field or click on Quick Add to add multiple fields.
- Add the equivalent fields by selecting HikaShop field in Field names. The fields here should be added in the same order as they are in the VirtueMart export.
- Save the template field
Make sure that you add the HikaShop template fields in the same order of fields as in VirtueMart export file. This way the data is matched to equivalent HikaShop field from the export file. One other way to do this would be add HikaShop fields in VirtueMart export so the export file would have HiksShop field name as column headers in VirtueMart export file.
Click to get Example HikaShop Order Product import template.
To know how to use the example template check RESTORE TEMPLATE section in Restore templates documentation.
More articles on this subject
HikaShop Characteristic Import
| HikaShop
Creating the template
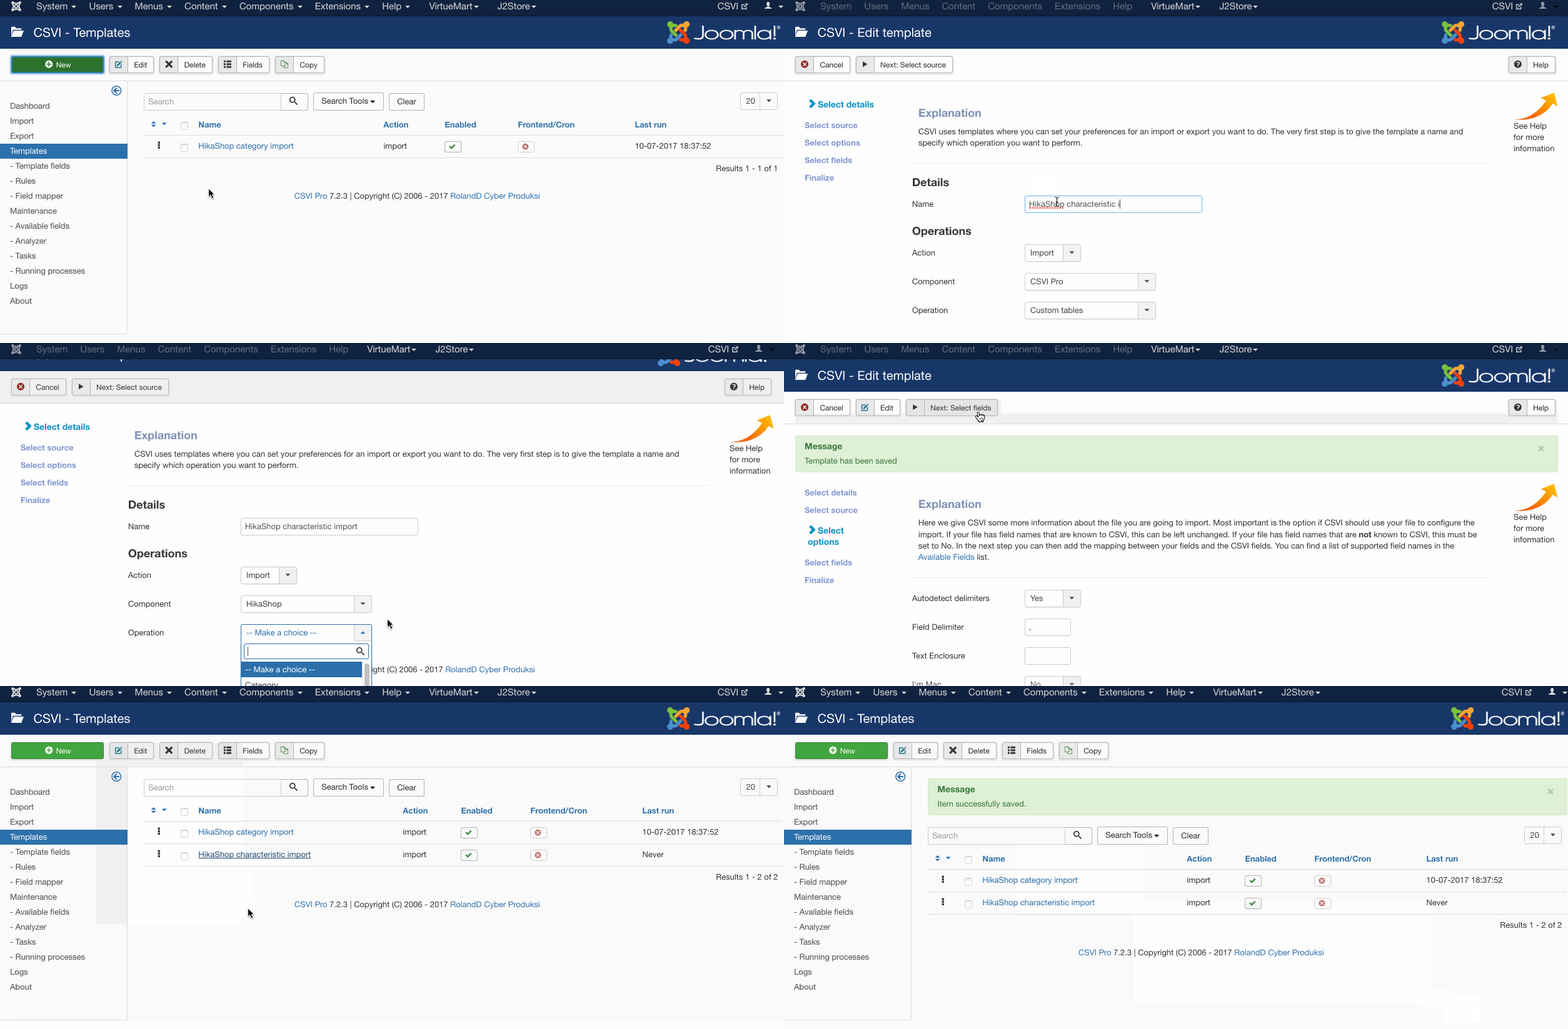
A template can be created by following these steps:
- Go to Components -> CSVI Pro -> Templates
- Click New
- Give the template a name
- Set Action to Import
- Set Component to HikaShop
- Set Operation to Characteristic
- Click Next: Select Source
- Source is set default to Load from your computer. No need for change.
- Click Next: Select options
- The default values are OK, change if needed.
- Click Next: Select fields
- Nothing needed here as we set to Use column headers as configuration in step 10.
- Click Next: Finalize
- All done here
- Click Close to return to the list of templates or Edit if you want to fine-tune the template further.
Adding the template fields
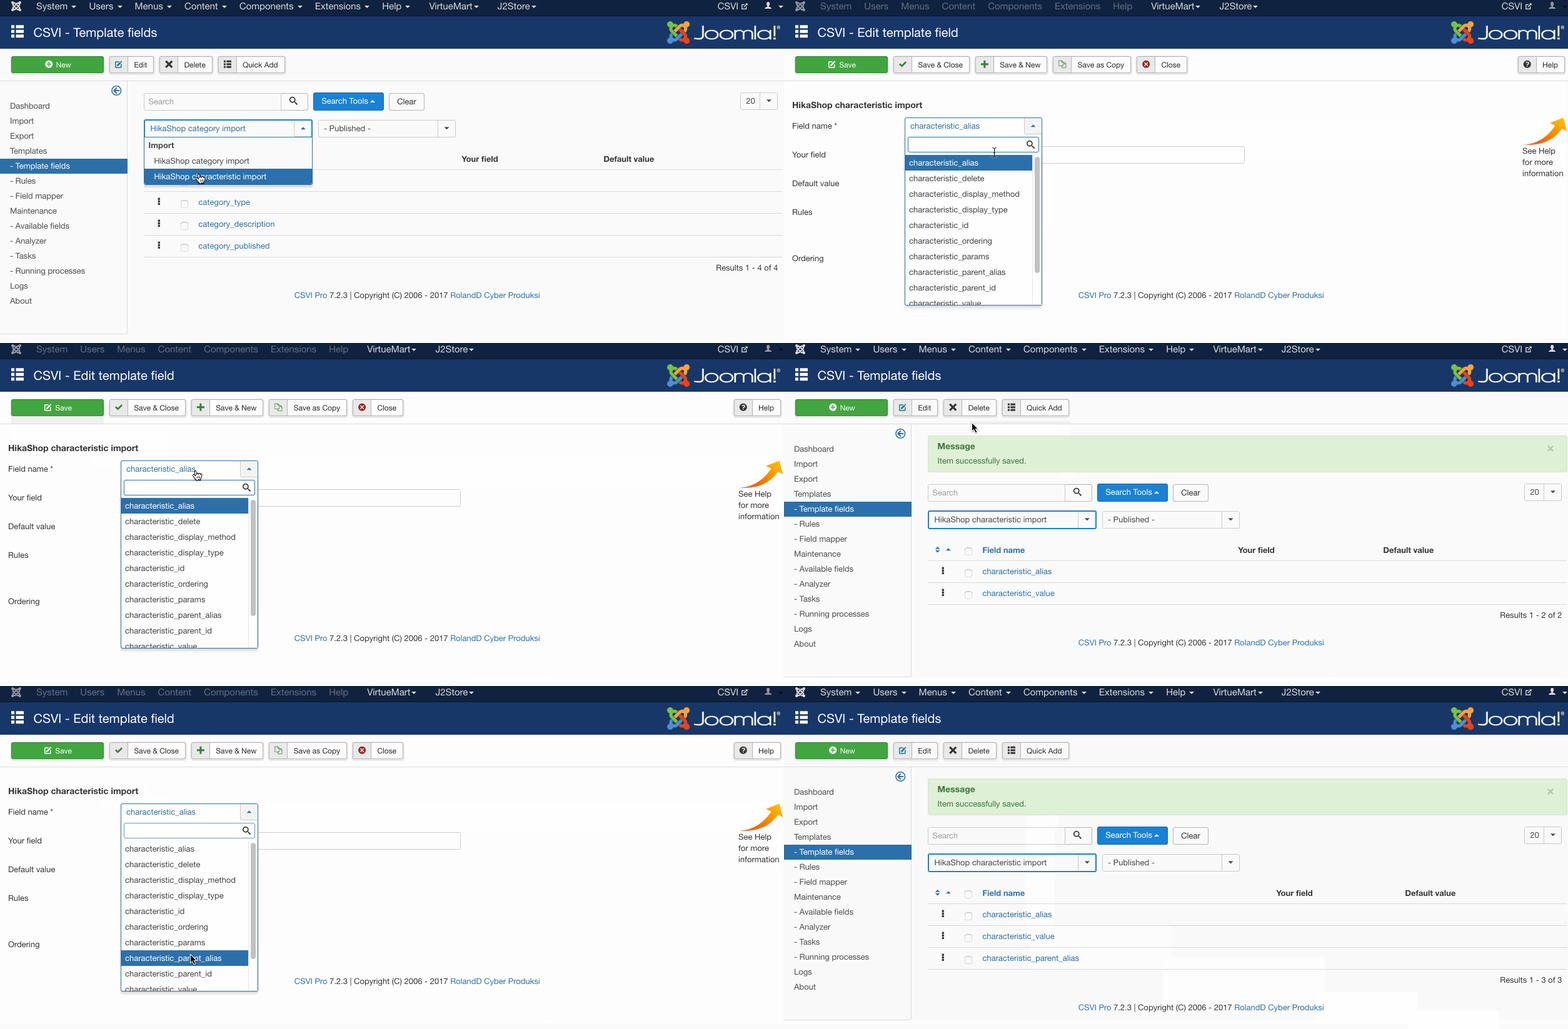
Template fields can be added by following these steps:
- Go to Components -> CSVI Pro -> Templates
- Click on Template fields
- In the Search Tools select your template
- Click on New to add a single field or click on Quick Add to add multiple fields.
Quick Add
The Quick Add Option allows you to quickly add multiple fields to a template. It is not possible to set any settings per field here but that can be done after the fields have been added to the template.
Required fields
- characteristic_alias
Criteria
- characteristic_alias
Run the import
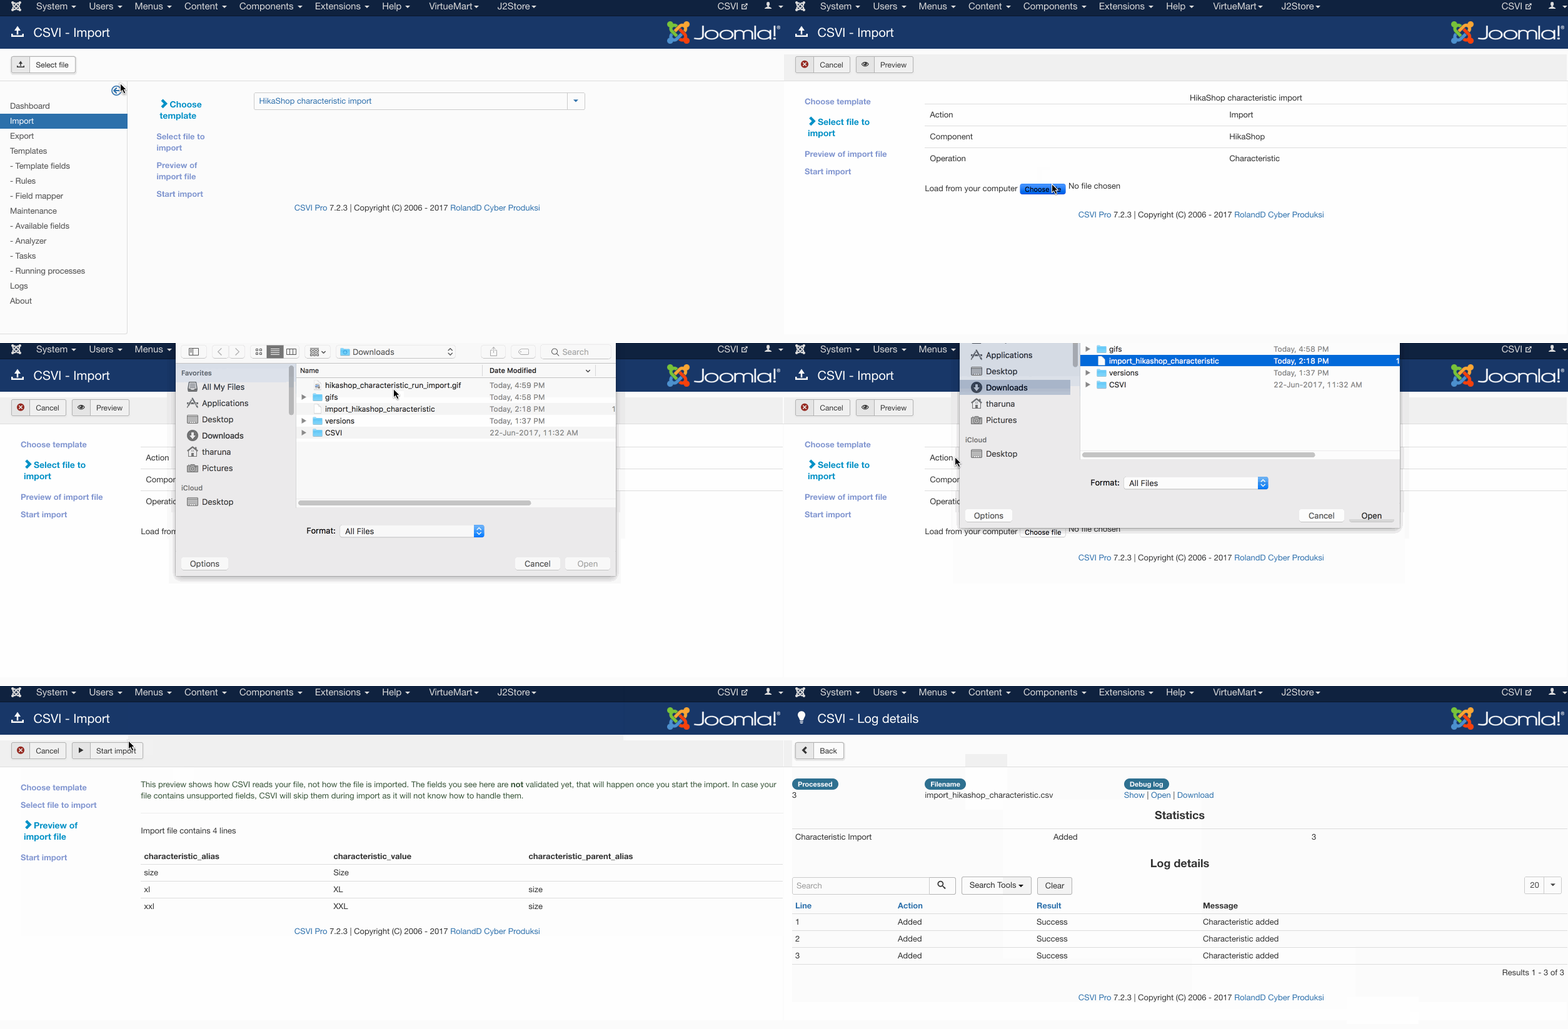
The import can be run by following these steps:
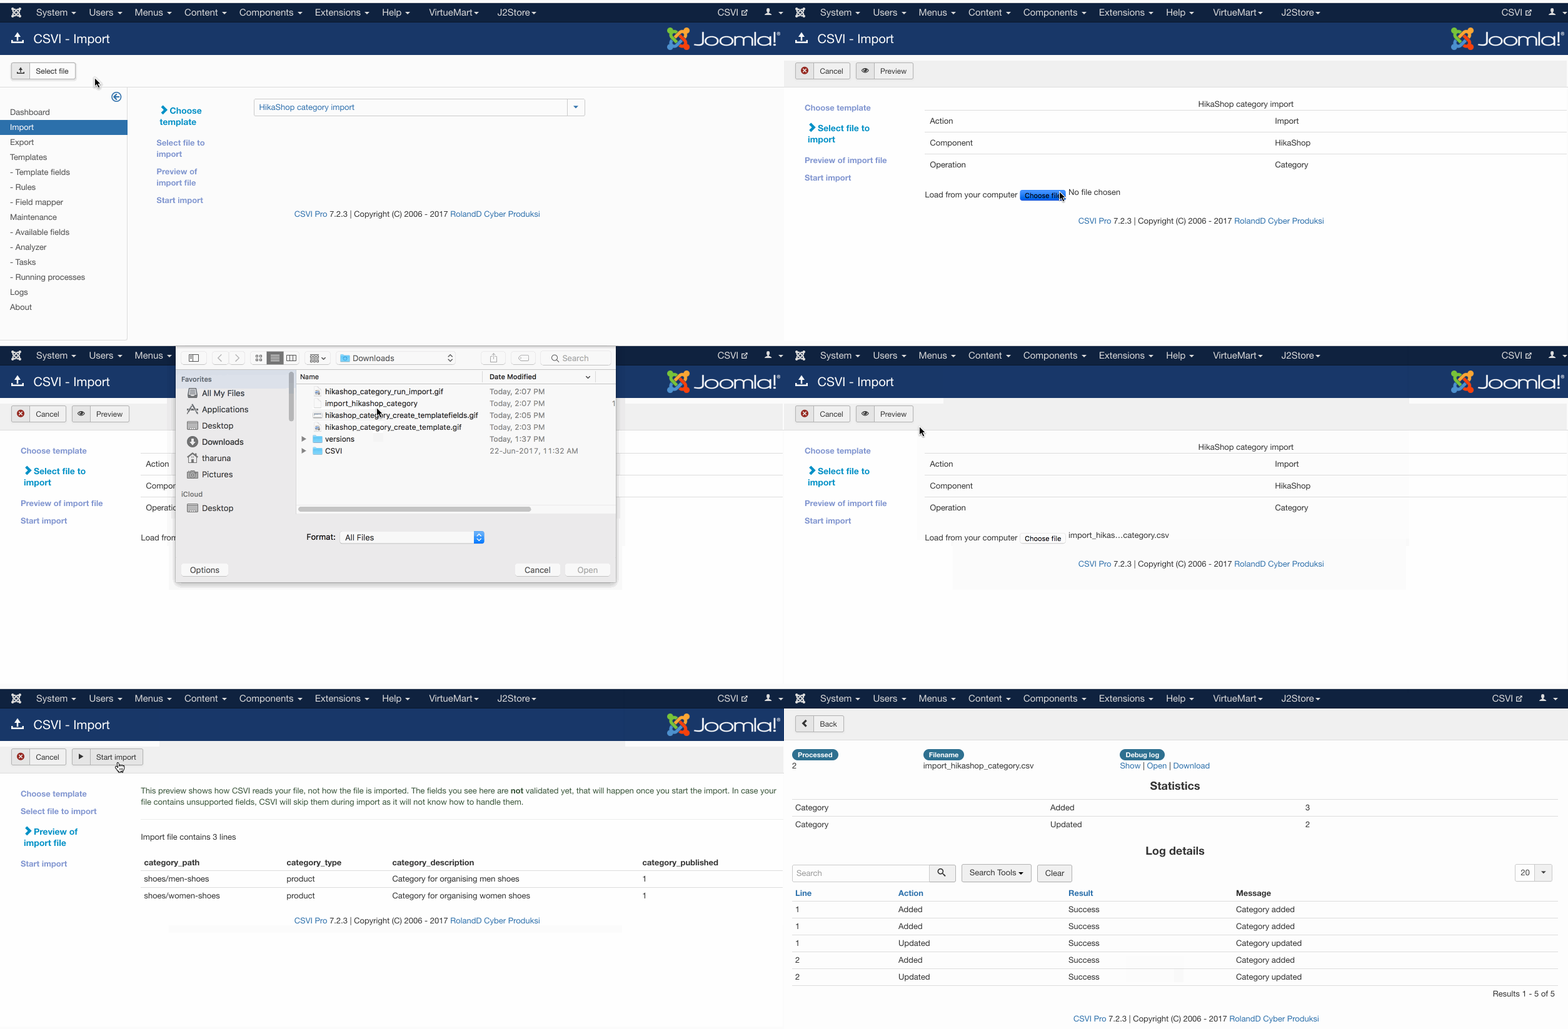
- Go to Components -> CSVI Pro -> Import
- Select the template created earlier
- Click Select file
- Select the file to import
- Click Preview
- You now see a preview of the file as to how CSVI sees the file
- Click Start import
- The import is run
- The Log details page will be shown with information regarding the import if the Enable logging is enabled in the template
Example file
HikaShop Shipping Rates Export
| HikaShop
Creating the export template
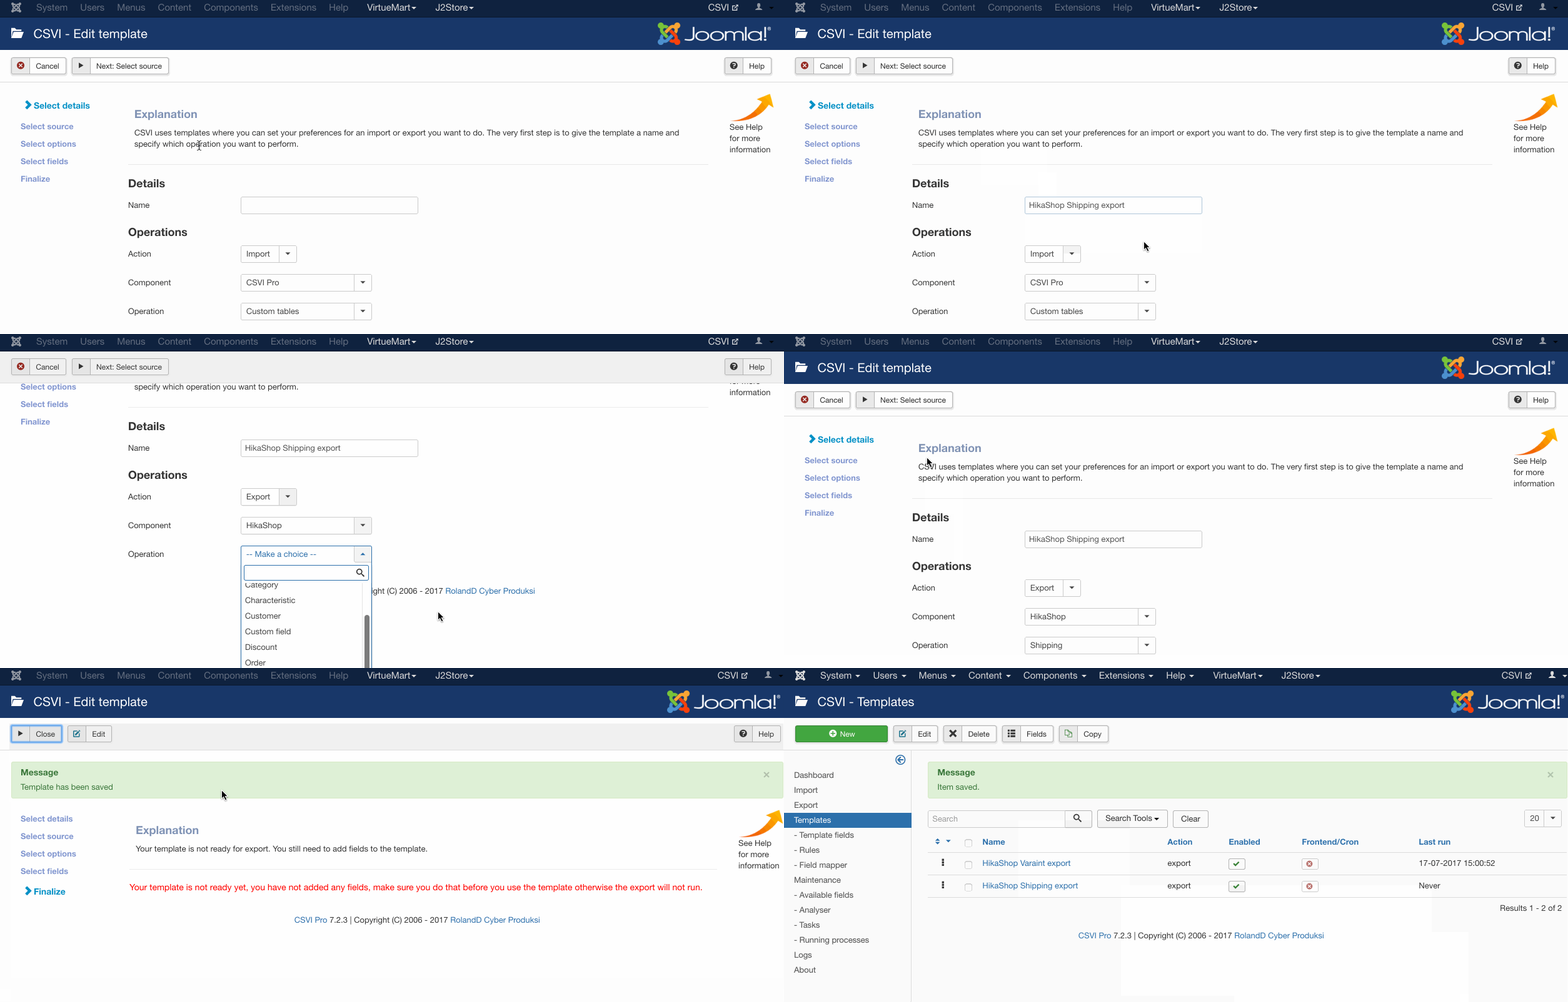
A template can be created by following these steps:
- Go to Components -> RO CSVI -> Templates
- Click New
- Give the template a name
- Set Action to Export
- Set Component to HikaShop
- Set Operation to Shipping
- Click Next: Select Source
- Destination is set default to Download. No need for change.
- Click Next: Select options
- The default values are OK, change if needed.
- Click Next: Select fields
- Fields must be added otherwise there is nothing for RO CSVI to export. Click Edit template fields.
- A new window opens with the Template fields page. You can add new fields by clicking New or Quick Add.
- When all fields are added you can close the window
- Click Next: Finalize
- All done here
- Click Close to return to the list of templates or Edit if you want to fine-tune the template further.
Add the fields to export
Template fields can be added by following these steps:
- Go to Components -> CSVI Pro -> Templates
- Click on Template fields
- In the Search Tools select your template
- Click on New to add a single field or click on Quick Add to add multiple fields.
Quick Add
The Quick Add Option allows you to quickly add multiple fields to a template. It is not possible to set any settings per field here but that can be done after the fields have been added to the template. 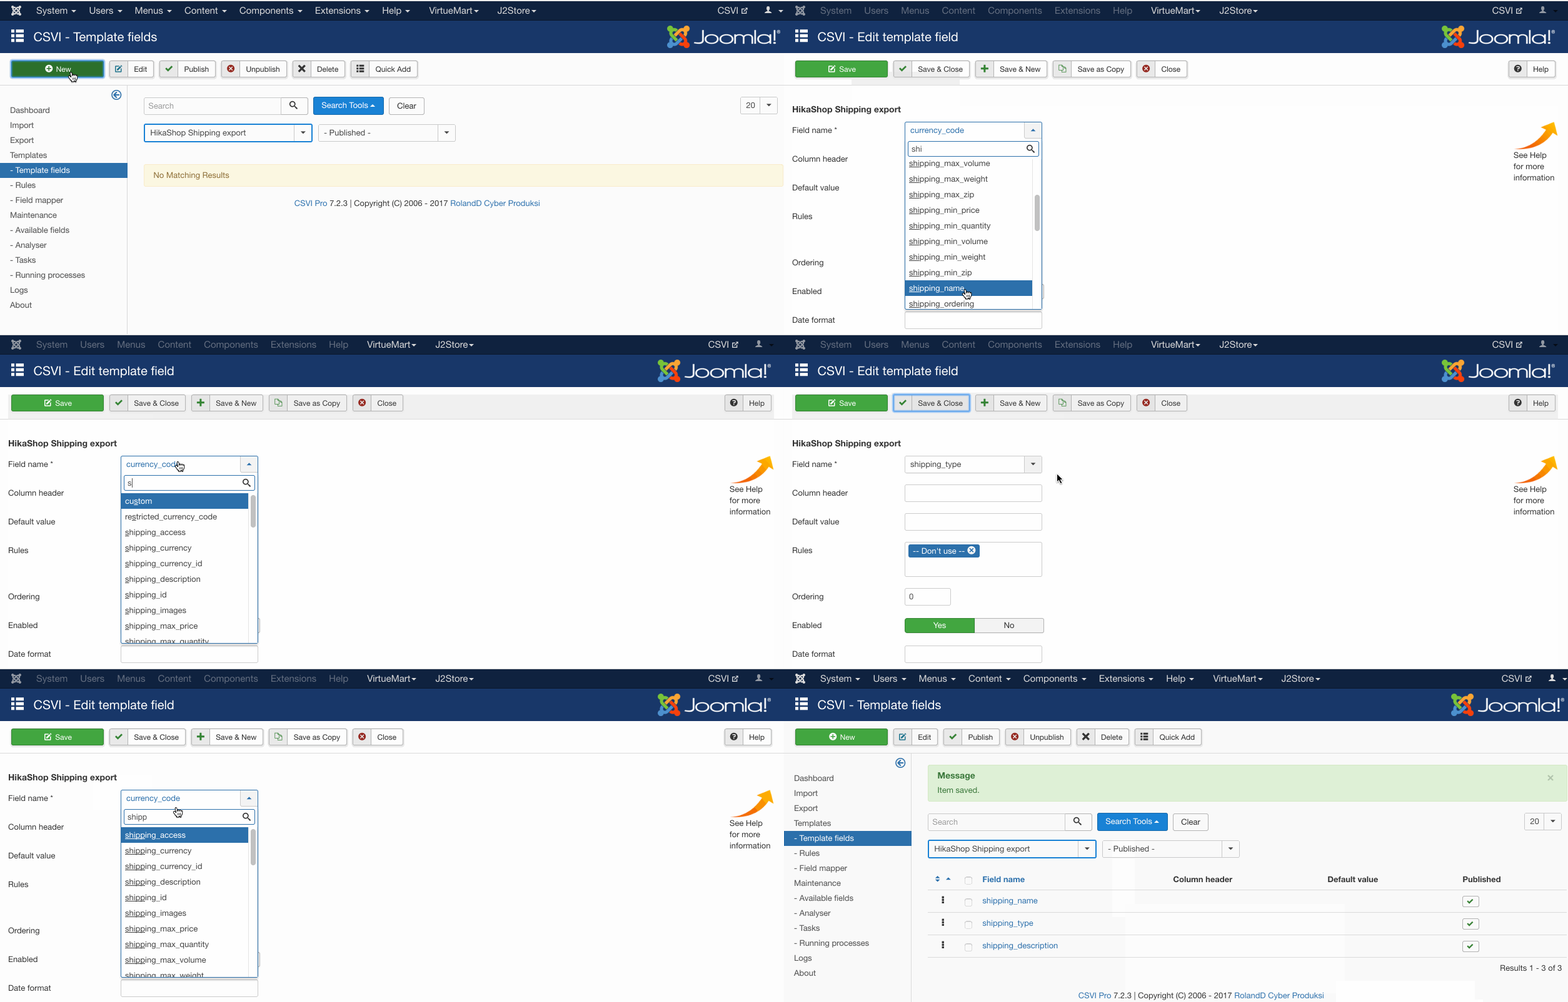
Run the export
The export can be run by following these steps:
- Go to Components -> RO CSVI -> Export
- Select the template created earlier
- Click Export
- The export is run
- The Log details page will be shown with information regarding the export if the Enable logging is enabled in the template
HikaShop Category Import
| HikaShop
Creating the template
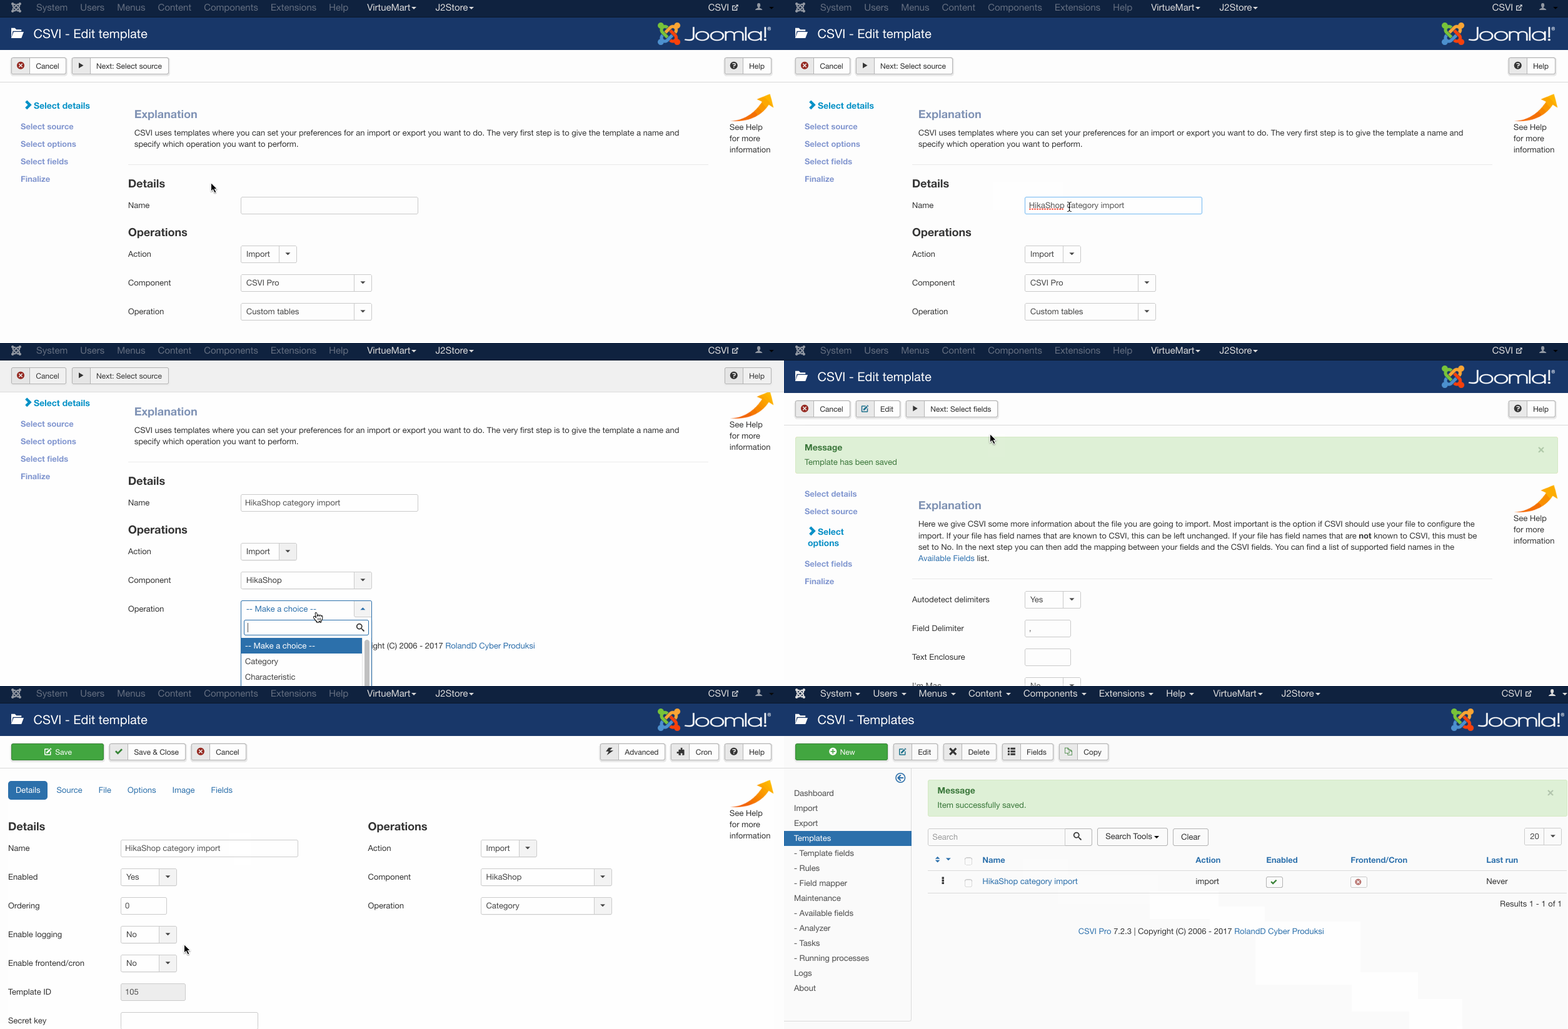
A template can be created by following these steps:
- Go to Components -> RO CSVI -> Templates
- Click New
- Give the template a name
- Set Action to Import
- Set Component to HikaShop
- Set Operation to Custom field
- Click Next: Select Source
- Source is set default to Load from your computer. No need for change.
- Click Next: Select options
- The default values are OK, change if needed.
- Click Next: Select fields
- Nothing needed here as we set to Use column headers as configuration in step 10.
- Click Next: Finalize
- All done here
- Click Close to return to the list of templates or Edit if you want to fine-tune the template further.
Adding the template fields
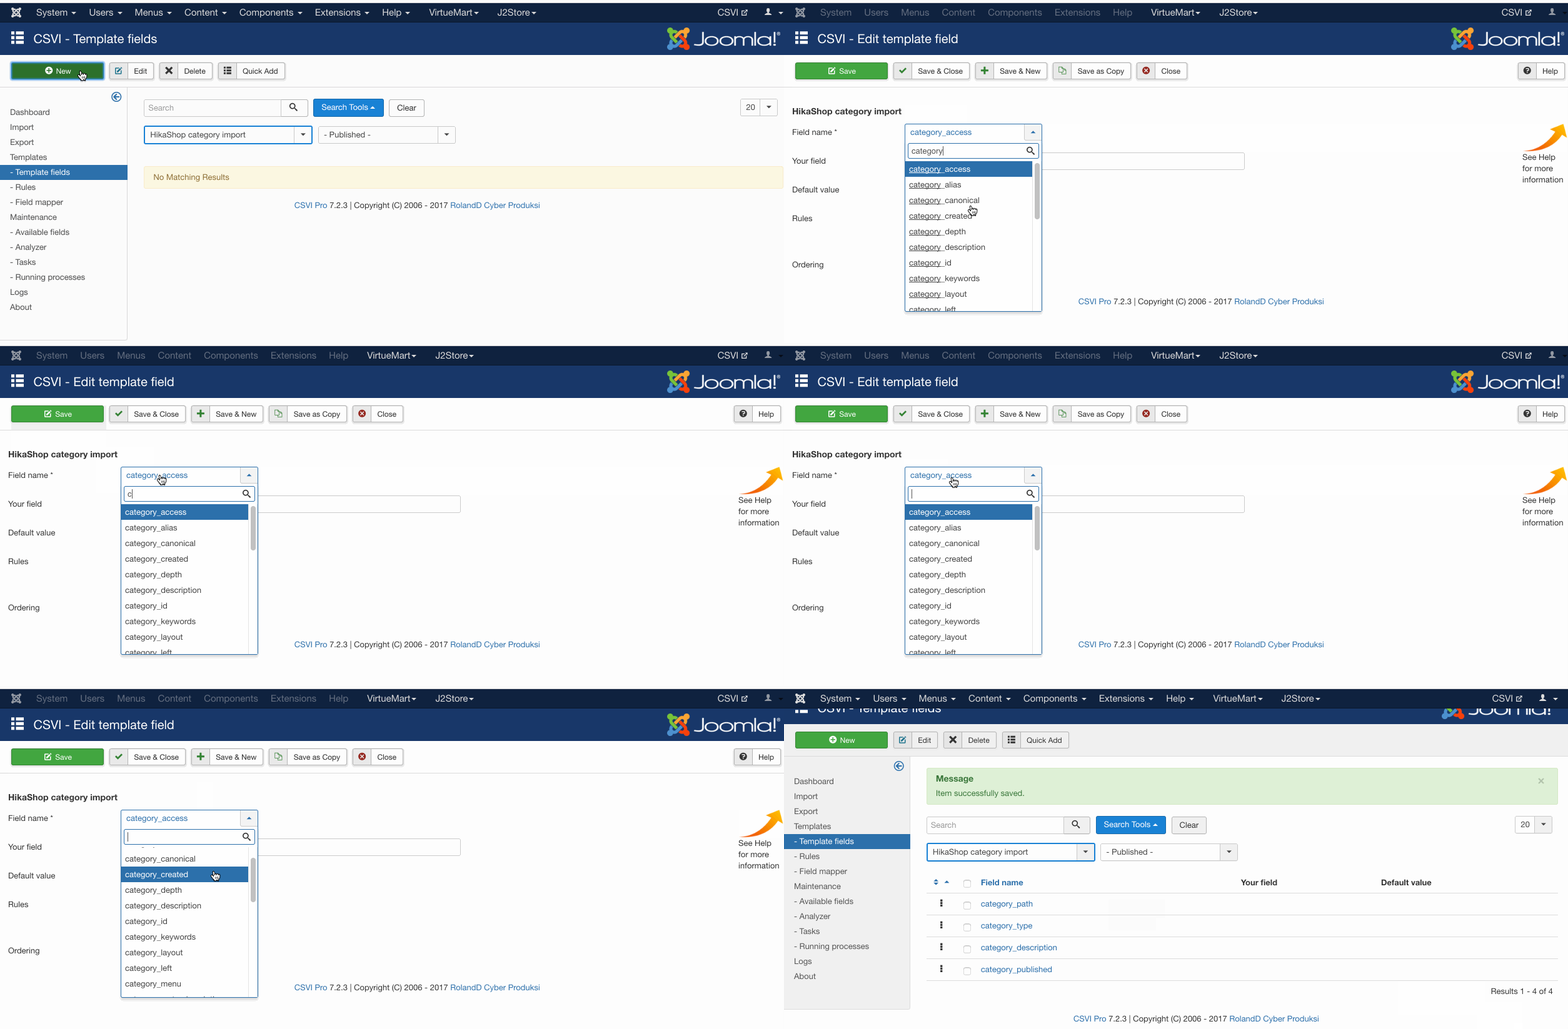
Template fields can be added by following these steps:
- Go to Components -> RO CSVI -> Templates
- Click on Template fields
- In the Search Tools select your template
- Click on New to add a single field or click on Quick Add to add multiple fields.
Quick Add
The Quick Add Option allows you to quickly add multiple fields to a template. It is not possible to set any settings per field here but that can be done after the fields have been added to the template.
Required fields
- category_path
- category_type
Criteria
- category_path
- category_type
HikaShop uses one database table to store order status, tax, manufacturer and product categories as categories. In order to differentiate between the values you are storing in import as category, it is important to specify what is the category_type field you are importing. For example to import product categories set category_type as product in import file.
Run the import
The import can be run by following these steps:
- Go to Components -> RO CSVI -> Import
- Select the template created earlier
- Click Select file
- Select the file to import
- Click Preview
- You now see a preview of the file as to how CSVI sees the file
- Click Start import
- The import is run
- The Log details page will be shown with information regarding the import if the Enable logging is enabled in the template
